

English
AeroDrain Dehumidifier D12 Manual
Safety Information
Please read the following instructions carefully before using this device. Failure to observe these safety instructions may result in injury and will release Vivosun of all liability and void all product warranties.
-
In case of any abnormality, turn off the dehumidifier, unplug it, and contact the seller. Abnormal operation may result in unit failure, electric shock, fire, or other hazards.
-
It is forbidden to disassemble, modify, repair, or clean internal components without authorization.
-
To avoid the risk of fire or explosion, do not spray liquids onto the dehumidifier. Do not place flammable materials or chemicals near the unit.
-
To prevent resin parts from melting or catching fire, do not place the dehumidifier near heating appliances.
-
Never insert rods or objects into the openings of the dehumidifier.
-
Remove any water collected in the tank. Accidental consumption or use of this water may cause illness or accidents.
-
The dehumidifier must be used on a level and stable surface.
-
Do not use this product outdoors, in direct sunlight, or expose it to weather or other elements.
-
Do not replace the power cord without authorization, splice it, or use it in parallel with other high-power electrical devices.
-
Do not cover the product or power cords with rugs or other fabric materials.
-
Place the device on a flat, dry surface, maintaining at least 50 cm of clearance from surrounding objects or walls.
-
Do not place the product on a soft, elevated, or unstable surface where it may fall or block its air intakes or exhaust.
-
Do not clean the dehumidifier with chemical solvents such as gasoline or alcohol. Before cleaning, disconnect the power supply and use a slightly damp soft cloth. For heavy dirt, use a mild detergent.
-
Turn off the unit and empty the water tank before moving it. Always use the handle when relocating the unit.
-
This device may be used by children aged 8 and above, as well as individuals with reduced physical, sensory, or mental capabilities, or those lacking experience and knowledge, provided they are properly supervised or instructed on safe usage and understand the hazards involved. Children must not play with the device.
Risk of Fire or Explosion – This device contains a flammable refrigerant. Please follow all additional safety precautions to avoid potential hazards.
-
Do not use any methods to accelerate the defrosting process or for cleaning other than those recommended by the manufacturer.
-
Store the device in a room free from continuously operating ignition sources, such as open flames, gas appliances, or electric heaters.
-
Do not pierce or burn the refrigerant tubing. Be aware that refrigerants may be odorless.
-
Keep all ventilation openings free from obstruction.
-
Do not drill holes into the unit.
-
Maintenance, cleaning, and servicing must only be carried out by technicians who are properly trained and certified to handle flammable refrigerants.
-
Dispose of the dehumidifier in accordance with federal and local regulations. Flammable refrigerants require special disposal procedures.
PRODUCT CONTENTS
| Image | Quantity |
|---|---|
|
1pc |
|
1pc |
|
1pc |
|
1pc |
|
1pc |
|
1pc |
|
1pc |
|
1pc |


Dimensions
Size |
10.8 x 7.3 x 19.0 inch (27.5x18.5x48.2 cm) |
NetWeight |
19.8lbs (9 kg) |
Dehumidifying Capacity |
32Pints / Day@95°F,90%RH 25Pints /Day @86°F,80%RH 14Pints /Day @80°F,60%RH 8Pints /Day @65°F, 60% RH 15 L / Day @35°C, 90% RH 12 L / Day @30°C, 80%RH 7 L / Day @27°C, 60% RH 4 L / Day @18°C, 60% RH |
Water Tank Capacity |
2 L (4.2 Pints) |
Power Supply |
120 V, 60Hz / 200–240 V, 50Hz (For available voltage, please refer to product label.) |
Rated Input |
120 W |
Refrigerant |
R290 |
Operating Temperature |
41–95°F (5–35°C) |
Operating Humidity |
10%–99% RH |
Installation
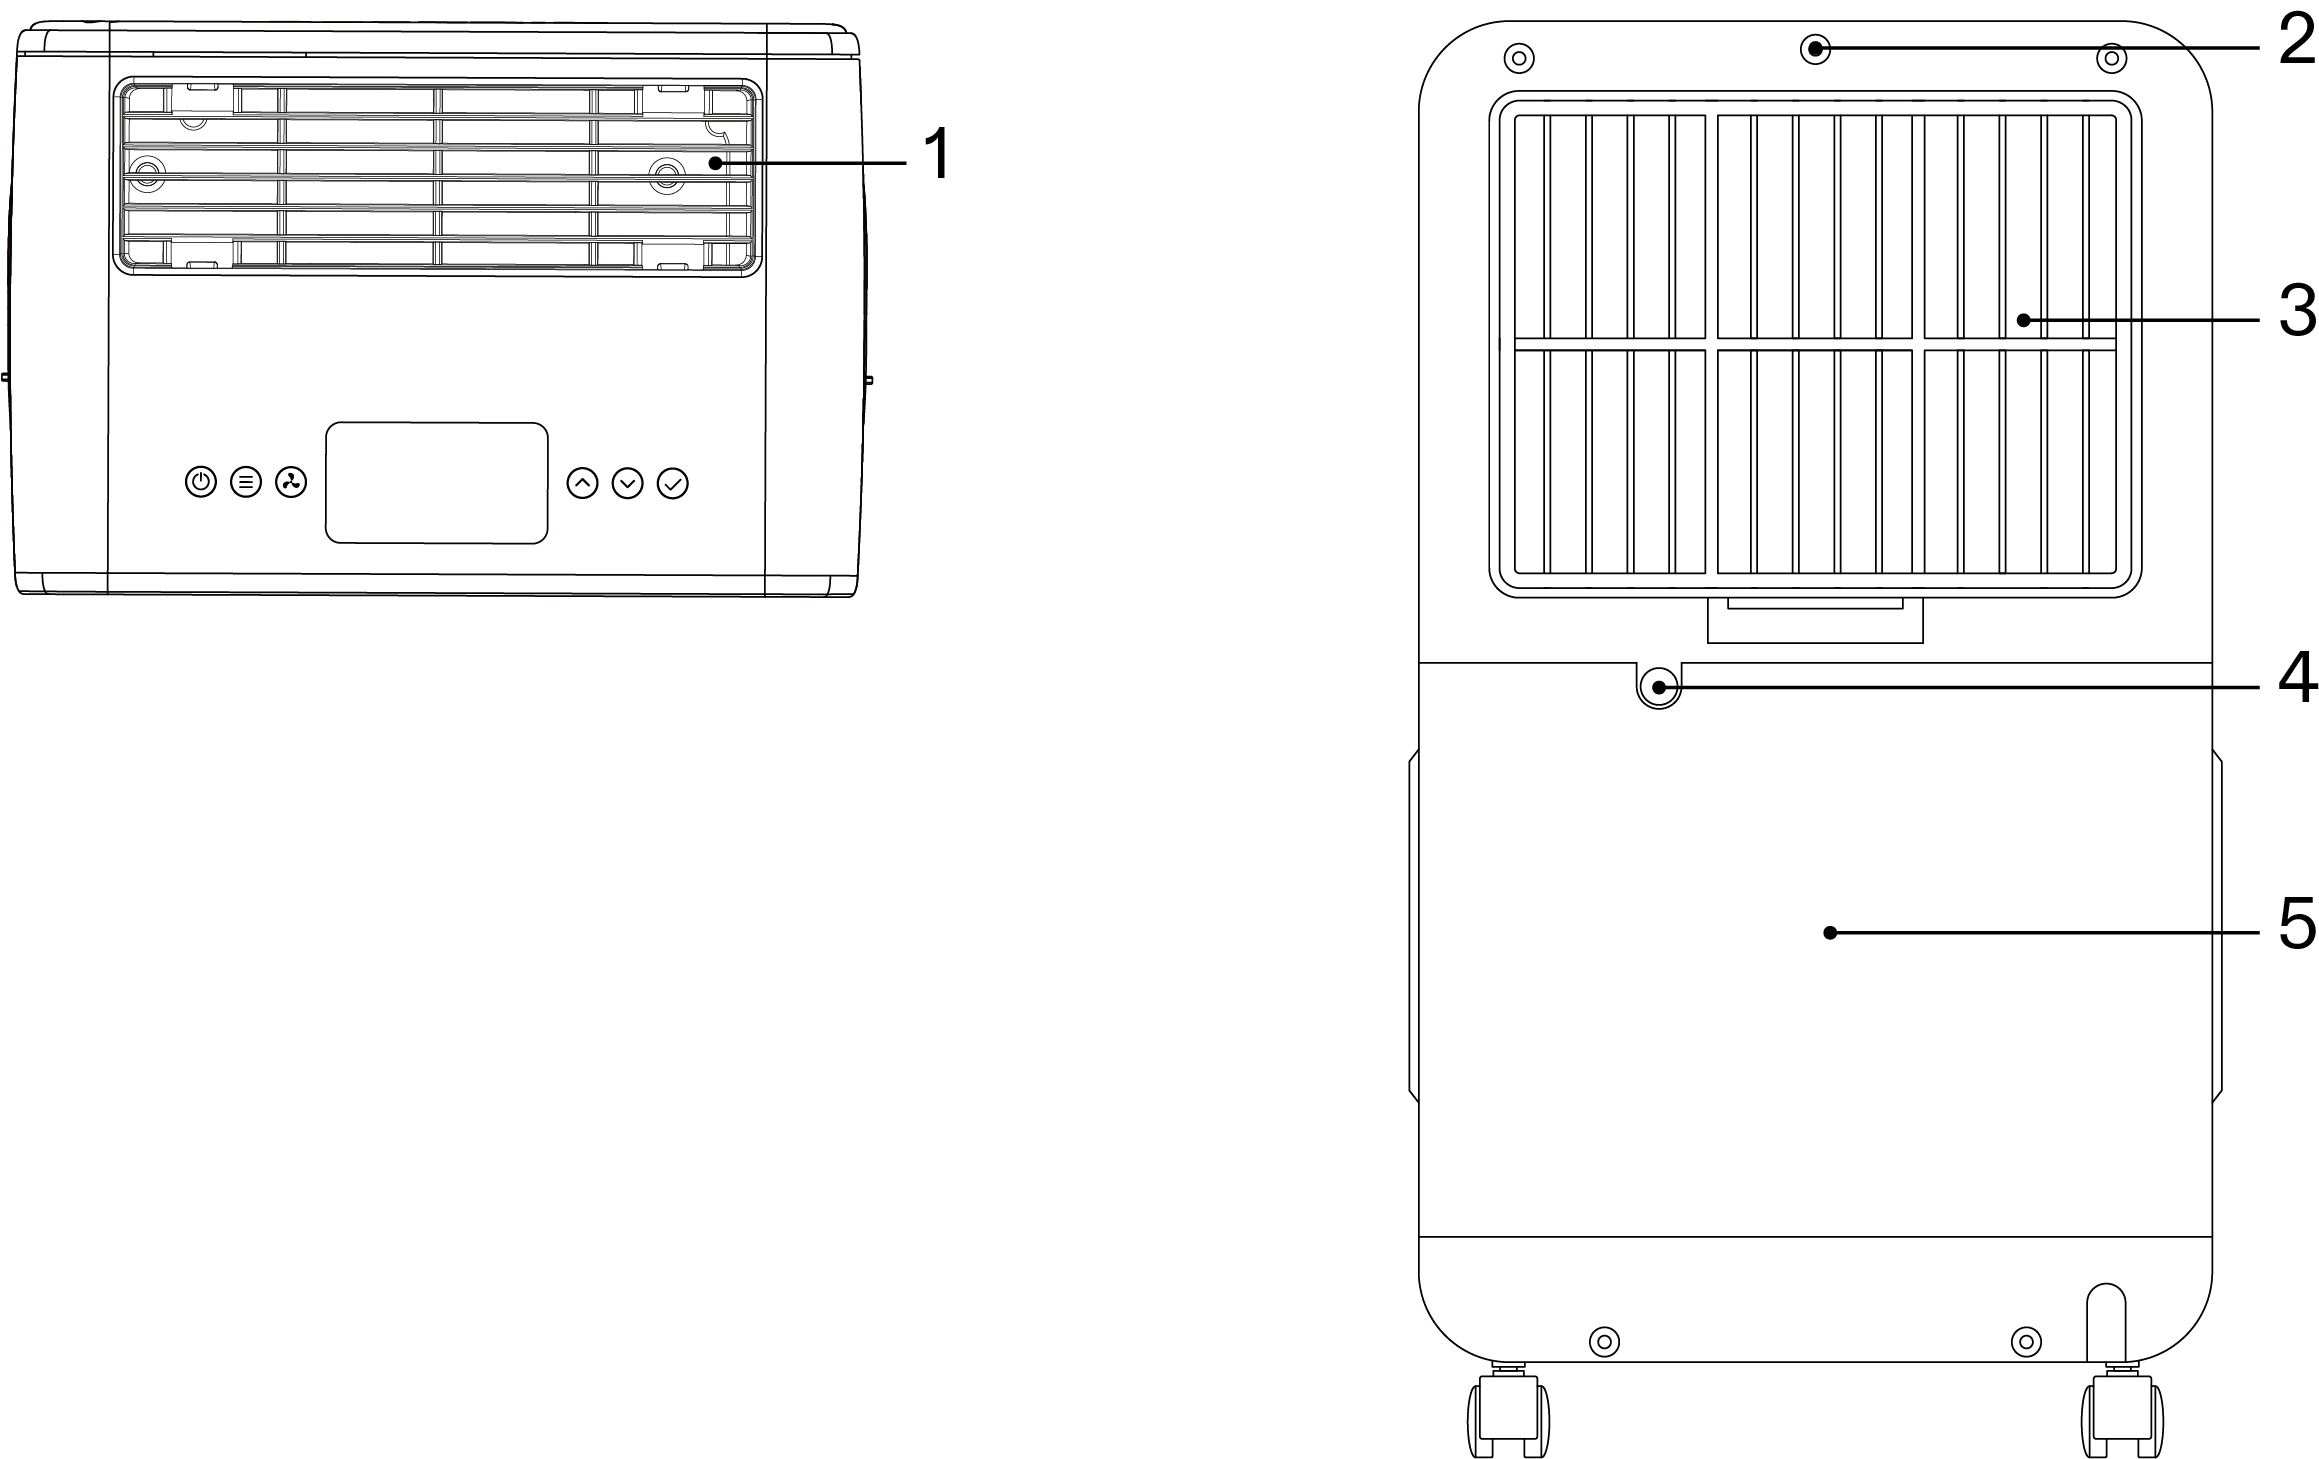
1 |
Air Outlet |
2 |
2.5mm Jack Interface |
3 |
Air Inlet |
4 |
Drainage Hole |
5 |
Water Tank |
Installing the Accessories
STEP 1
Insert the air outlet hood into the air outlet of the dehumidifier.
STEP 2
Insert the air inlet hood and filter into the air inlet of the dehumidifier.
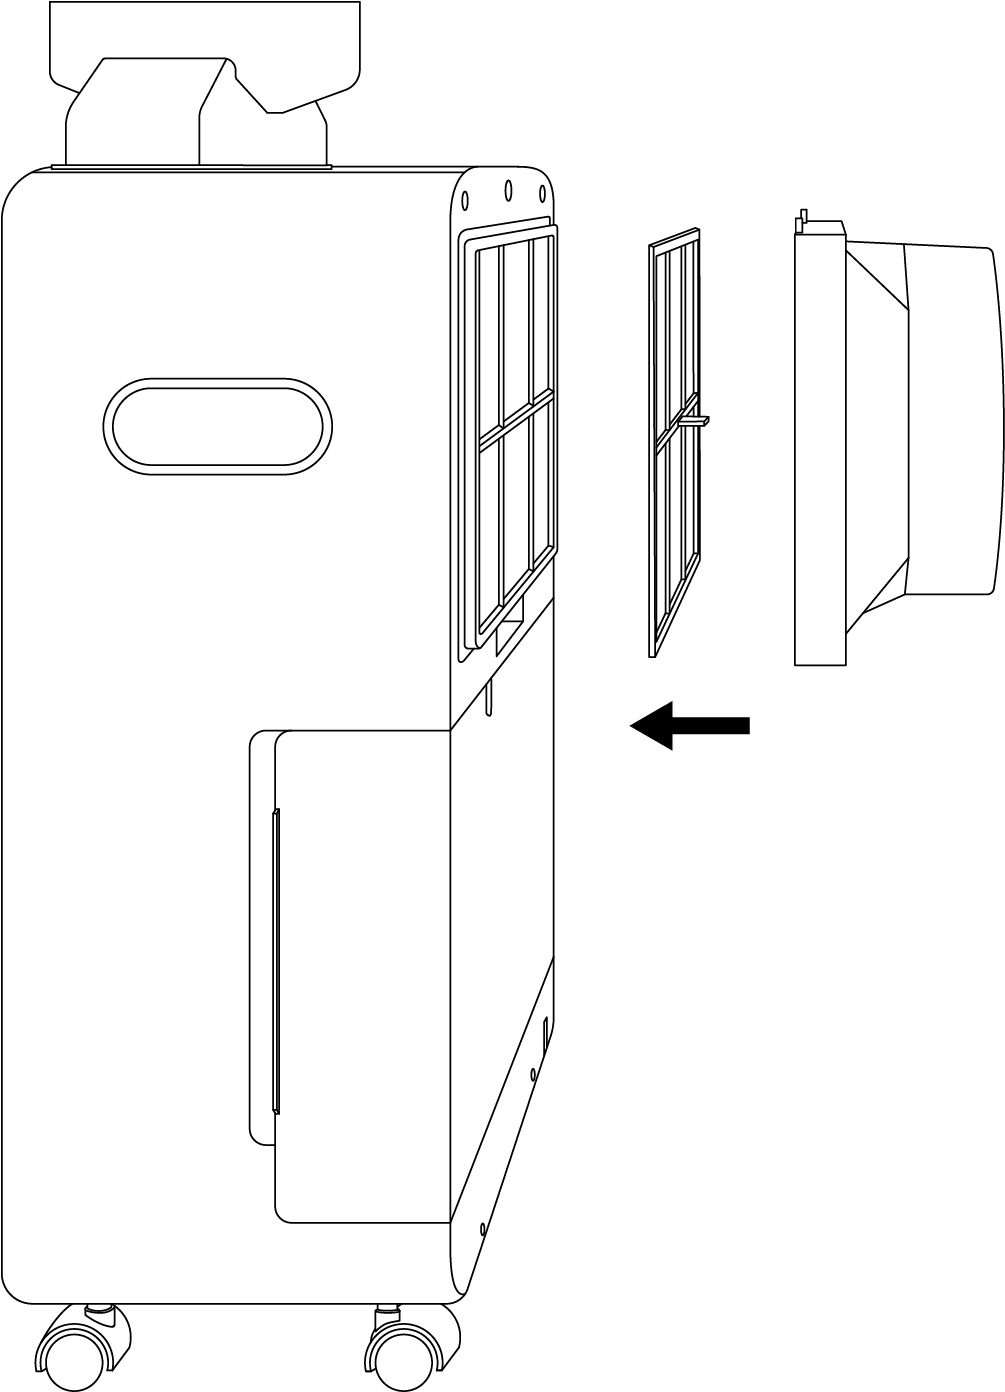
STEP 3
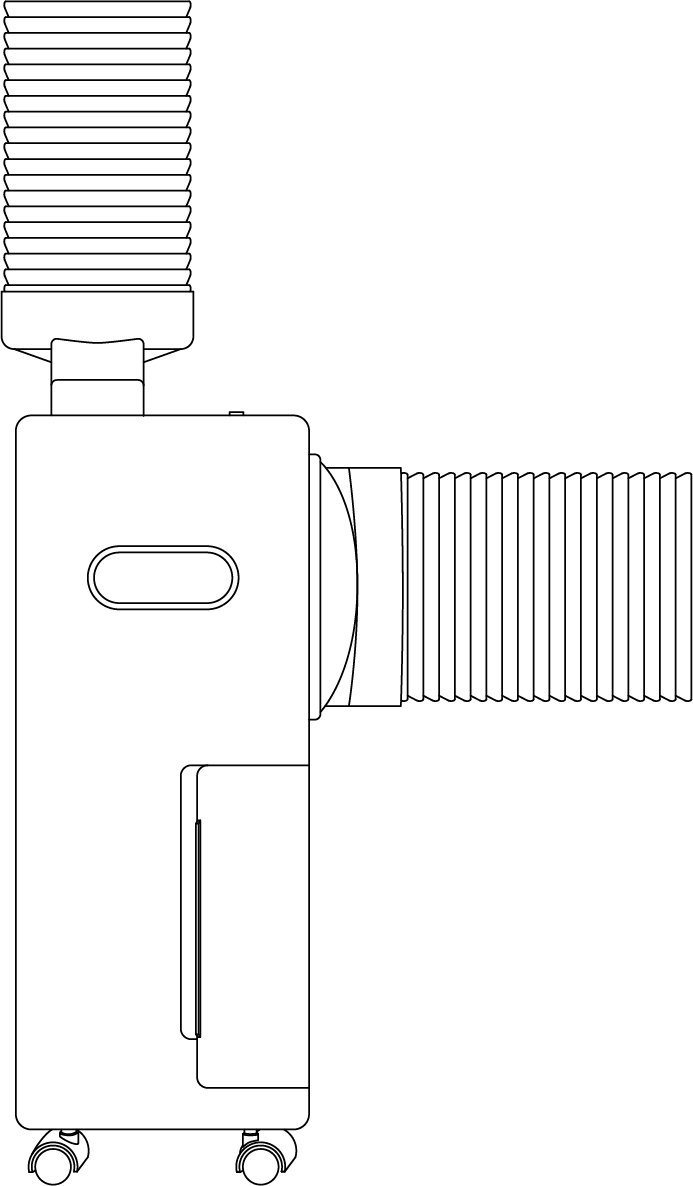
Take one Exhaust Duct (Ø 130 mm) and connect it to the air outlet hood, then tighten it clockwise.

STEP 4
Take one Exhaust Duct (Ø 150 mm) and connect it to the air inlet hood, then tighten it clockwise.
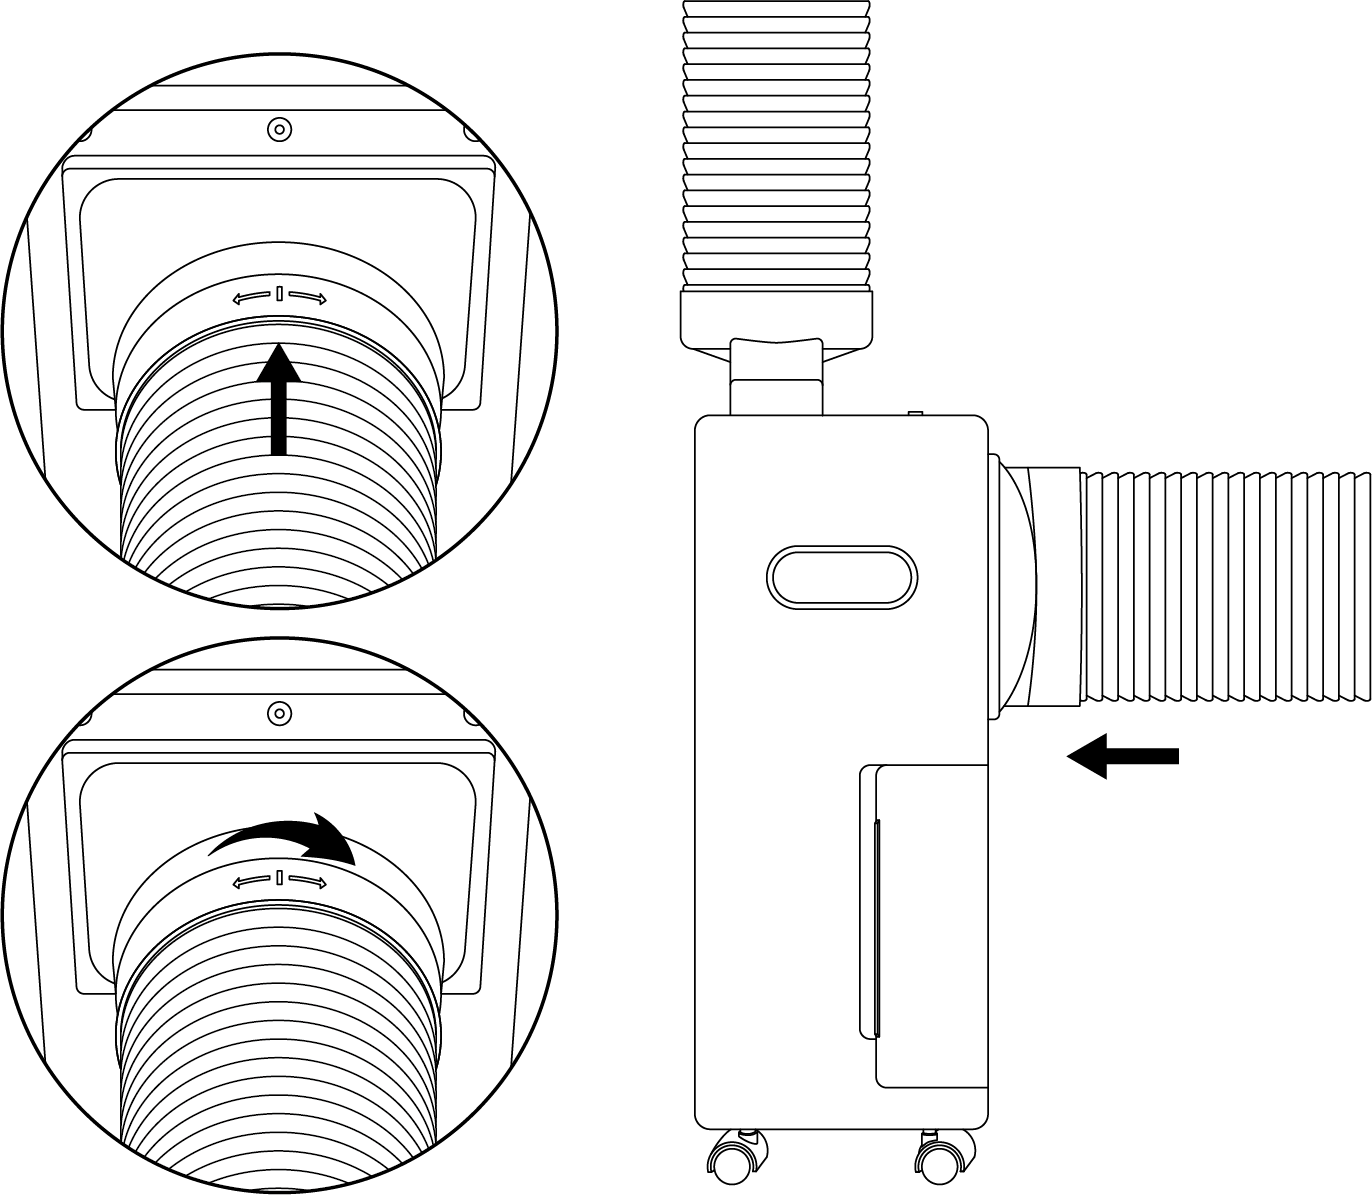
STEP 5
Check if the adapter, hoods, and ducts are securely installed in place.
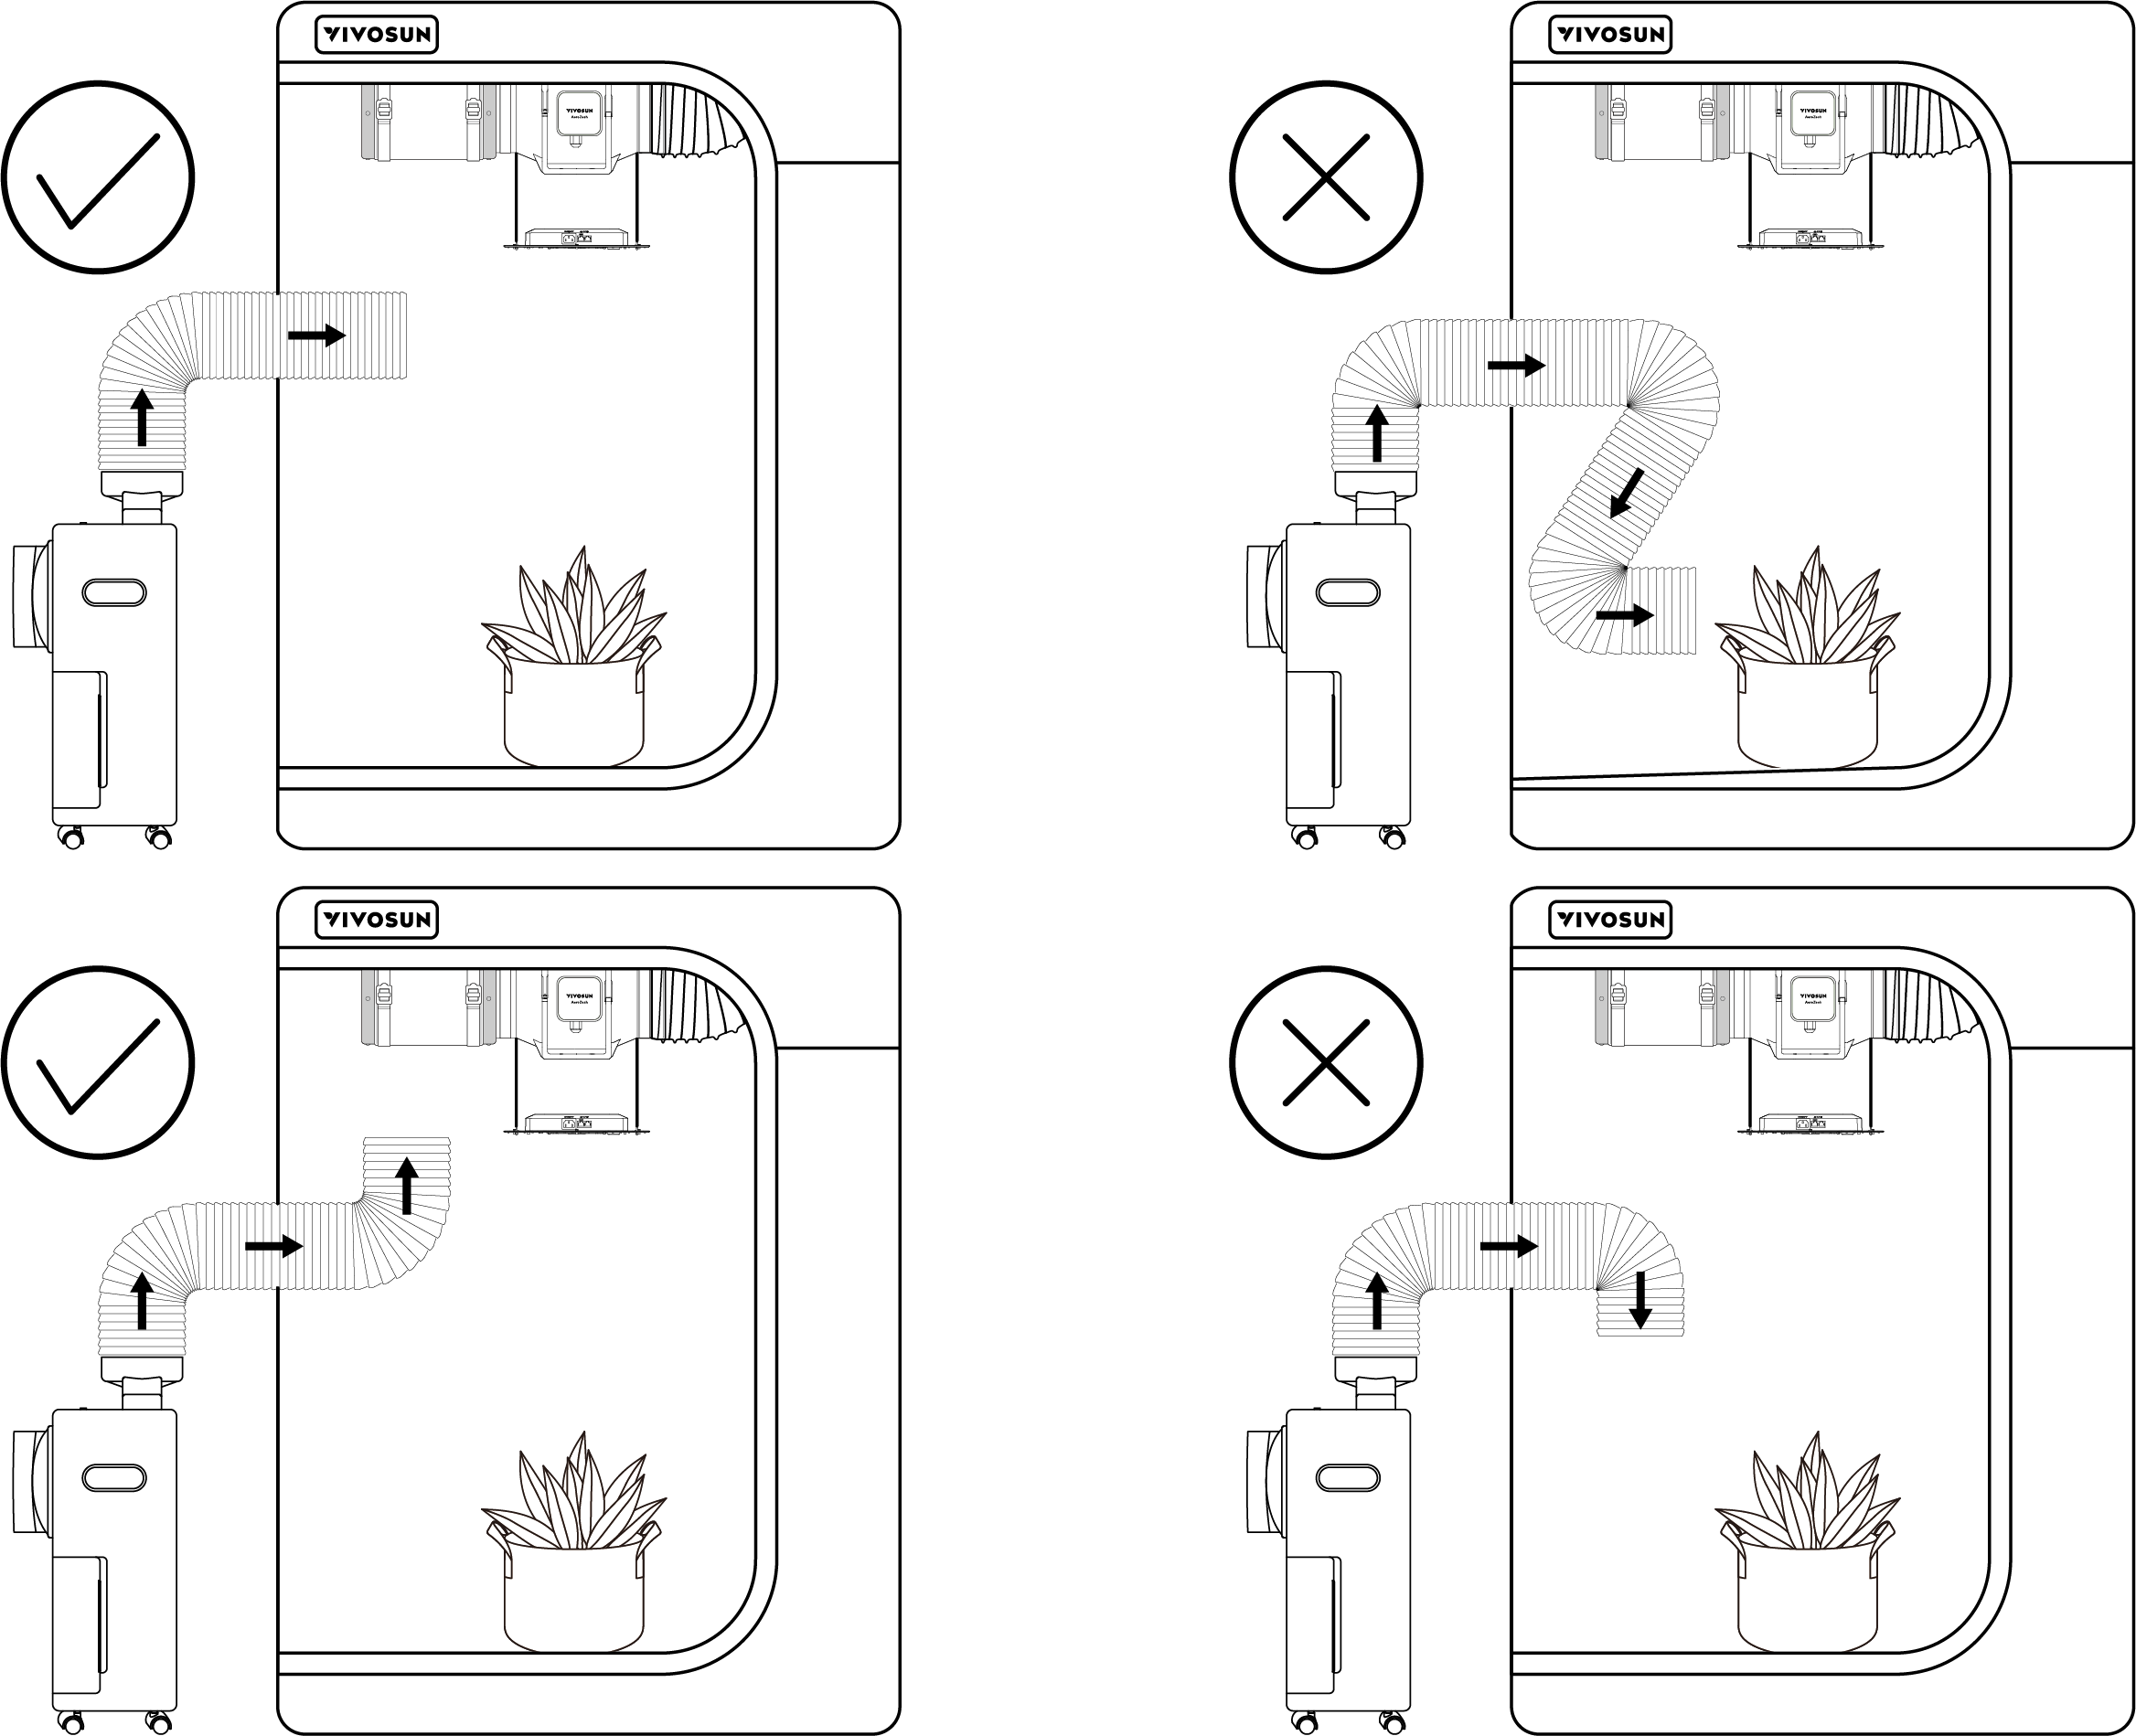
Configuring the Air Duct
You can configure the duct according to your specific scenario.
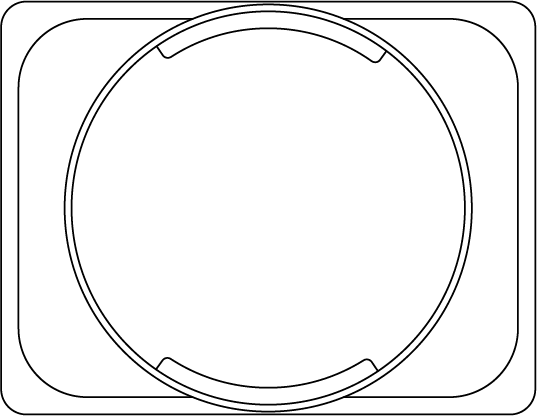
A. In common scenarios |
|
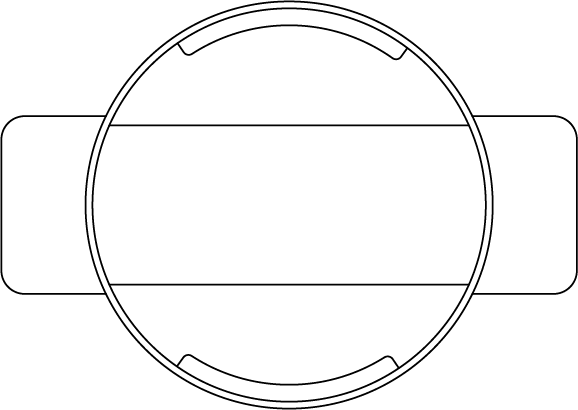
B. When the plants grow tall |
|
C. Configured directly in the grow tent |
|
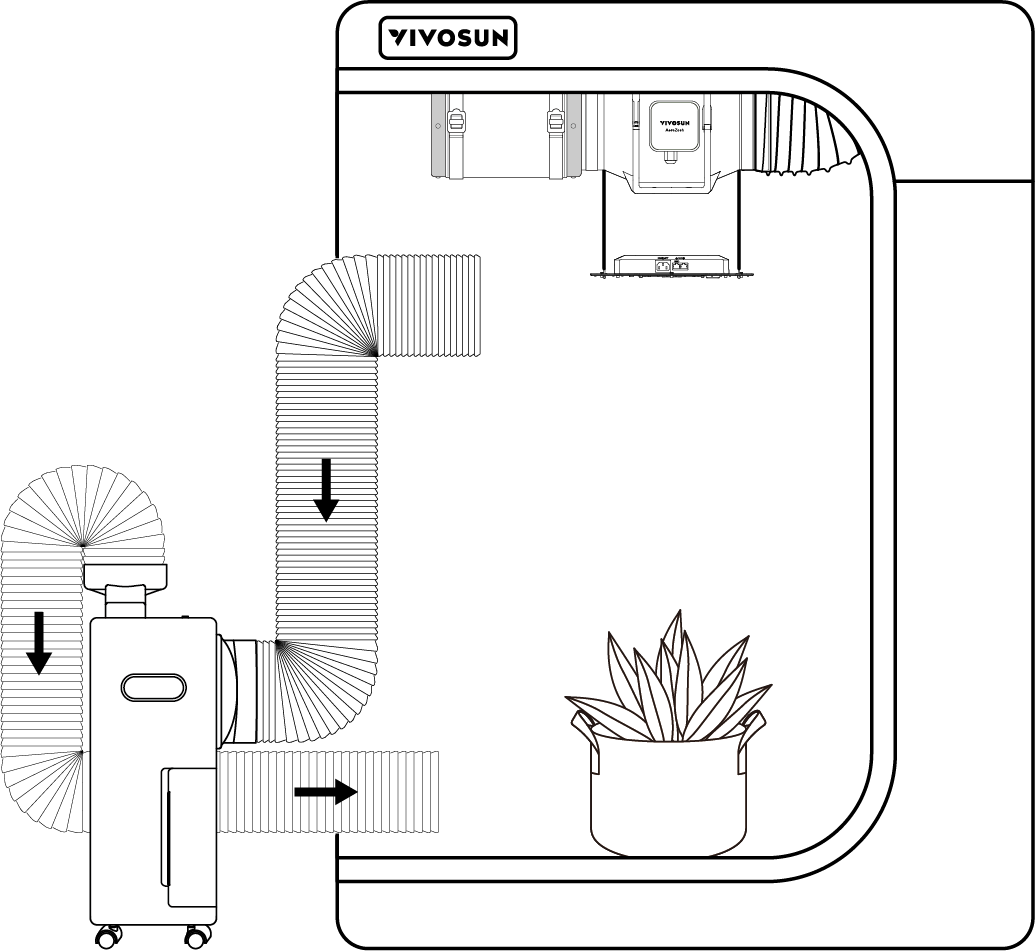
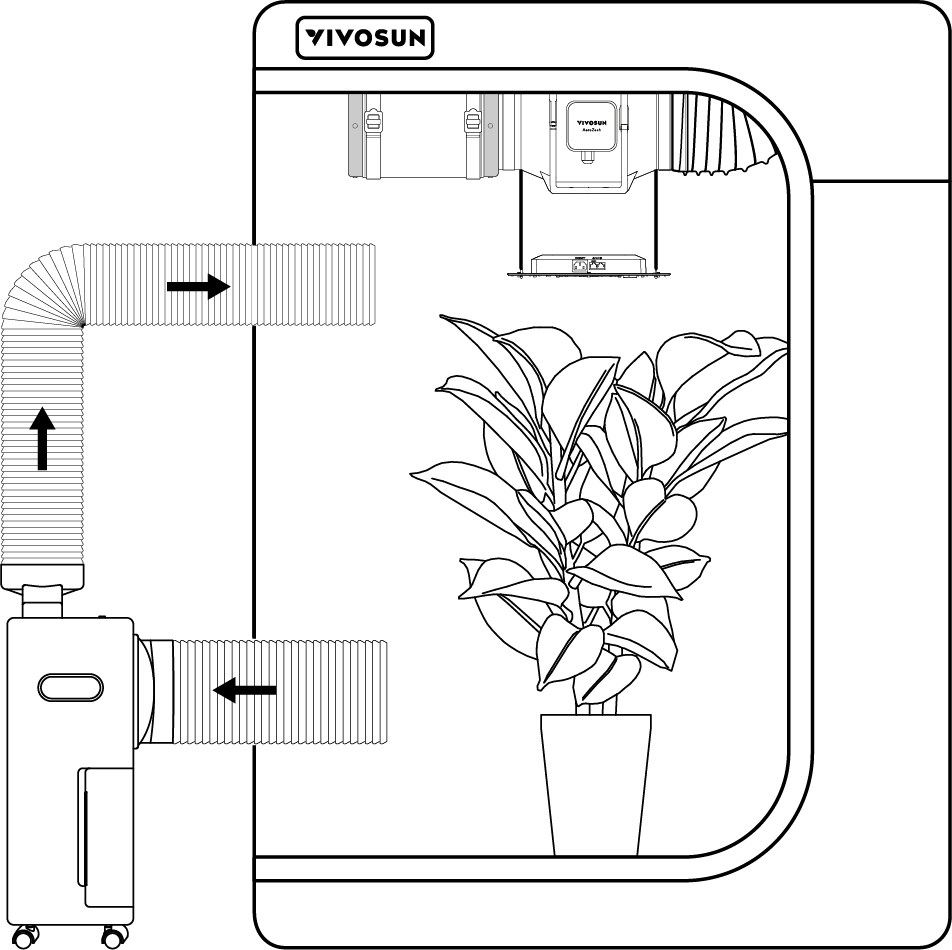
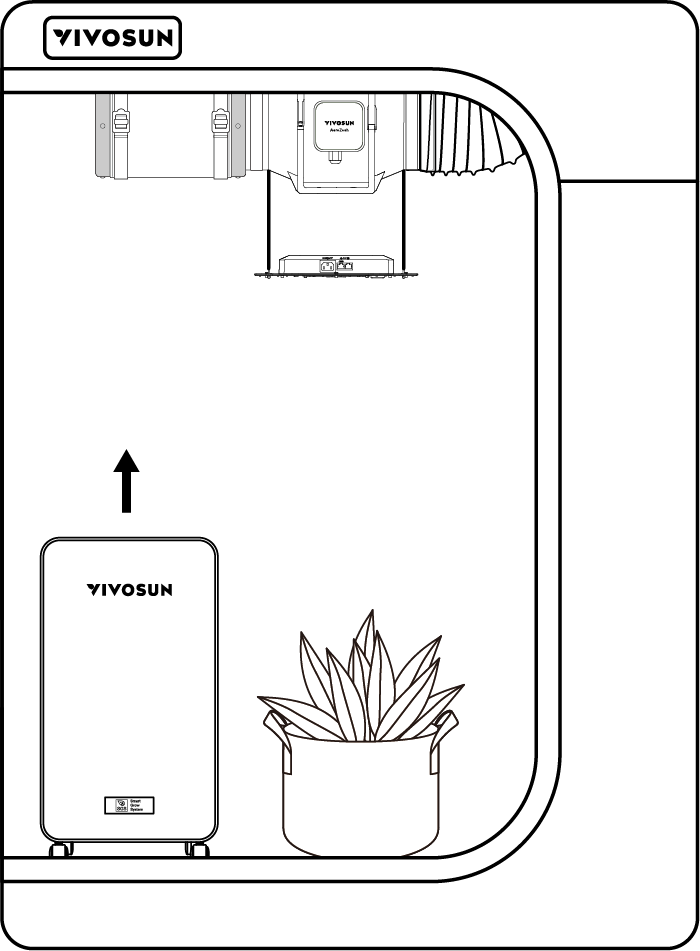
Note:
-
Ensure the exhaust duct does not have sharp bends (greater than 45°), as this may affect the dehumidifier’s performance.
-
Inside the tent, position the exhaust duct upwards and avoid directing airflow directly onto the leaves.
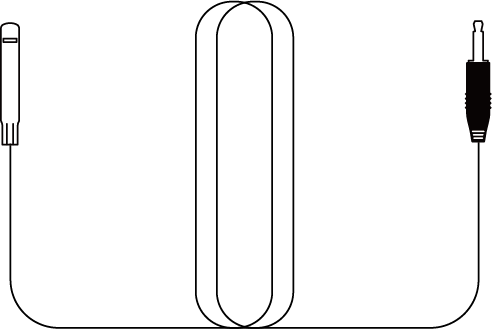
Installing the Probe
STEP 1
Insert the temperature and humidity probe into the 2.5 mm jack located above the air inlet, and ensure it is securely connected. Note: If the probe is not connected, the display will show “–”.
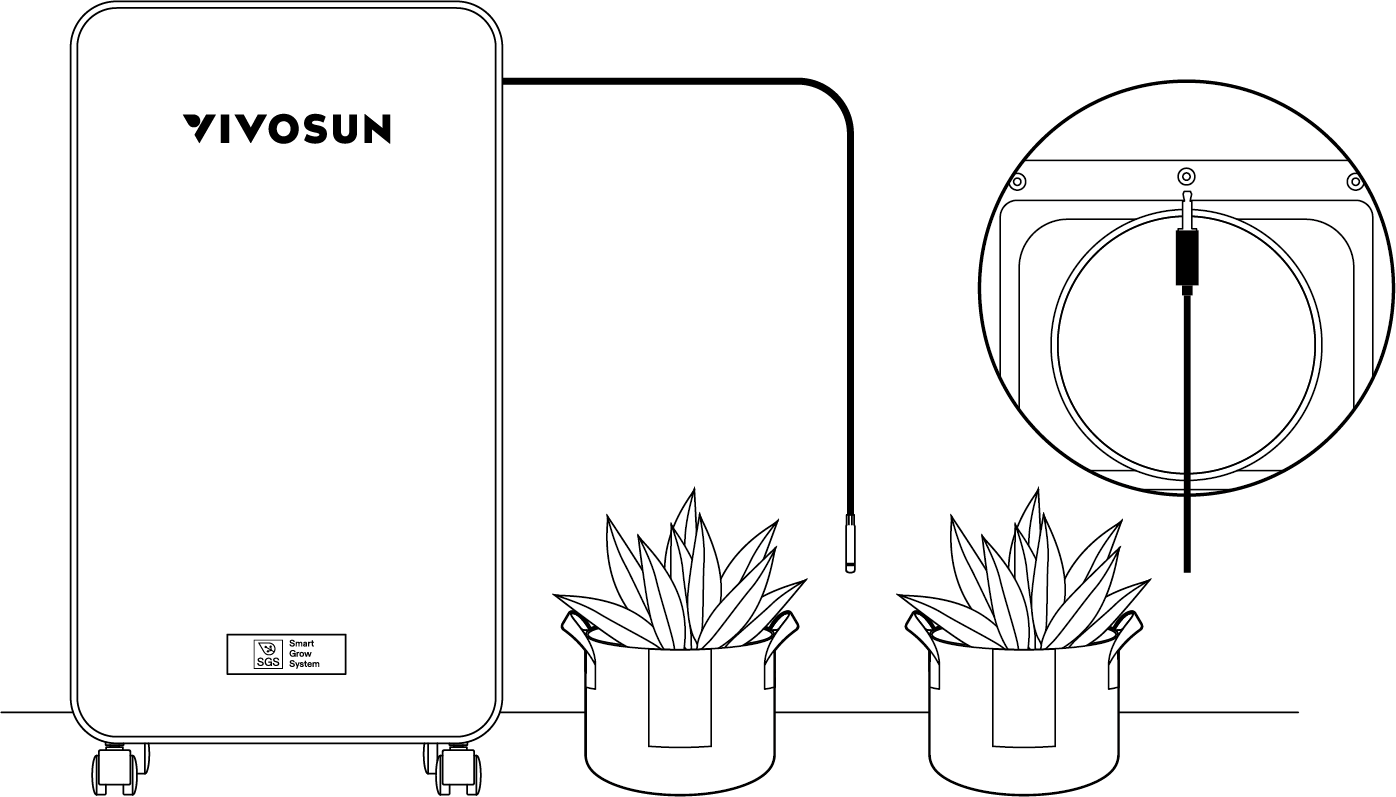
STEP 2
Place the probe in the target area and secure it firmly. Note: It is recommended to position the sensor at a height of 2 to 4 inches above the canopy.
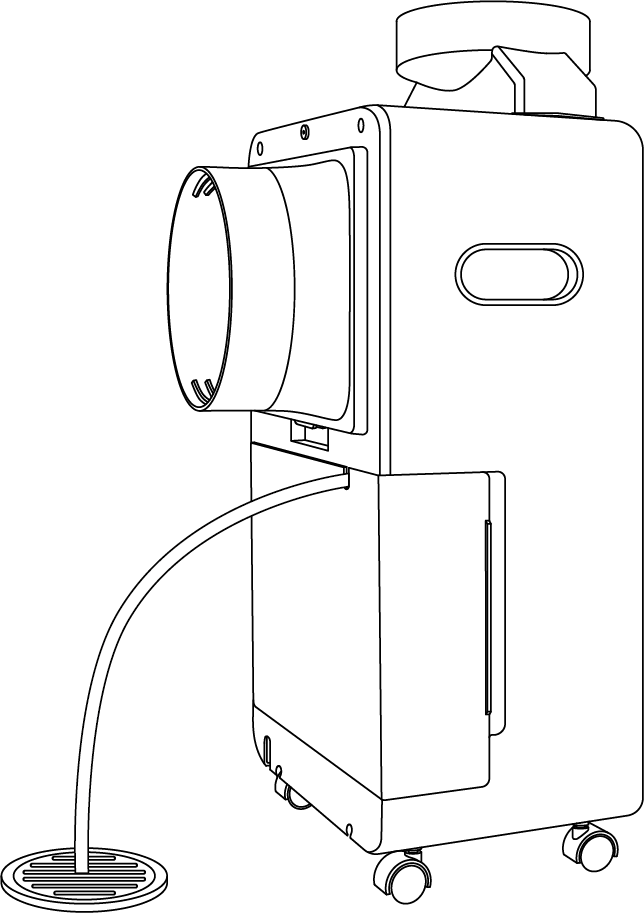
Drainage Methods
A. Water Tank
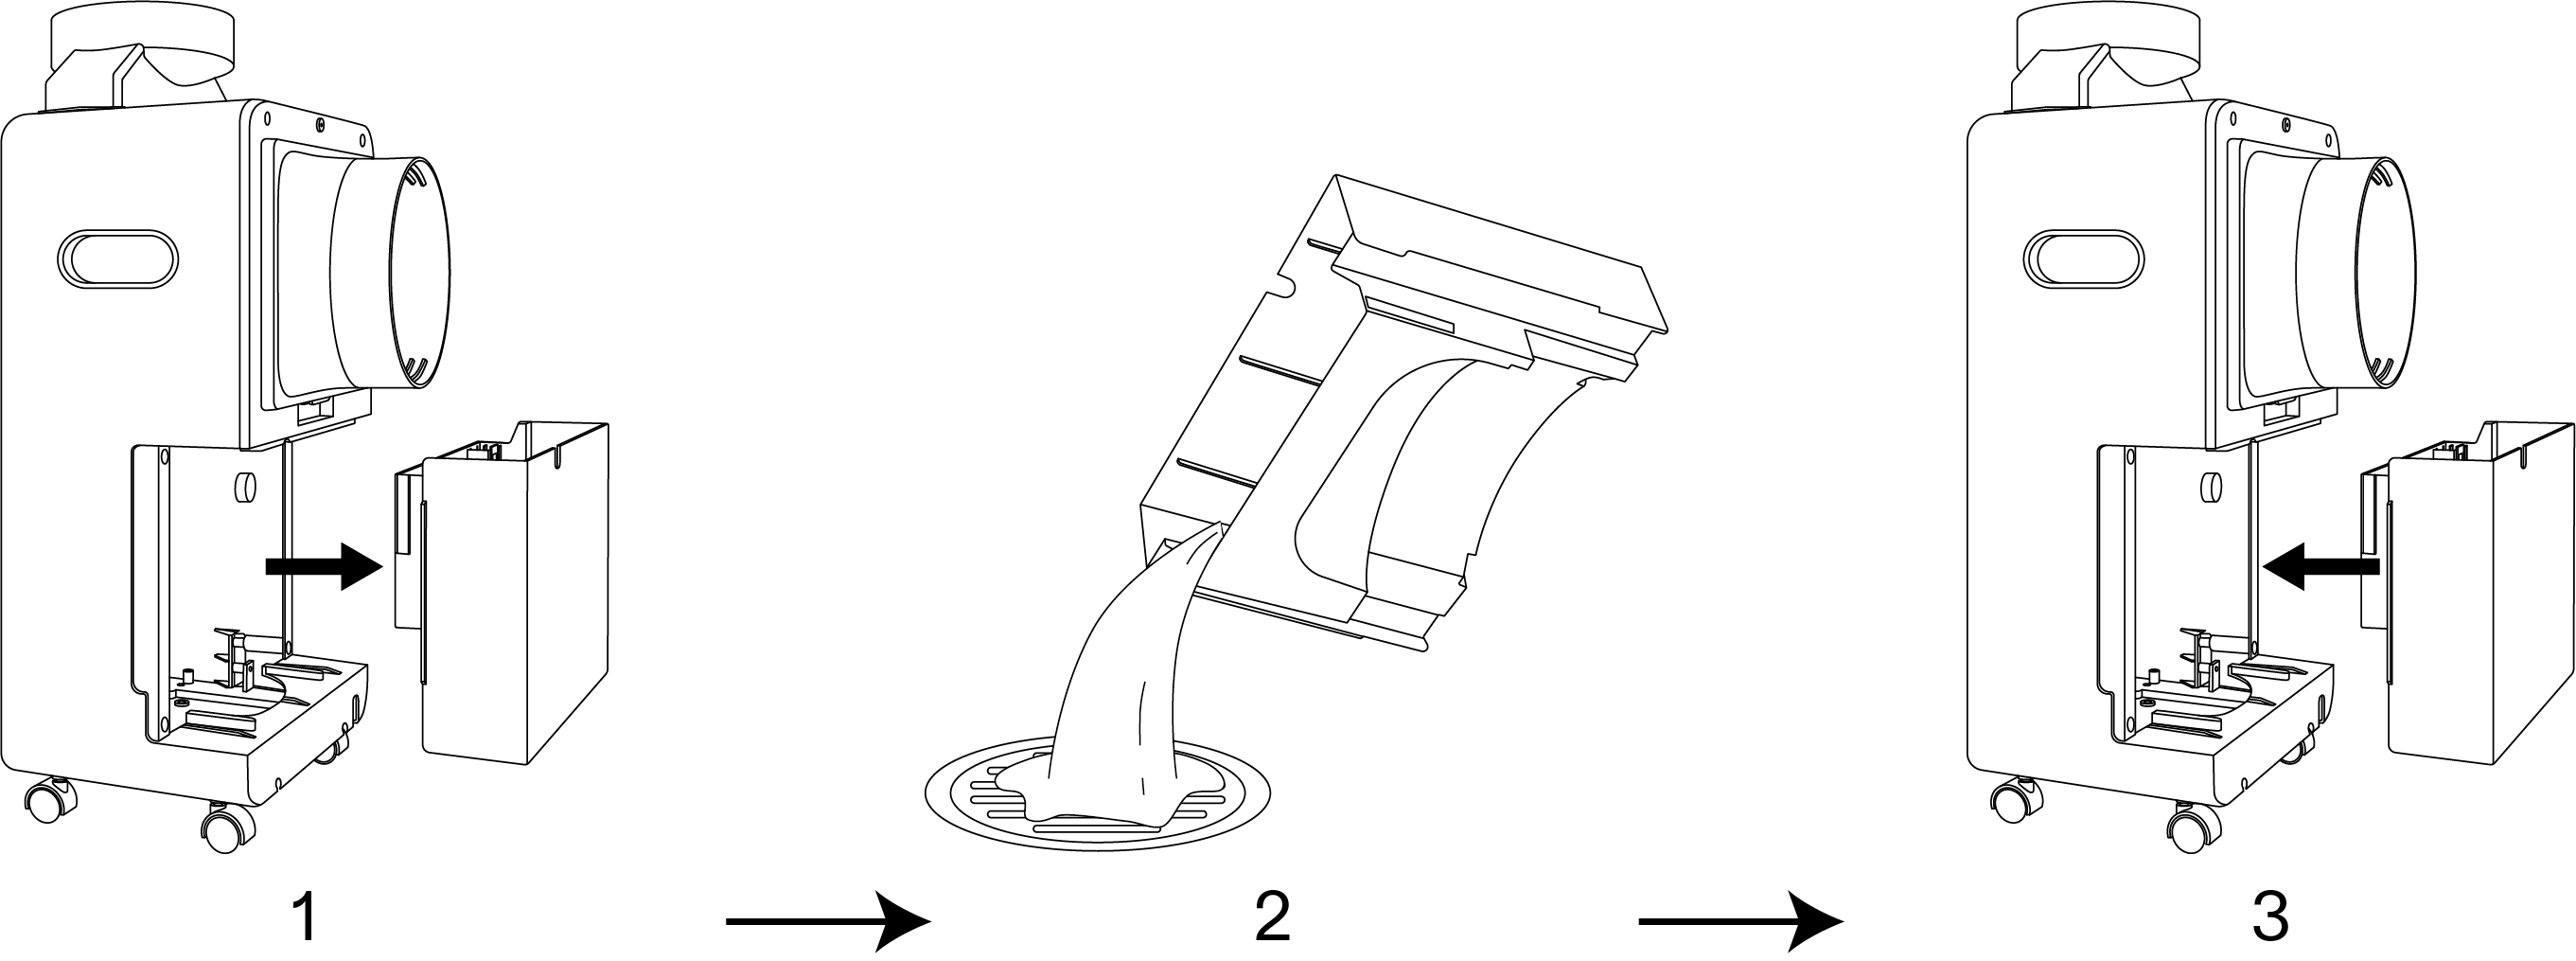
1 |
Remove the water tank |
2 |
Drain the water |
3 |
Reinstall the tank |
B. Drain Pipe
Connecting the drainage pipe allows for continuous water drainage.
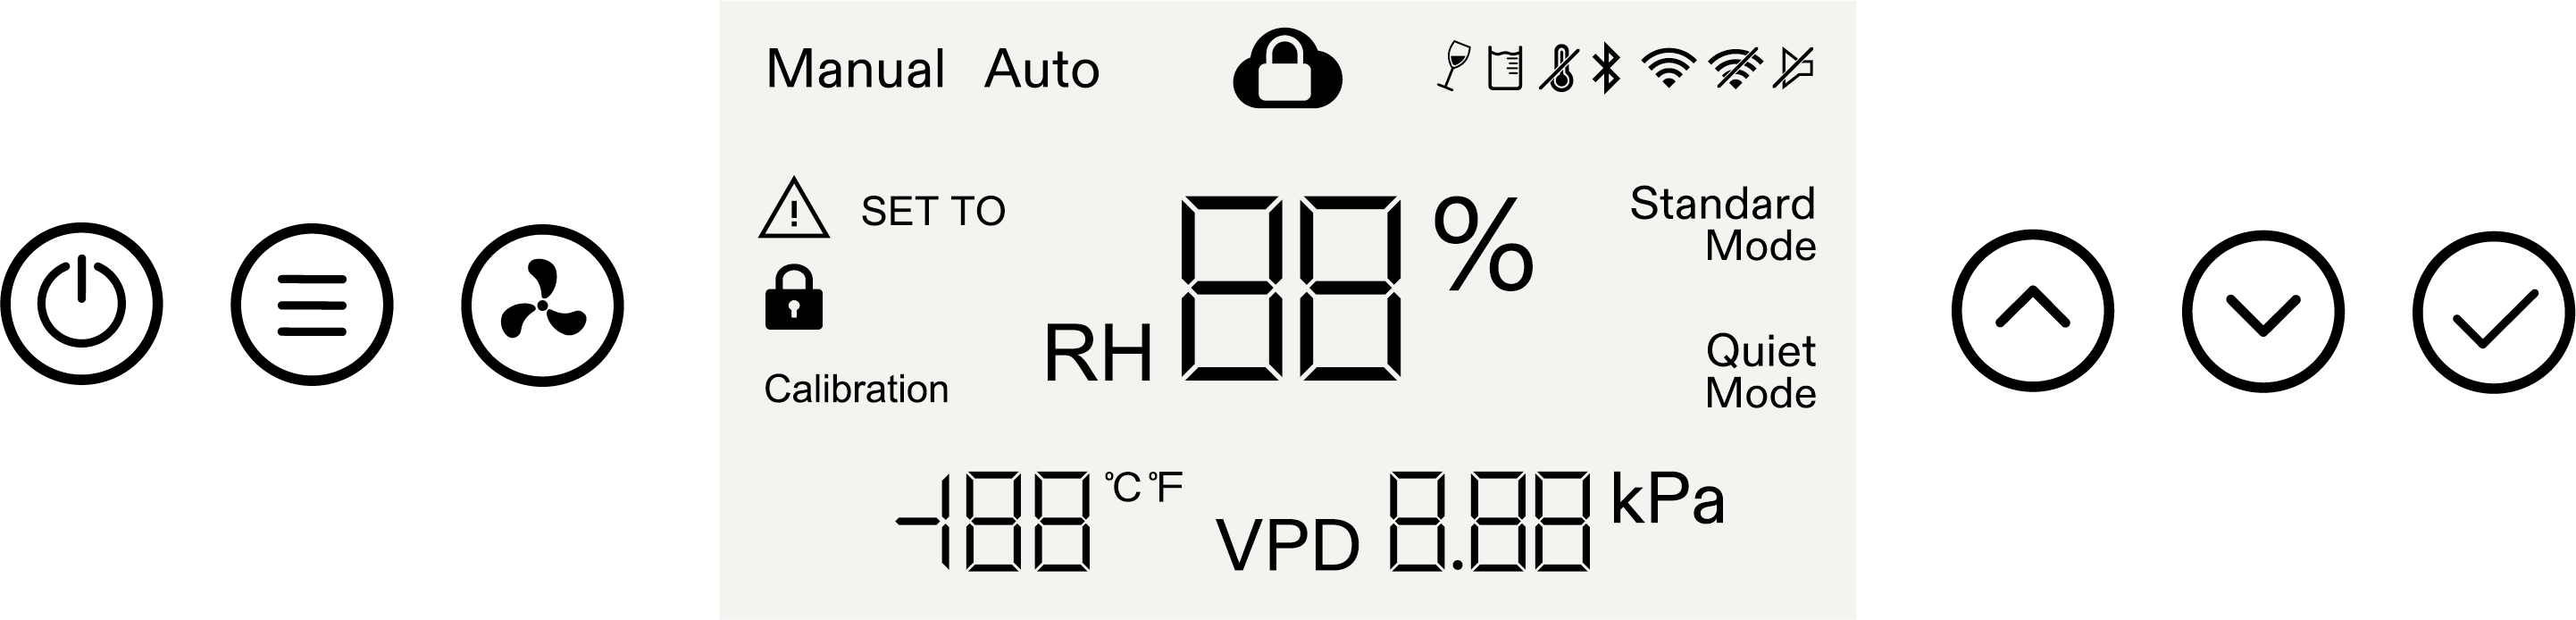
Control Panel
| Image | Name | Control |
|---|---|---|

|
On/Off Button |
Press to turn on. Press and hold for 3 seconds to turn off. |

|
Mode Button |
Press to switch between Manual and Auto modes. Press and hold to exit Recipe Mode (only effective while a recipe is running) |

|
Fan Speed Button |
Press to switch the fan between Standard Mode and Quiet Mode. |

|
Up Button |
Press to increase the value of the current setting. Press and hold to switch between °C and °F |

|
Down Button |
Press to decrease the value of the current setting. |

|
Confirm Button |
Press to confirm the current operation. Press and hold to enter the settings menu, including calibration, and mute toggle options. |
Other Button Operations:
-
Press and hold the On/Off and Up buttons to lock or unlock the device.
-
Press and hold the On/Off and Confirm buttons to reset the device to factory settings.
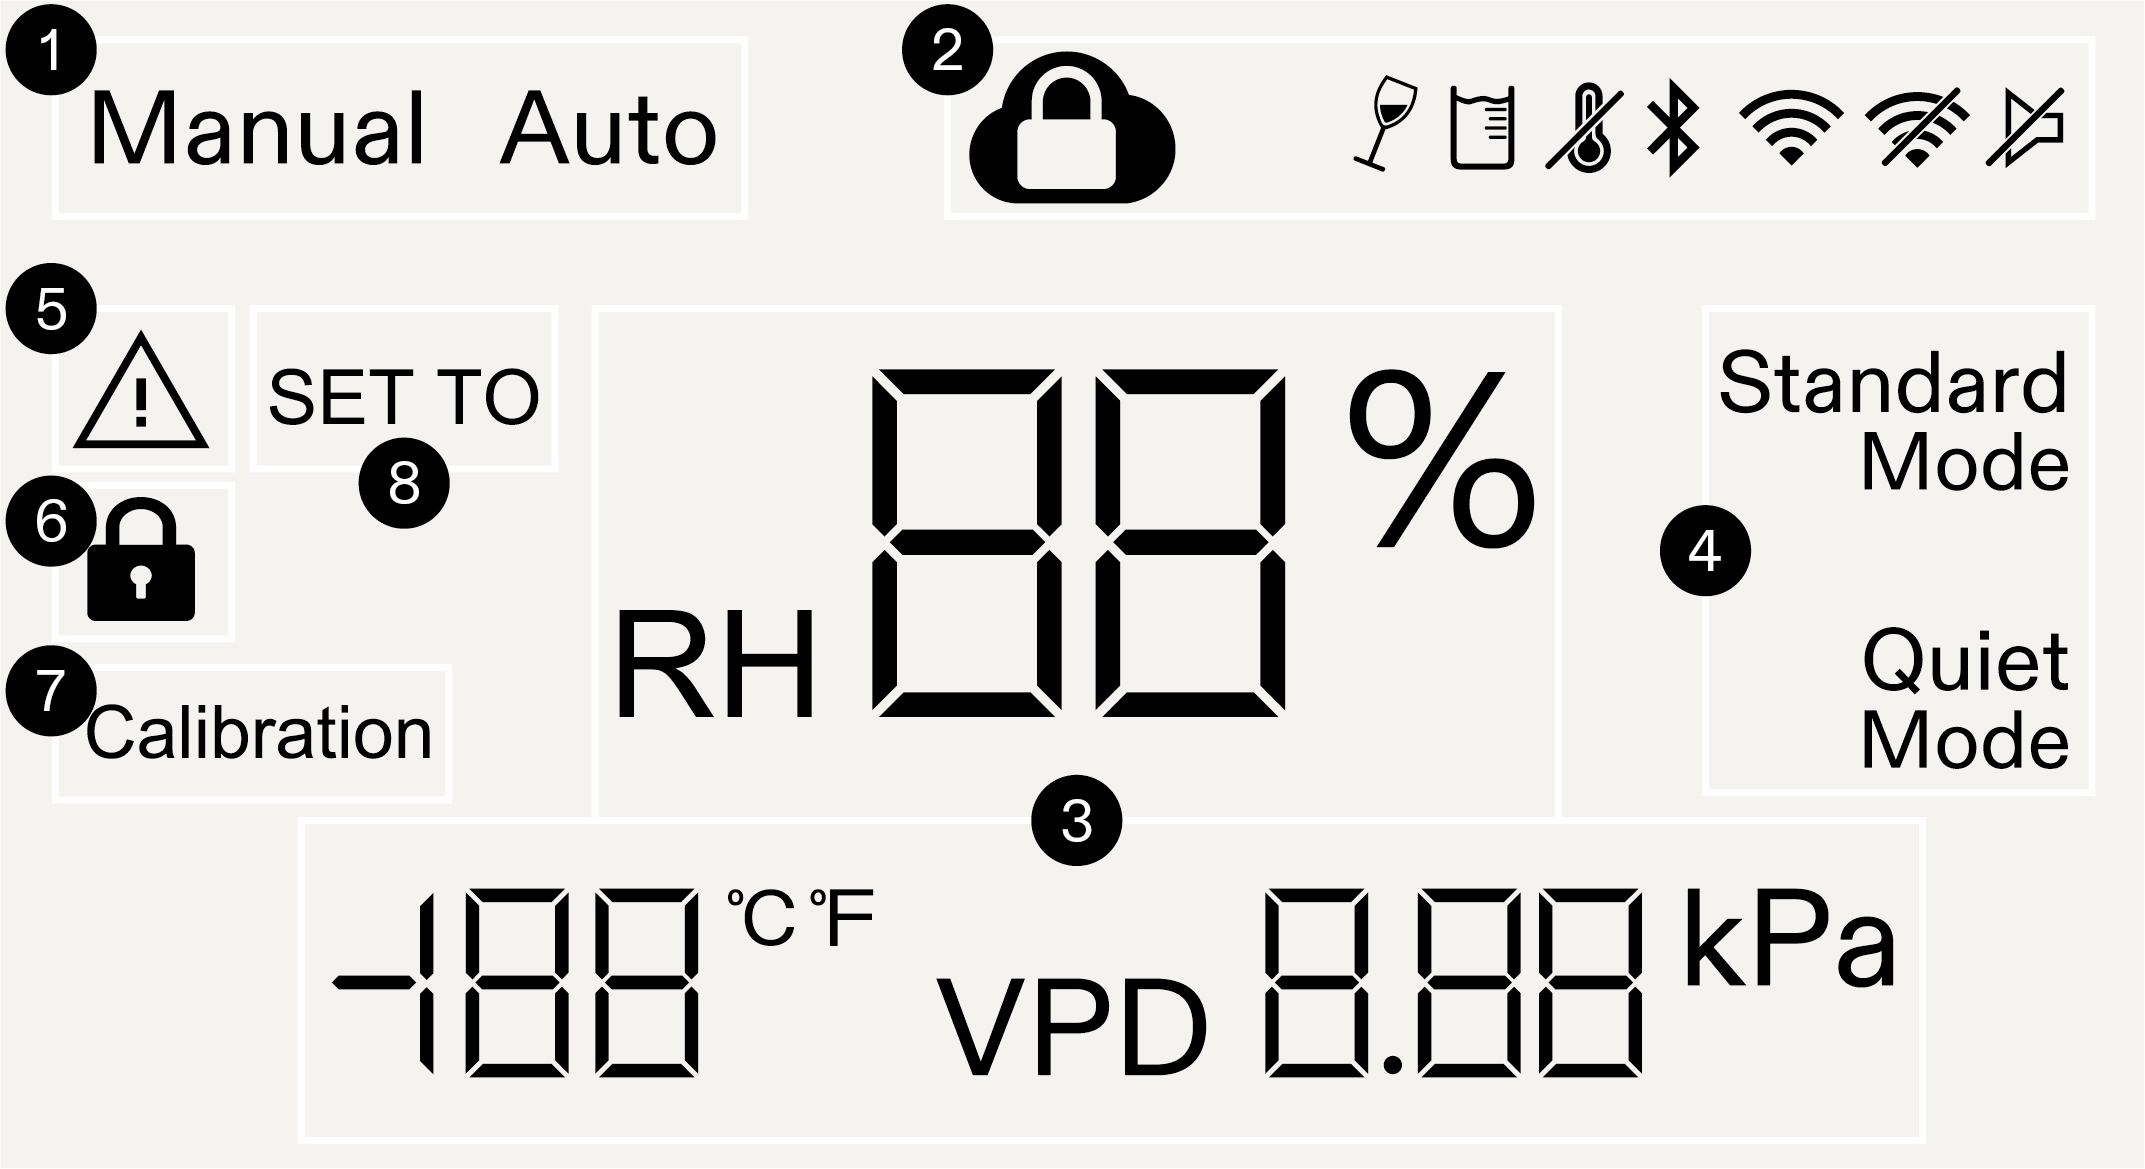
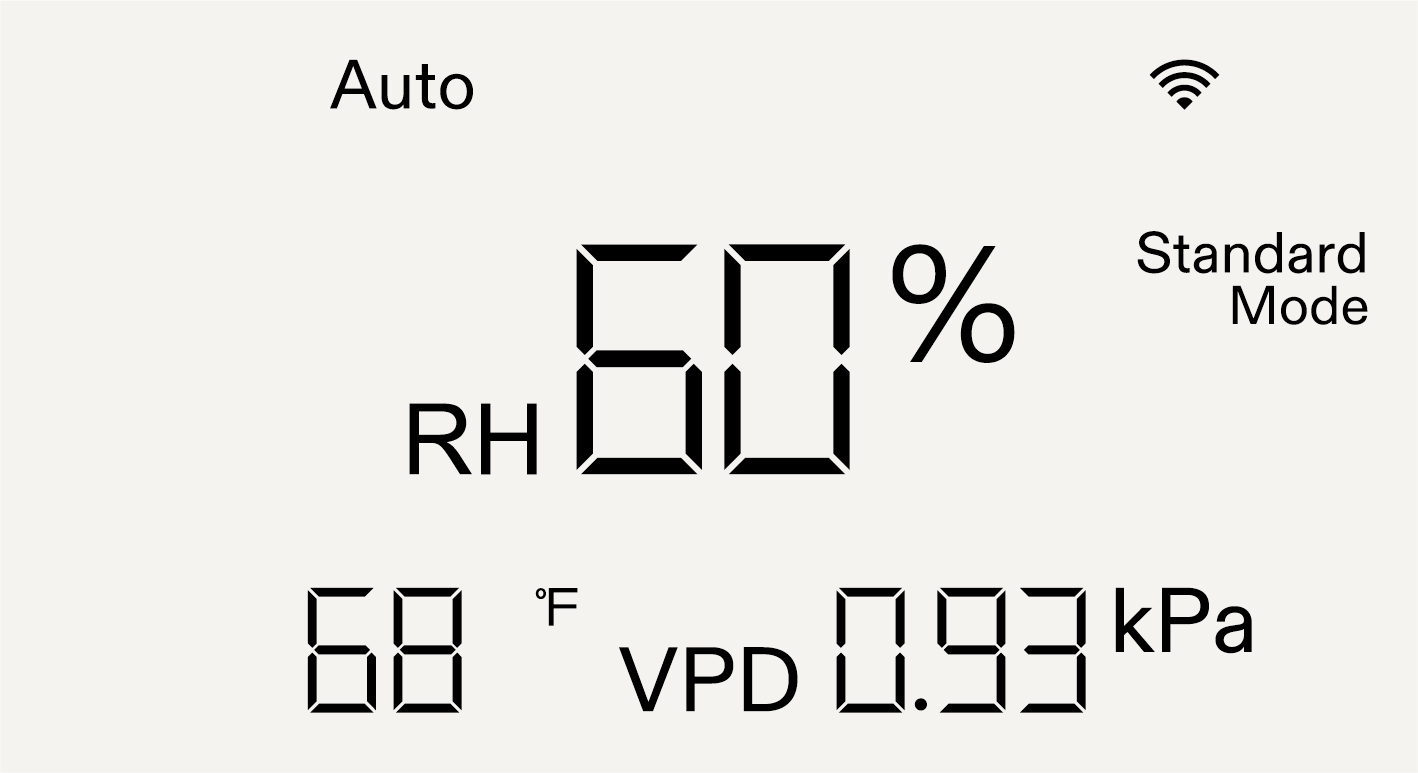
1 |
Operation Mode |
Displays the current mode: Manual or Auto. |
2 |
Status Icon |
Indicates various device statuses, including cloud lock, tilt, full water tank, probe detection, connection status, and mute. |
3 |
Probe Readings |
Displays current probe readings, including temperature, relative humidity, and VPD. |
4 |
Fan Speed |
Displays the current fan mode: Standard or Quiet. Note: The fan speed icon turns off when the dehumidifier is not running. |
5 |
Error Icon |
Appears when an error is detected and displays the corresponding error code. |
6 |
Screen lock Icon |
Indicates that screen operation is locked when the icon is visible. |
7 |
Calibration Mode |
The icon appears when temperature or humidity calibration is in progress. |
8 |
Setting Mode |
The icon appears when adjusting temperature or humidity settings. |
Operation
Manual Mode
Press the Operation Mode button to enter mode selection. Then, press the Mode button to cycle through the available modes. When “MANUAL” appears on the screen, press the Confirm button to confirm your selection.
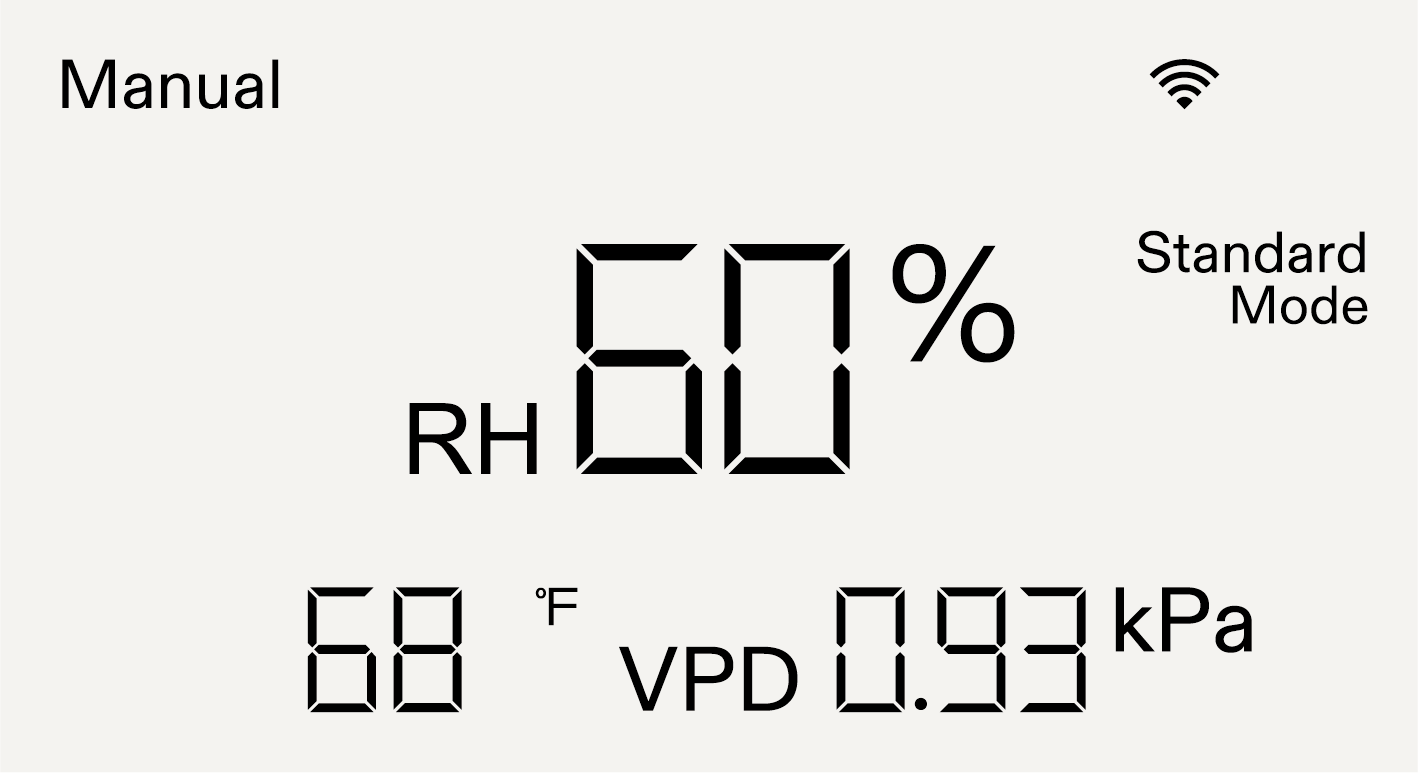
Note:
-
When operating in MANUAL mode, press the On/Off button to pause operation. Press the button again to resume.
-
The fan speed can be adjusted at any time.
Auto Mode
Press the Operation Mode button to enter mode selection. Then, press the Mode button repeatedly to cycle through the modes. When “Auto” appears on the screen, press the Confirm button to proceed to the humidity setting. Use the Up and Down buttons to adjust the target humidity level, then press the Confirm button again to confirm the setting.
Note:
-
In Auto mode, the target humidity has a buffer range of ±3%.
Wi-Fi Configuration
Step 1 Download the Vivosun App
Search “VIVOSUN” in the Apple App Store or in the Google Play Store to download the Vivosun app.

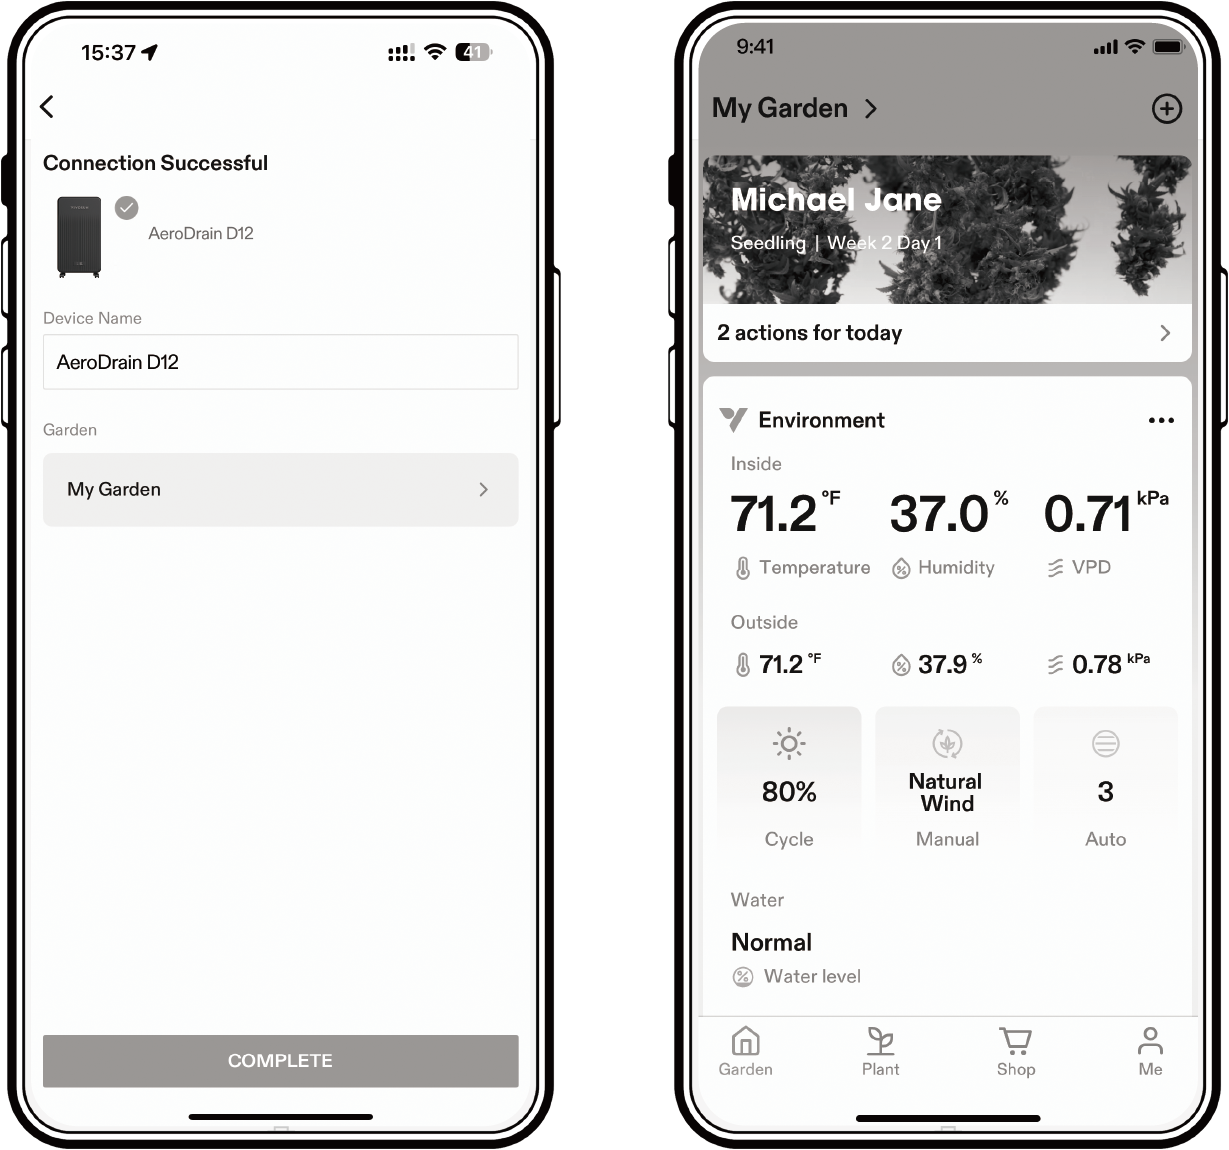
Step 2 Add AeroDrain
Tap “+” to add AeroDrain, then follow the prompts in the app to complete the Wi-Fi configuration.
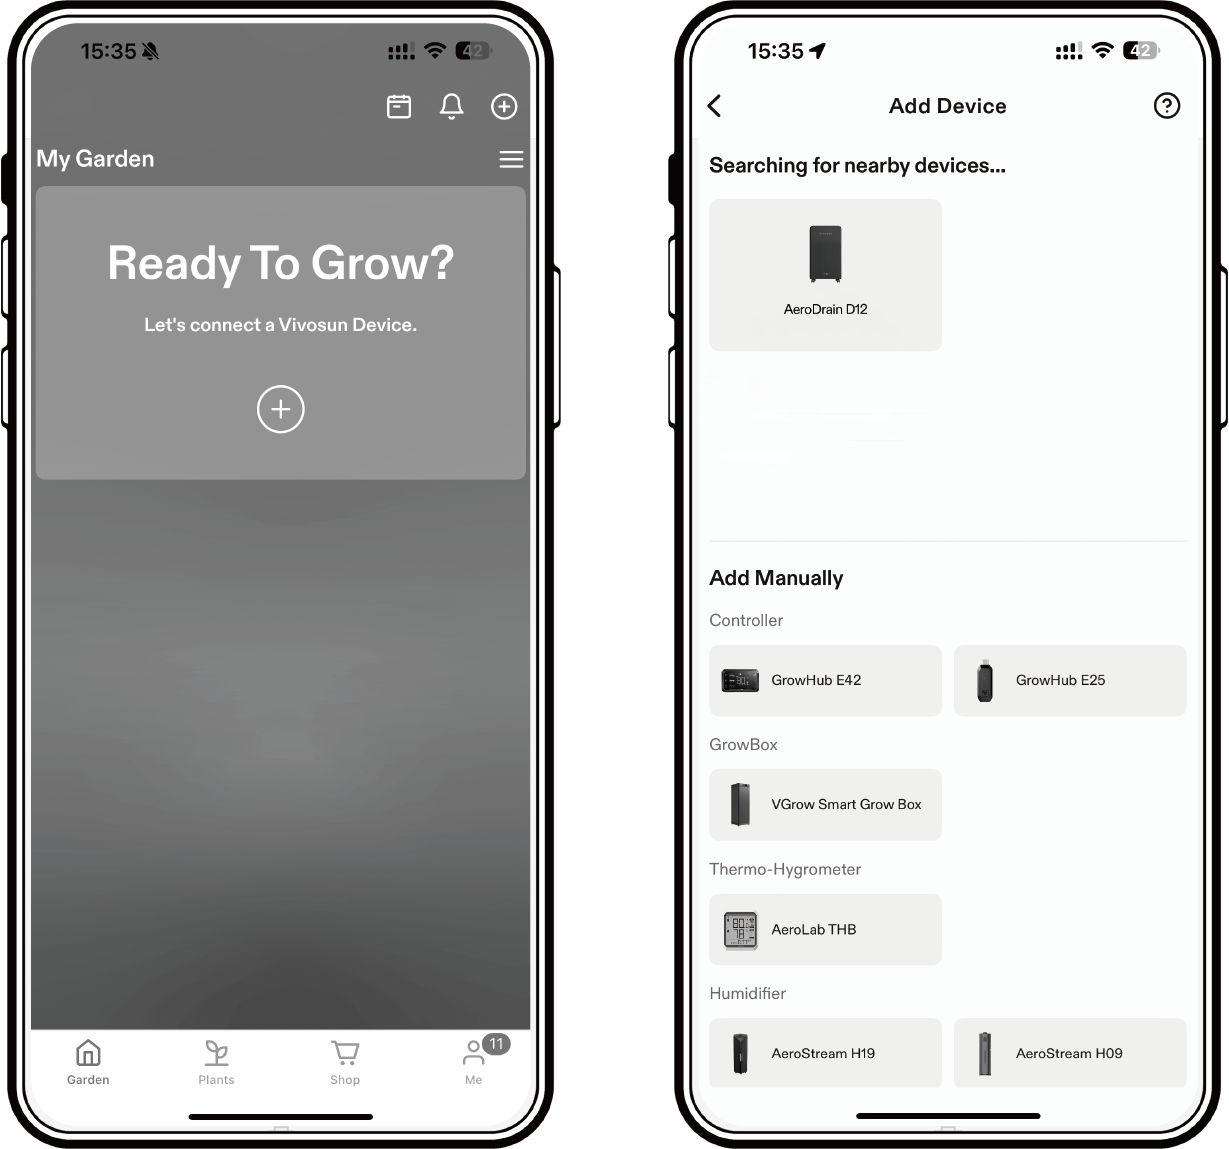
Step 3 Name Your Device
After successfully connecting AeroDrain, you can rename your device.
Troubleshooting
| Problems | Reasons | Solutions |
|---|---|---|
The dehumidifier does not work. |
There is no electricity |
Turn it on after connecting it toa powered socket. |
The water tank is full |
Drain the water from it. |
|
Temperature and humidity probe not detected. |
Reinsert or replace the temperature and humidity probe. |
|
The dehumidifier tipped over. |
Lay the device flat and allow it to rest for at least 24 hours before use. |
|
The ambient temperature is too low or too high. |
It is recommended to use the device at a temperature between 5–35°C (41–95°F). |
|
The environmental target humidity value has been reached. |
Adjust the target humidity. |
|
The compressor must wait for 3 minutes after stopping before it can restart (system protection). |
Wait for 3 minutes and check if it works. |
|
Product displays error code: DF: Defrosting in progress E01: Power board communication failure E02: NTC sensor fault E04: EC fan fault |
Wait for 5 minutes to see if the issue resolves itself. If not, please contact our customer service for assistance. |
|
The dehumidification capacity is low. |
The filter is too dirty. |
Clean or replace the filter. |
The air inlet and/or outlet is blocked. |
Clear the blockage. |
|
The exhaust duct is severely bent. |
Ensure that the duct bend does not exceed 45°. |
|
Noise or vibration |
The dehumidifier is not placed on a flat surface. |
Place the dehumidifier on a hard,flat surface. |
Warranty
VIVOSUN offers a 2-year limited warranty on this product purchased directly from us or our authorized dealers, beginning on the original date of purchase.
This warranty is provided in addition to, and does not affect, your statutory rights under applicable consumer protection laws in the country where the product was purchased.
For the full Warranty Policy, please visit: https://www.vivosun.com/help/warranty-policy
Alternatively, you may contact customer service at support@vivosun.com / +1 888-505-8486.
Contents

We help you grow your best green.

We provide the highest quality.

We relentlessly pursue the future.

We make growing more enjoyable.

We support every grower.
Sign up and get 10% off your first order
©2026 Vivosun All Rights Reserved