

Deutsch
AeroLush C08 Handbuch
Sicherheitsinformationen
Bitte lesen Sie diese Anweisungen sorgfältig durch, bevor Sie das Gerät verwenden. Nichteinhaltung dieser Sicherheitsrichtlinien kann zu Verletzungen führen, die Produktgarantie ungültig machen und Vivosun von jeglicher Haftung entbinden.
-
Betreiben Sie das Gerät nicht mit nassen Händen, tauchen Sie es nicht in Wasser ein und platzieren Sie es nicht in der Nähe von Wasser oder Öl.
-
Durchbohren oder verbrennen Sie das Gerät nicht.
-
Halten Sie alle Lüftungsöffnungen frei von Hindernissen.
-
Verwenden Sie dieses Produkt nicht im Freien, in direktem Sonnenlicht oder setzen Sie es nicht dem Wetter oder den Elementen aus.
-
Befolgen Sie bei der Installation der Klimaanlage die lokalen Netzanschlussregeln und sorgen Sie für eine ordnungsgemäße Erdung. Wenn Sie Fragen zur elektrischen Installation haben, befolgen Sie die Anweisungen des Herstellers oder konsultieren Sie einen professionellen Elektriker.
-
Stecken Sie niemals Finger oder Gegenstände in den Luftauslass. Warnen Sie Kinder vor diesen Gefahren.
-
Wenn das Gerät einen Brandgeruch abgibt oder Anzeichen einer Fehlfunktion aufweist, trennen Sie sofort die Stromversorgung und stellen Sie die Nutzung ein.
-
Zerlegen, modifizieren, reparieren oder reinigen Sie interne Komponenten nicht ohne Genehmigung.
-
Halten Sie Ihre Hände von dem Luftauslass und den internen Komponenten fern.
-
Platzieren Sie keine schweren Gegenstände auf dem Luftauslass und setzen Sie sich nicht direkt darauf.
-
Ersetzen Sie das Netzkabel nicht ohne Genehmigung, spleißen Sie es nicht und verwenden Sie es nicht parallel mit anderen Hochleistungselektrogeräten.
-
Decken Sie das Produkt oder die Netzkabel nicht mit Teppichen oder anderen Stoffen ab.
-
Stellen Sie das Gerät auf eine ebene, trockene Fläche und halten Sie mindestens 50 cm Abstand zu umgebenden Objekten oder Wänden.
-
Stellen Sie das Produkt nicht auf eine weiche, erhöhte oder instabile Fläche, wo es herunterfallen könnte oder die Lufteinlässe oder -auslässe blockiert sind.
-
Reinigen Sie die Klimaanlage nicht mit chemischen Lösungsmitteln wie Benzin oder Alkohol. Trennen Sie vor der Reinigung die Stromversorgung und verwenden Sie ein leicht feuchtes, weiches Tuch. Bei starker Verschmutzung verwenden Sie ein mildes Reinigungsmittel.
-
Dieses Gerät kann von Kindern ab 8 Jahren sowie von Personen mit eingeschränkten physischen, sensorischen oder geistigen Fähigkeiten oder mangelnder Erfahrung und Wissen verwendet werden, sofern sie ordnungsgemäß beaufsichtigt oder in die sichere Verwendung eingewiesen wurden und die damit verbundenen Gefahren verstehen. Kinder dürfen nicht mit dem Gerät spielen.
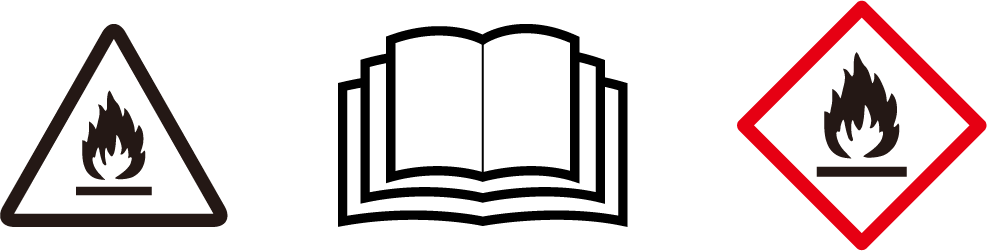
Brand- oder Explosionsgefahr—dieses Gerät enthält ein entzündliches Kältemittel. Befolgen Sie alle zusätzlichen Sicherheitsvorkehrungen, um Gefahren zu vermeiden.
-
Verwenden Sie keine Methoden zur Beschleunigung des Abtauvorgangs oder zur Reinigung, die nicht vom Hersteller empfohlen werden.
-
Das Gerät muss in einem Raum ohne ständig arbeitende Zündquellen wie offene Flammen, Gasgeräte oder Elektroheizungen gelagert werden.
-
Durchbohren oder verbrennen Sie keine Kältemittelleitungen. Seien Sie sich bewusst, dass Kältemittel geruchlos sein können. Halten Sie Lüftungsöffnungen frei von Hindernissen.
-
Bohren Sie keine Löcher in das Gerät.
-
Wartung, Reinigung und Instandhaltung sollten nur von Technikern durchgeführt werden, die in der Handhabung von entzündlichen Kältemitteln ordnungsgemäß geschult und qualifiziert sind.
-
Entsorgen Sie die Klimaanlage gemäß den föderalen und lokalen Vorschriften. Entzündliche Kältemittel erfordern spezielle Entsorgungsverfahren.
Hauptmerkmale
|
Für den Anbau konzipiert Einfache Installation—schnelles Anschließen der Klimaanlage an Ihren Anbauraum. |
|
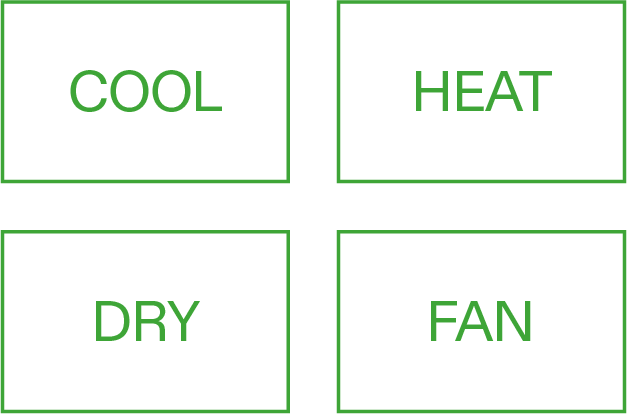
4-in-1 Modus 4-in-1 Modus: Kühlen, Heizen, Trocknen, Ventilator. Schaffen Sie die ideale Umgebung für Ihren Anbauraum. |
|
Präziser Sensor Externe Temperatur- und Feuchtigkeitssensoren können für präzise, gezielte Umgebungsablesungen angeschlossen werden. |
|
Bequeme Bedienung Verbinden Sie sich mit der Vivosun App für die Fernbedienung des Geräts, zusätzlich zur lokalen Bedienfeld. |
Produktinhalt
| Bild | Name | Menge |
|---|---|---|
|
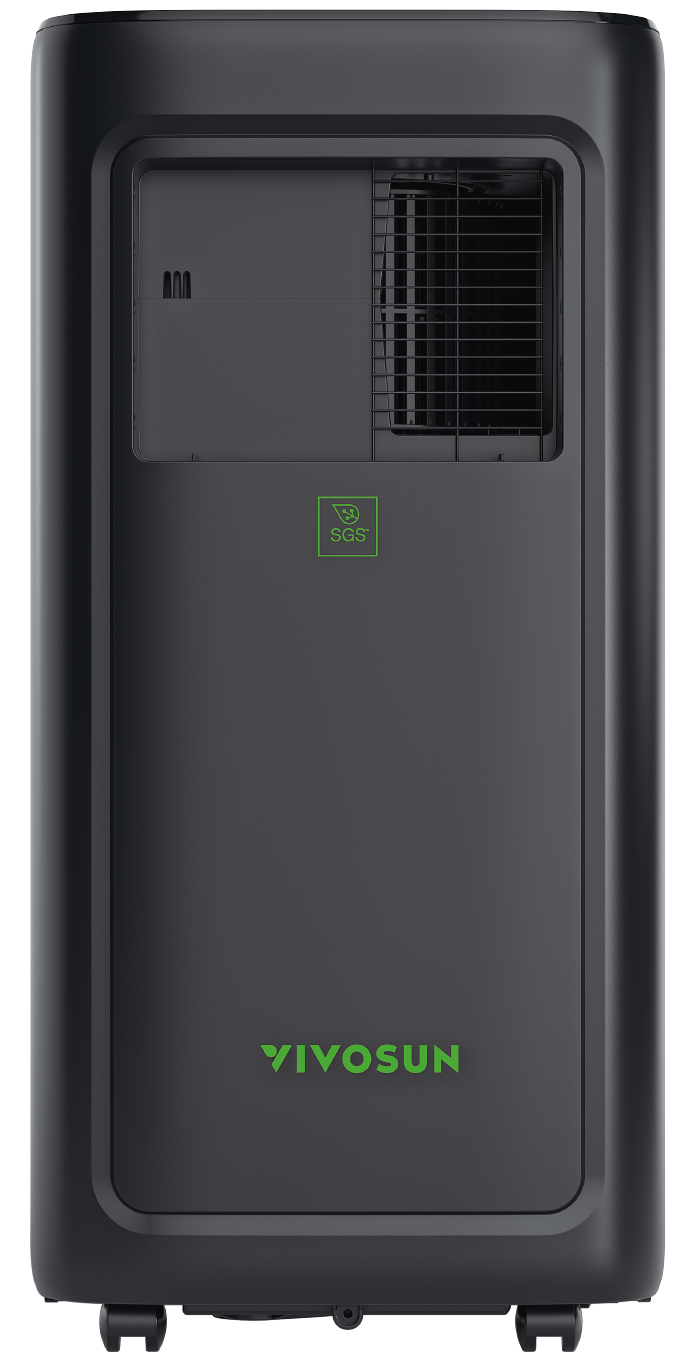
|
C08 |
1 ST |
|
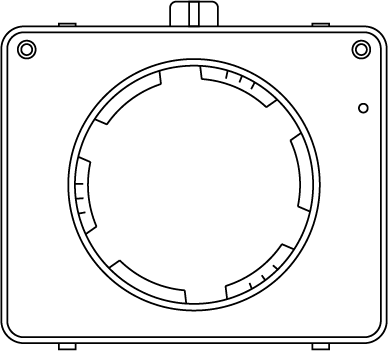
Verdampfer-Lufteinlasshaube |
1 ST |
|
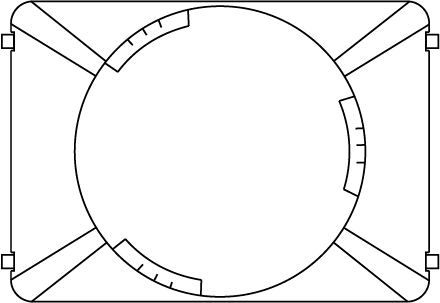
Verdampfer-Luftauslasshaube |
1 ST |
|
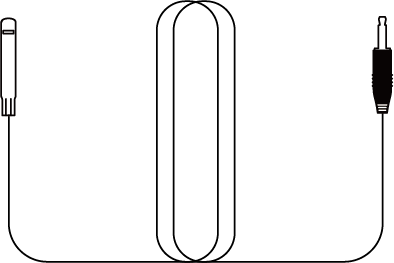
Temperatur- und Feuchtigkeitssonde |
1 ST |
|
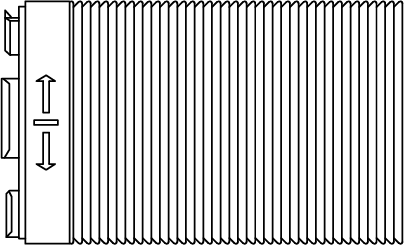
Abluftkanal 2m (mit Adapter) |
2 ST |

|
Abluftkanal 2m |
1 ST |
|
Filter |
1 ST |
|
Kondensator-Auslassadapter |
1 ST |
|
Fensterkanaladapter |
1 ST |
|
Fensterabdichtplattenmontage (Lang) |
1 ST |

|
Fensterabdichtplattenmontage (Kurz) |
1 ST |
|
Abflussrohr |
1 ST |
Dimensionen
Größe |
13.0*12.9*27.2 inch(33*32*69cm) |
Nettogewicht |
44.9 lbs (20.4kg) |
Stromversorgung |
115-120 V AC 60 Hz/220-240V AC 50Hz (Für verfügbare Spannung siehe Produktetikett) |
Entfeuchtungsleistung |
90 Pints/Day (95°F, 90% RH) 43 L/Day (35 °C, 90% RH) 80 Pints/Day (86°F, 80% RH) 38 L/Day (30 °C,80% RH) 45 Pints/Day (80°F, 60% RH) 21 L/Day (27 °C, 60% RH) 25 Pints/Day (65°F, 60% RH) 12 L/Day (18 °C, 60% RH) |
Installation
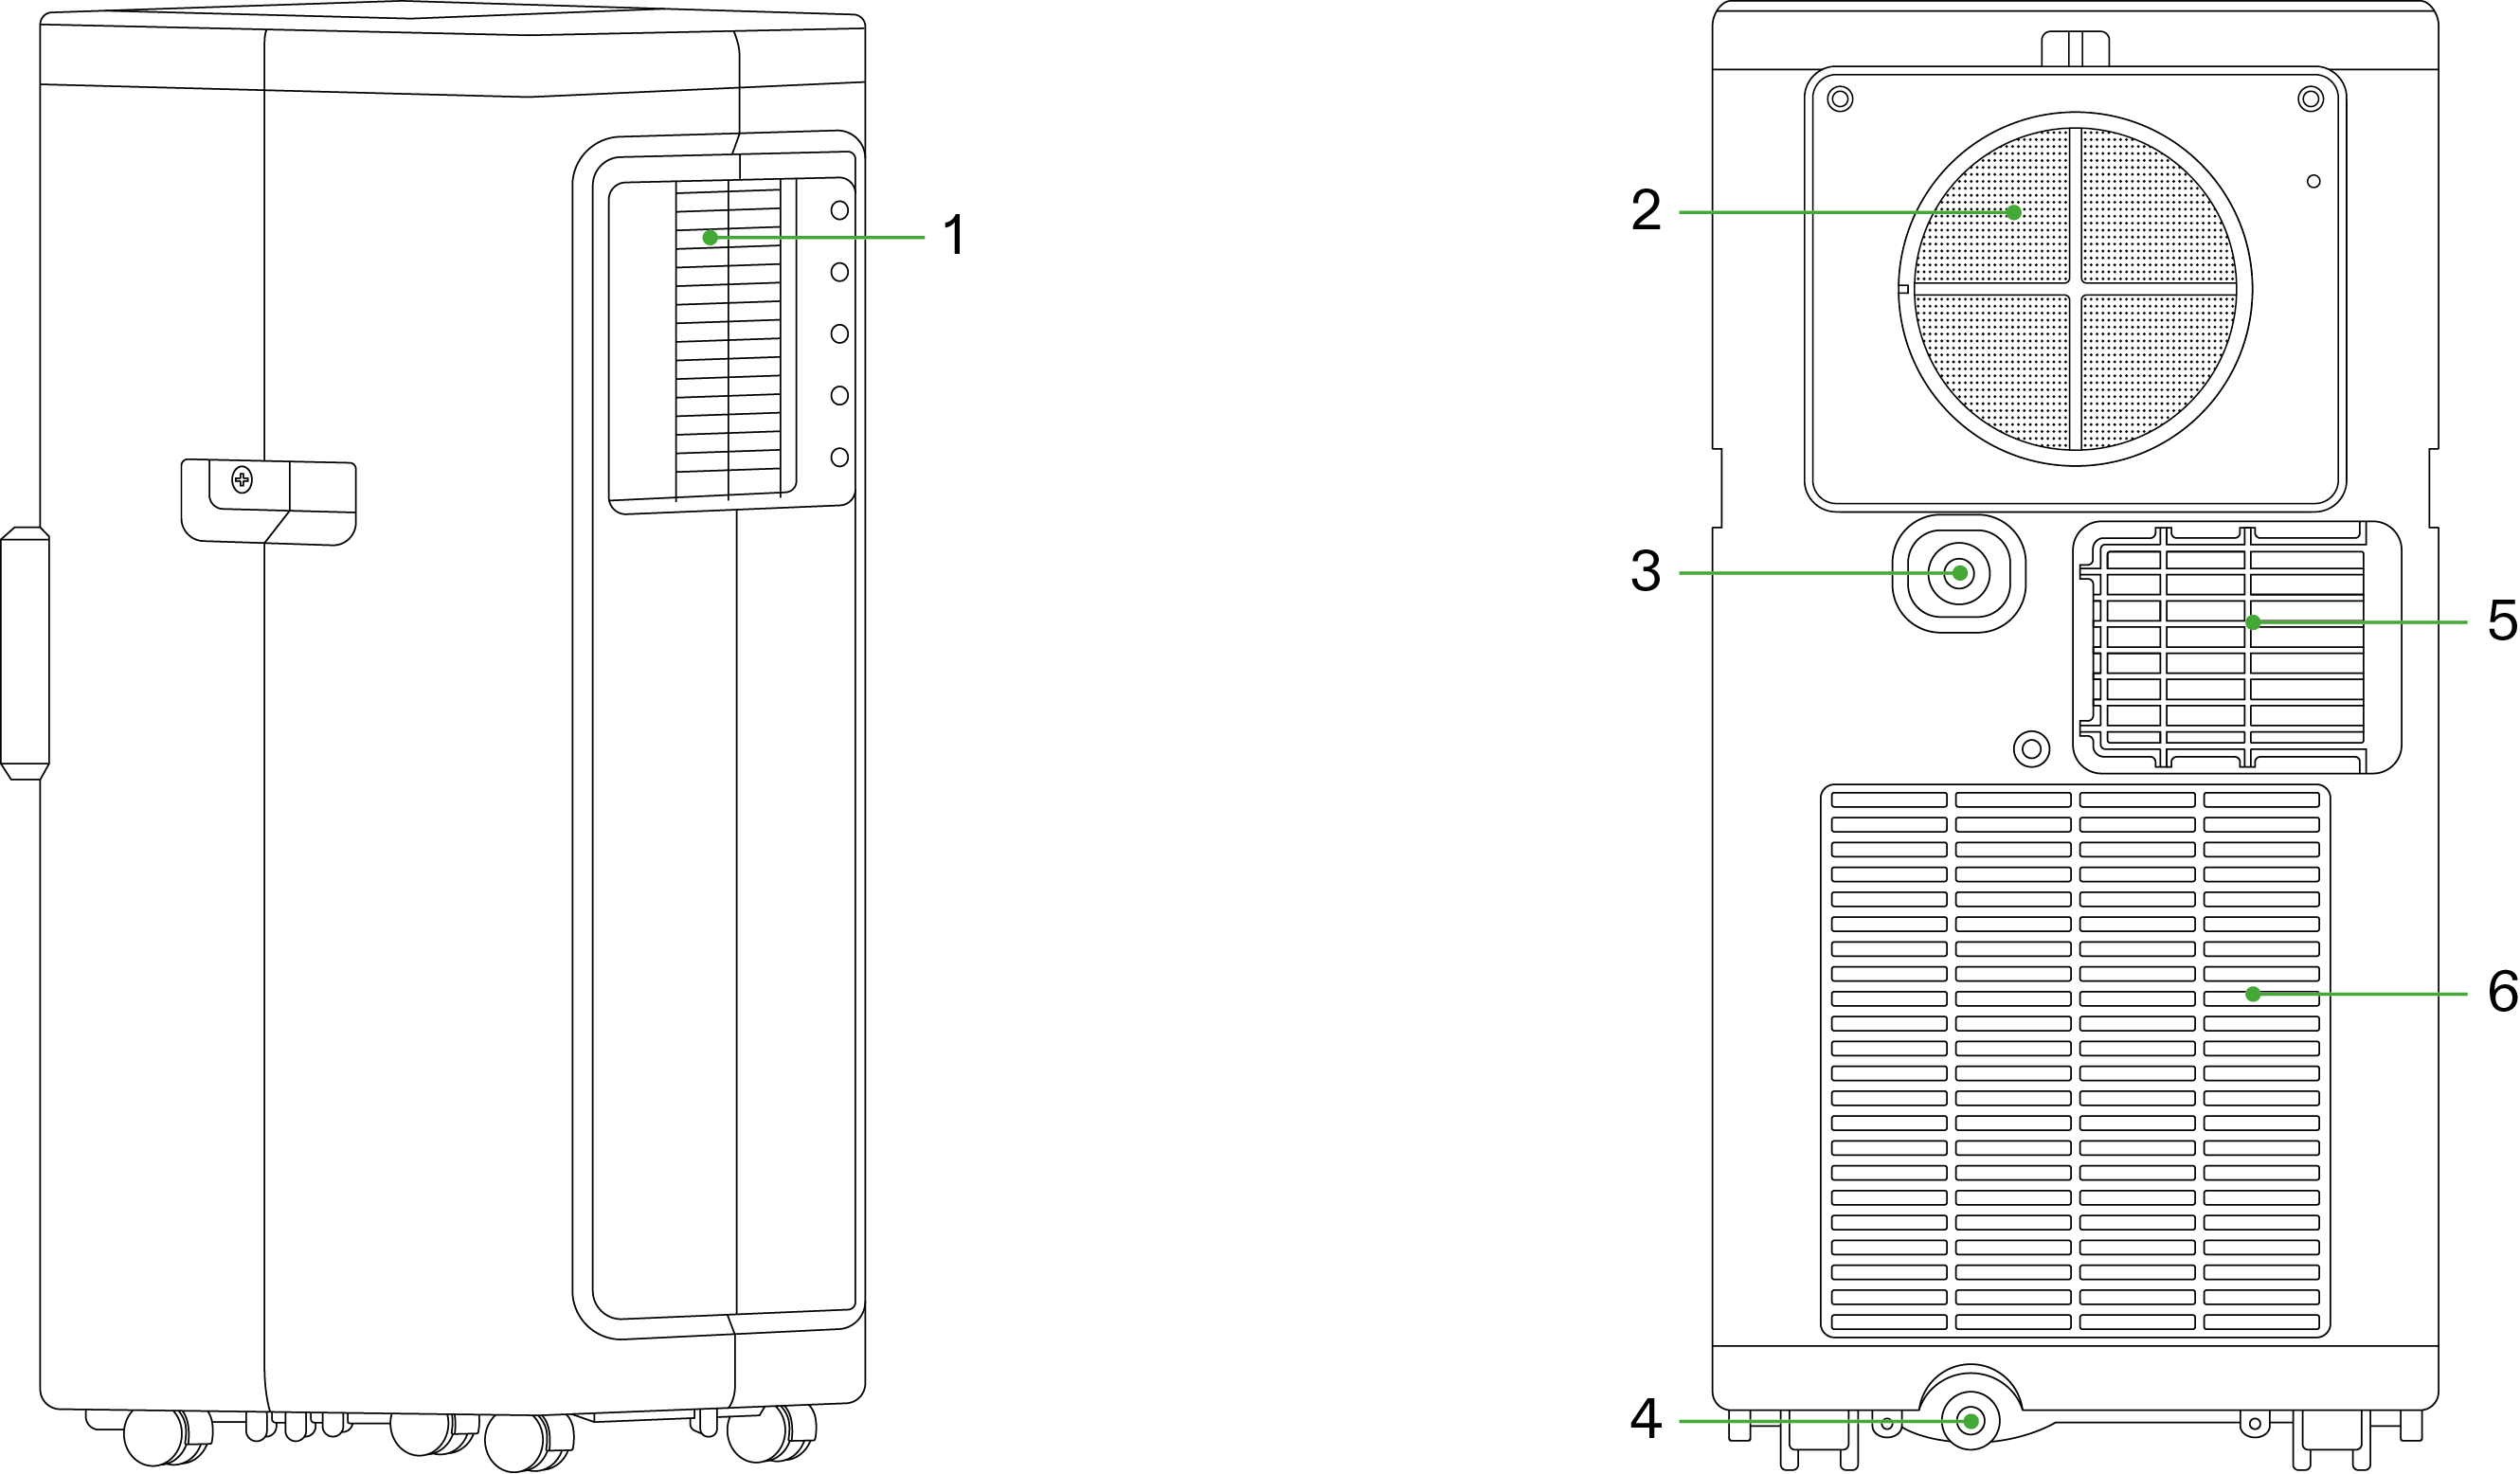
1 |
Verdampfer-Luftauslass |
4 |
Ersatz-Abflussloch |
2 |
Verdampfer-Lufteinlass |
5 |
Kondensator-Luftauslass |
3 |
Abflussloch |
6 |
Kondensator-Lufteinlass |
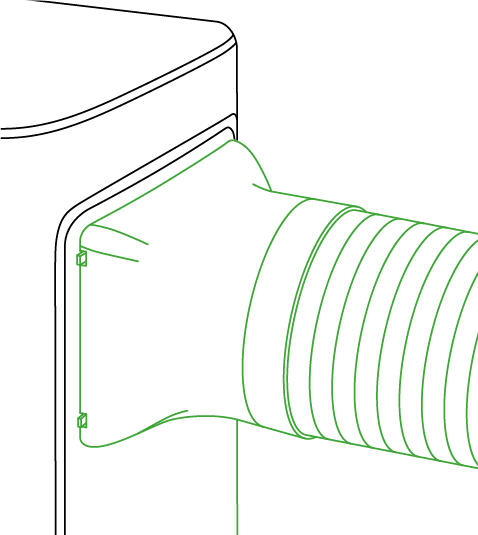
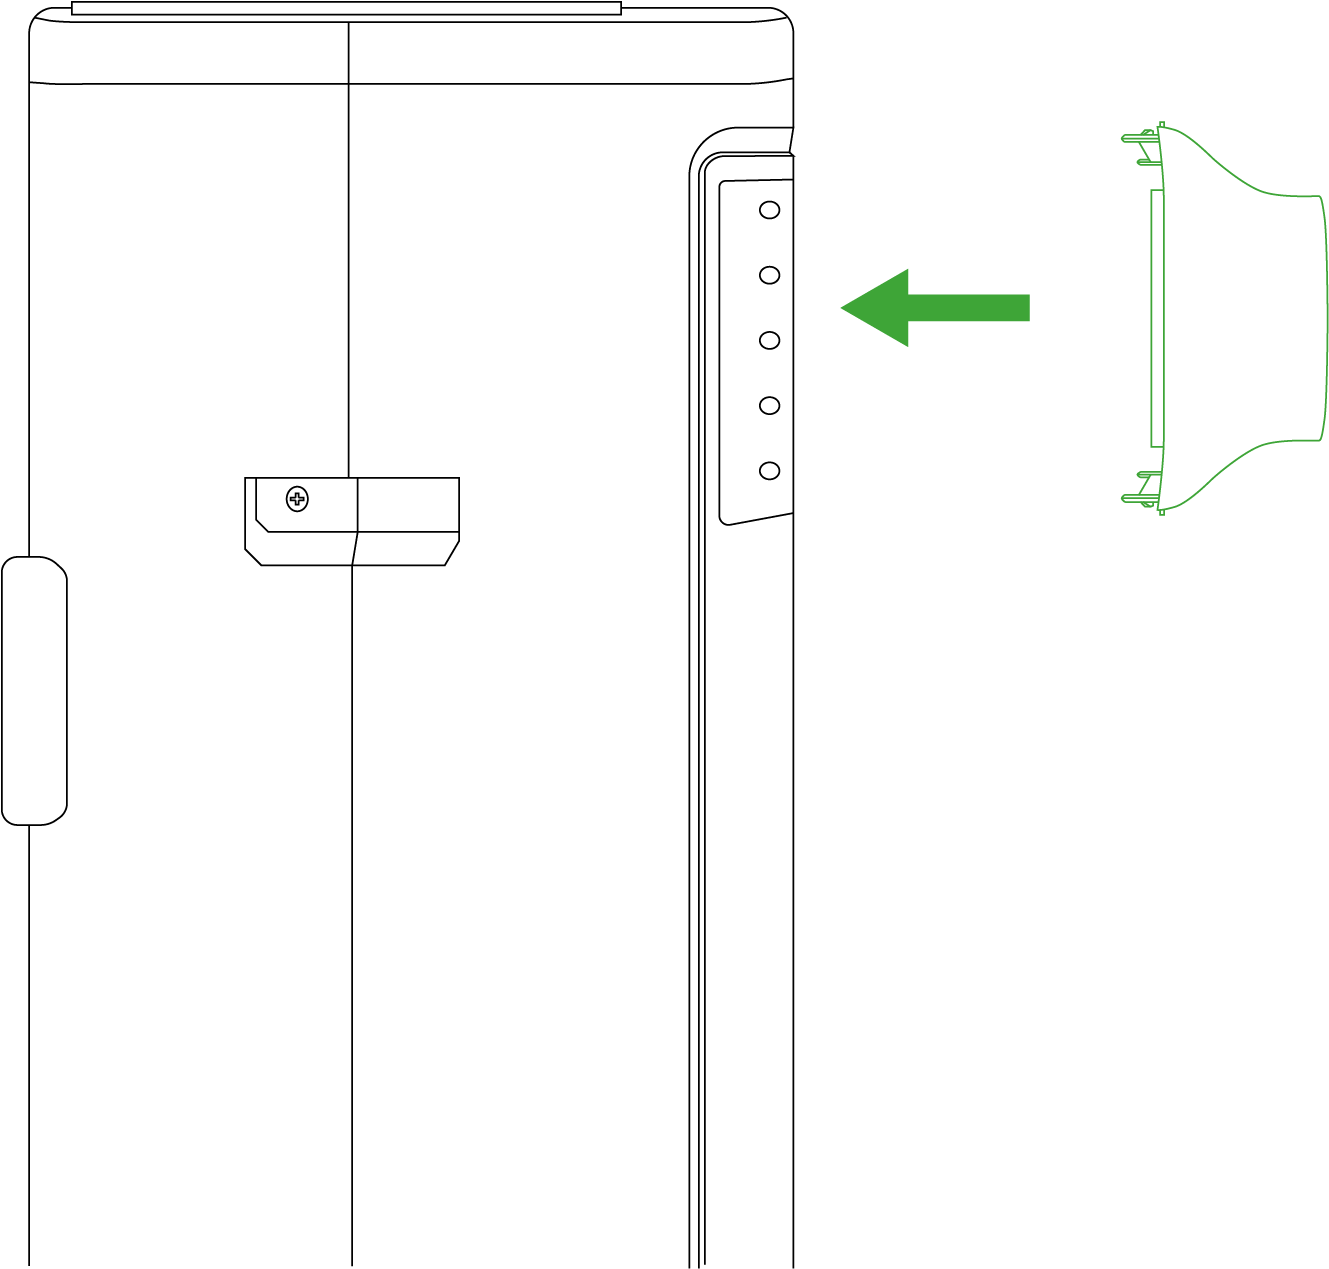
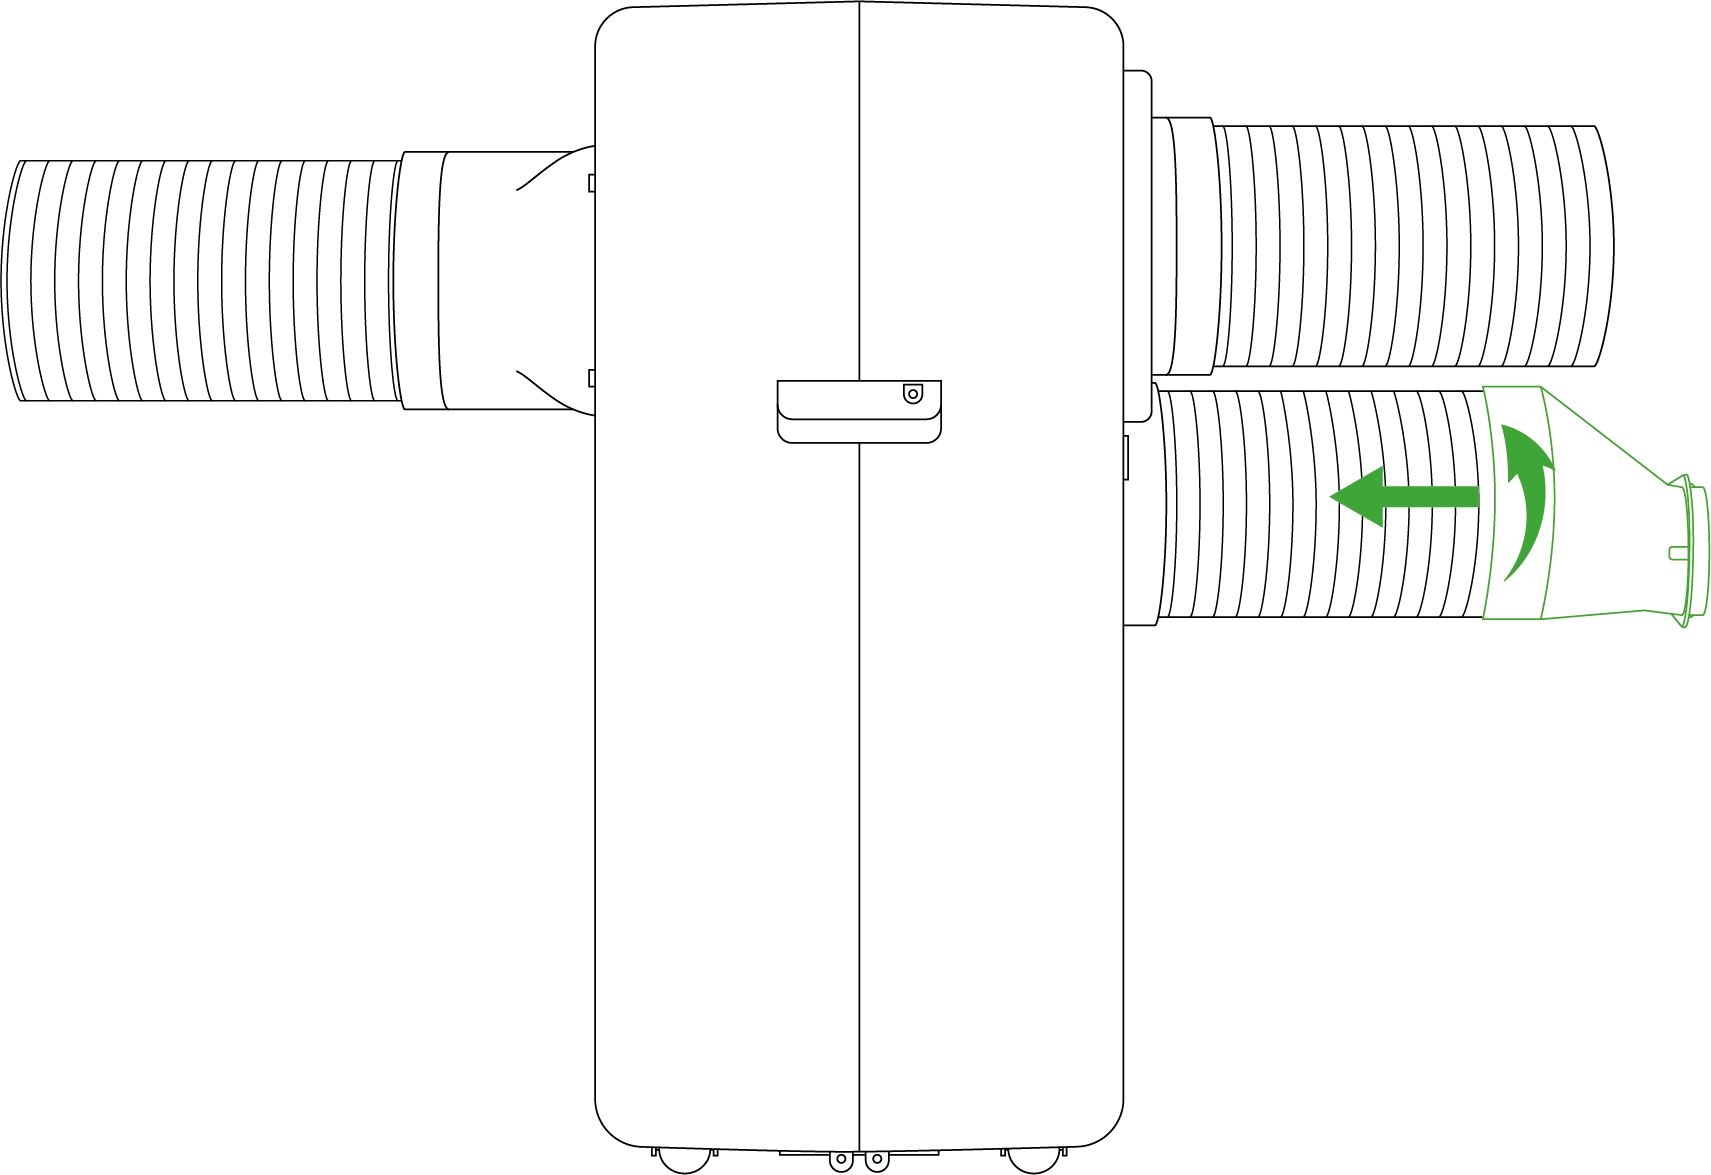
Installation von Zubehör
SCHRITT 1.1
Setzen Sie die Verdampfer-Luftauslasshaube in den Luftauslass des Verdampfers der Klimaanlage ein und achten Sie dabei auf die richtige Ausrichtung oben und unten an der Haube.
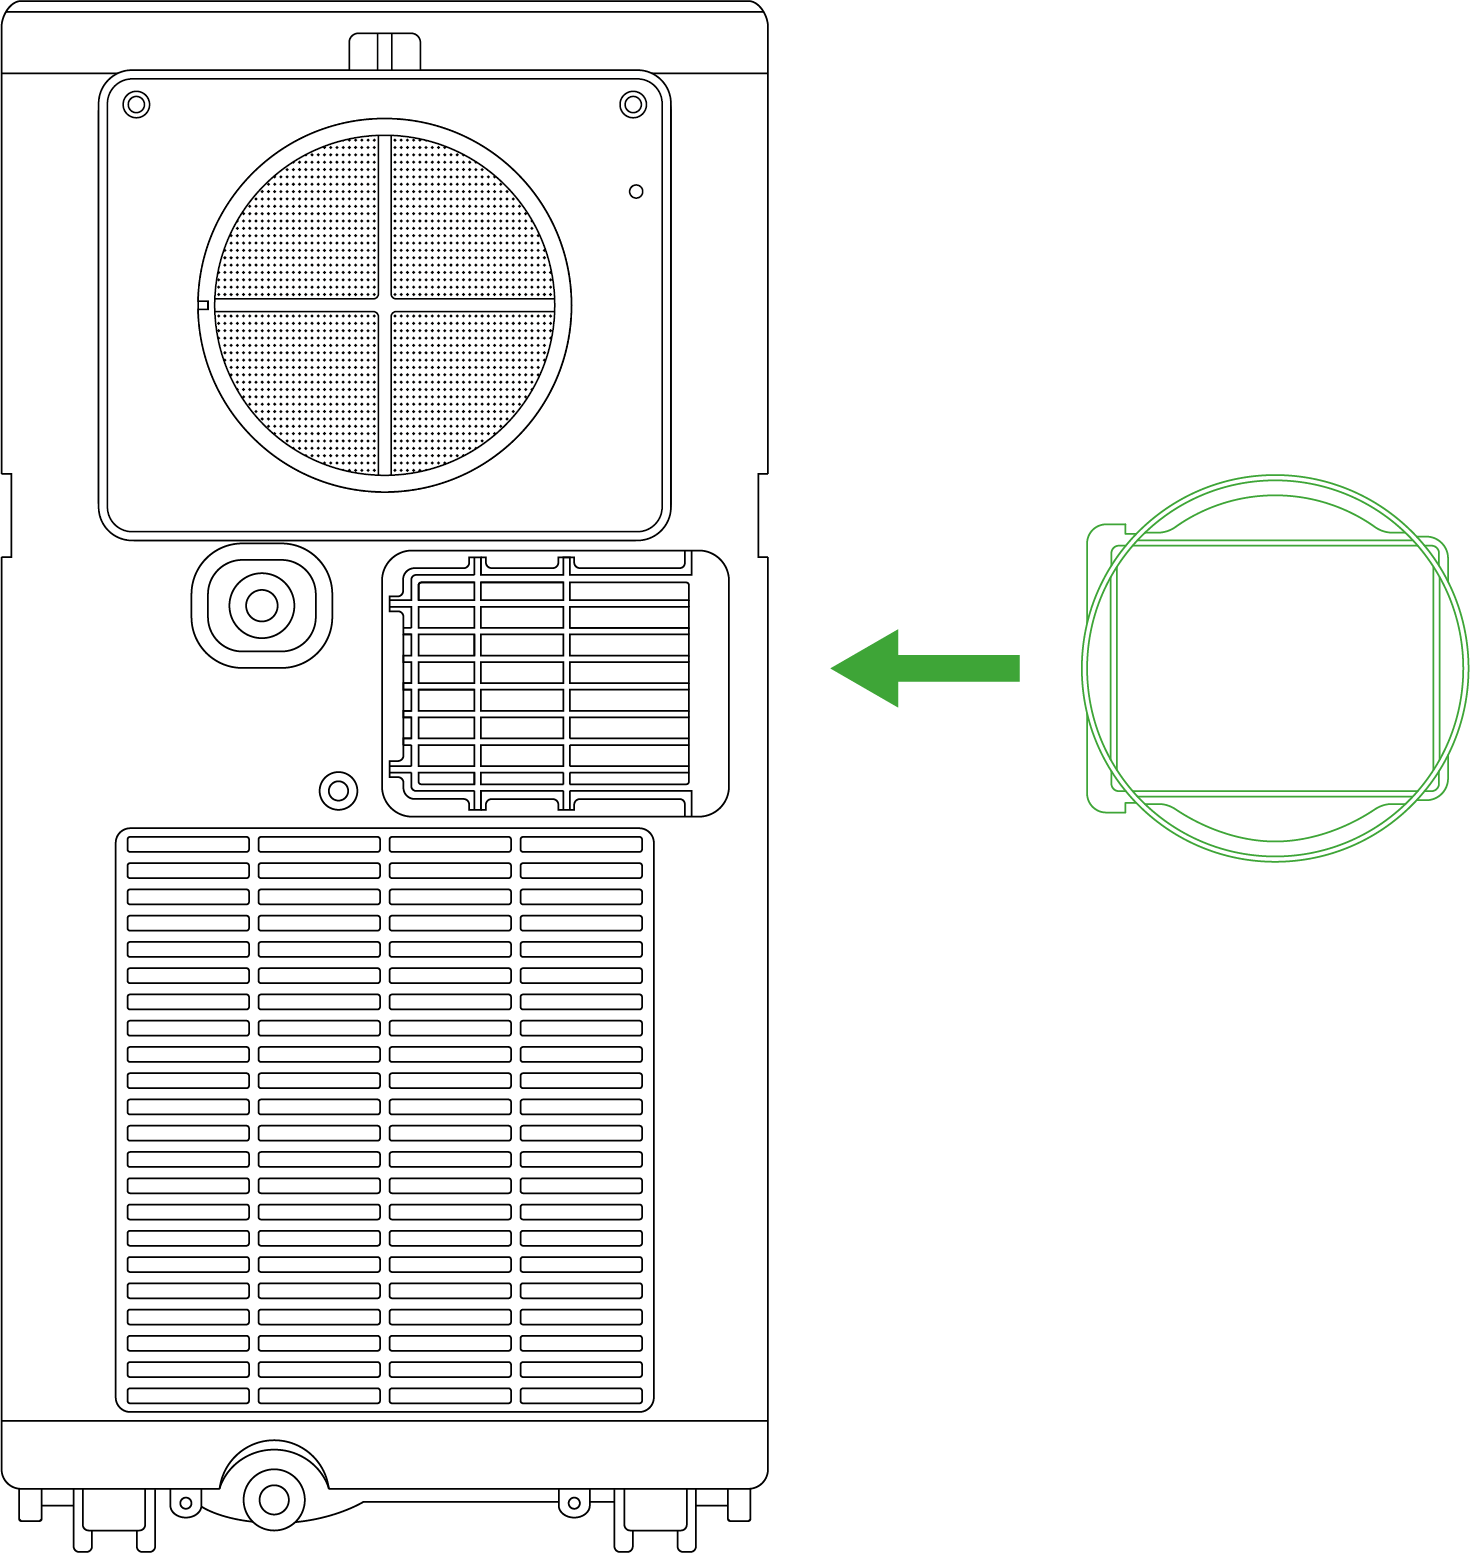
SCHRITT 1.2
Setzen Sie den Kondensatoranschluss horizontal in den Kondensator-Luftauslass ein.
SCHRITT 2.1
Nehmen Sie ein Stück Abluftkanal (2m mit Adapter) und verbinden Sie es mit der Verdampfer-Luftauslasshaube, dann drehen Sie es gegen den Uhrzeigersinn fest.
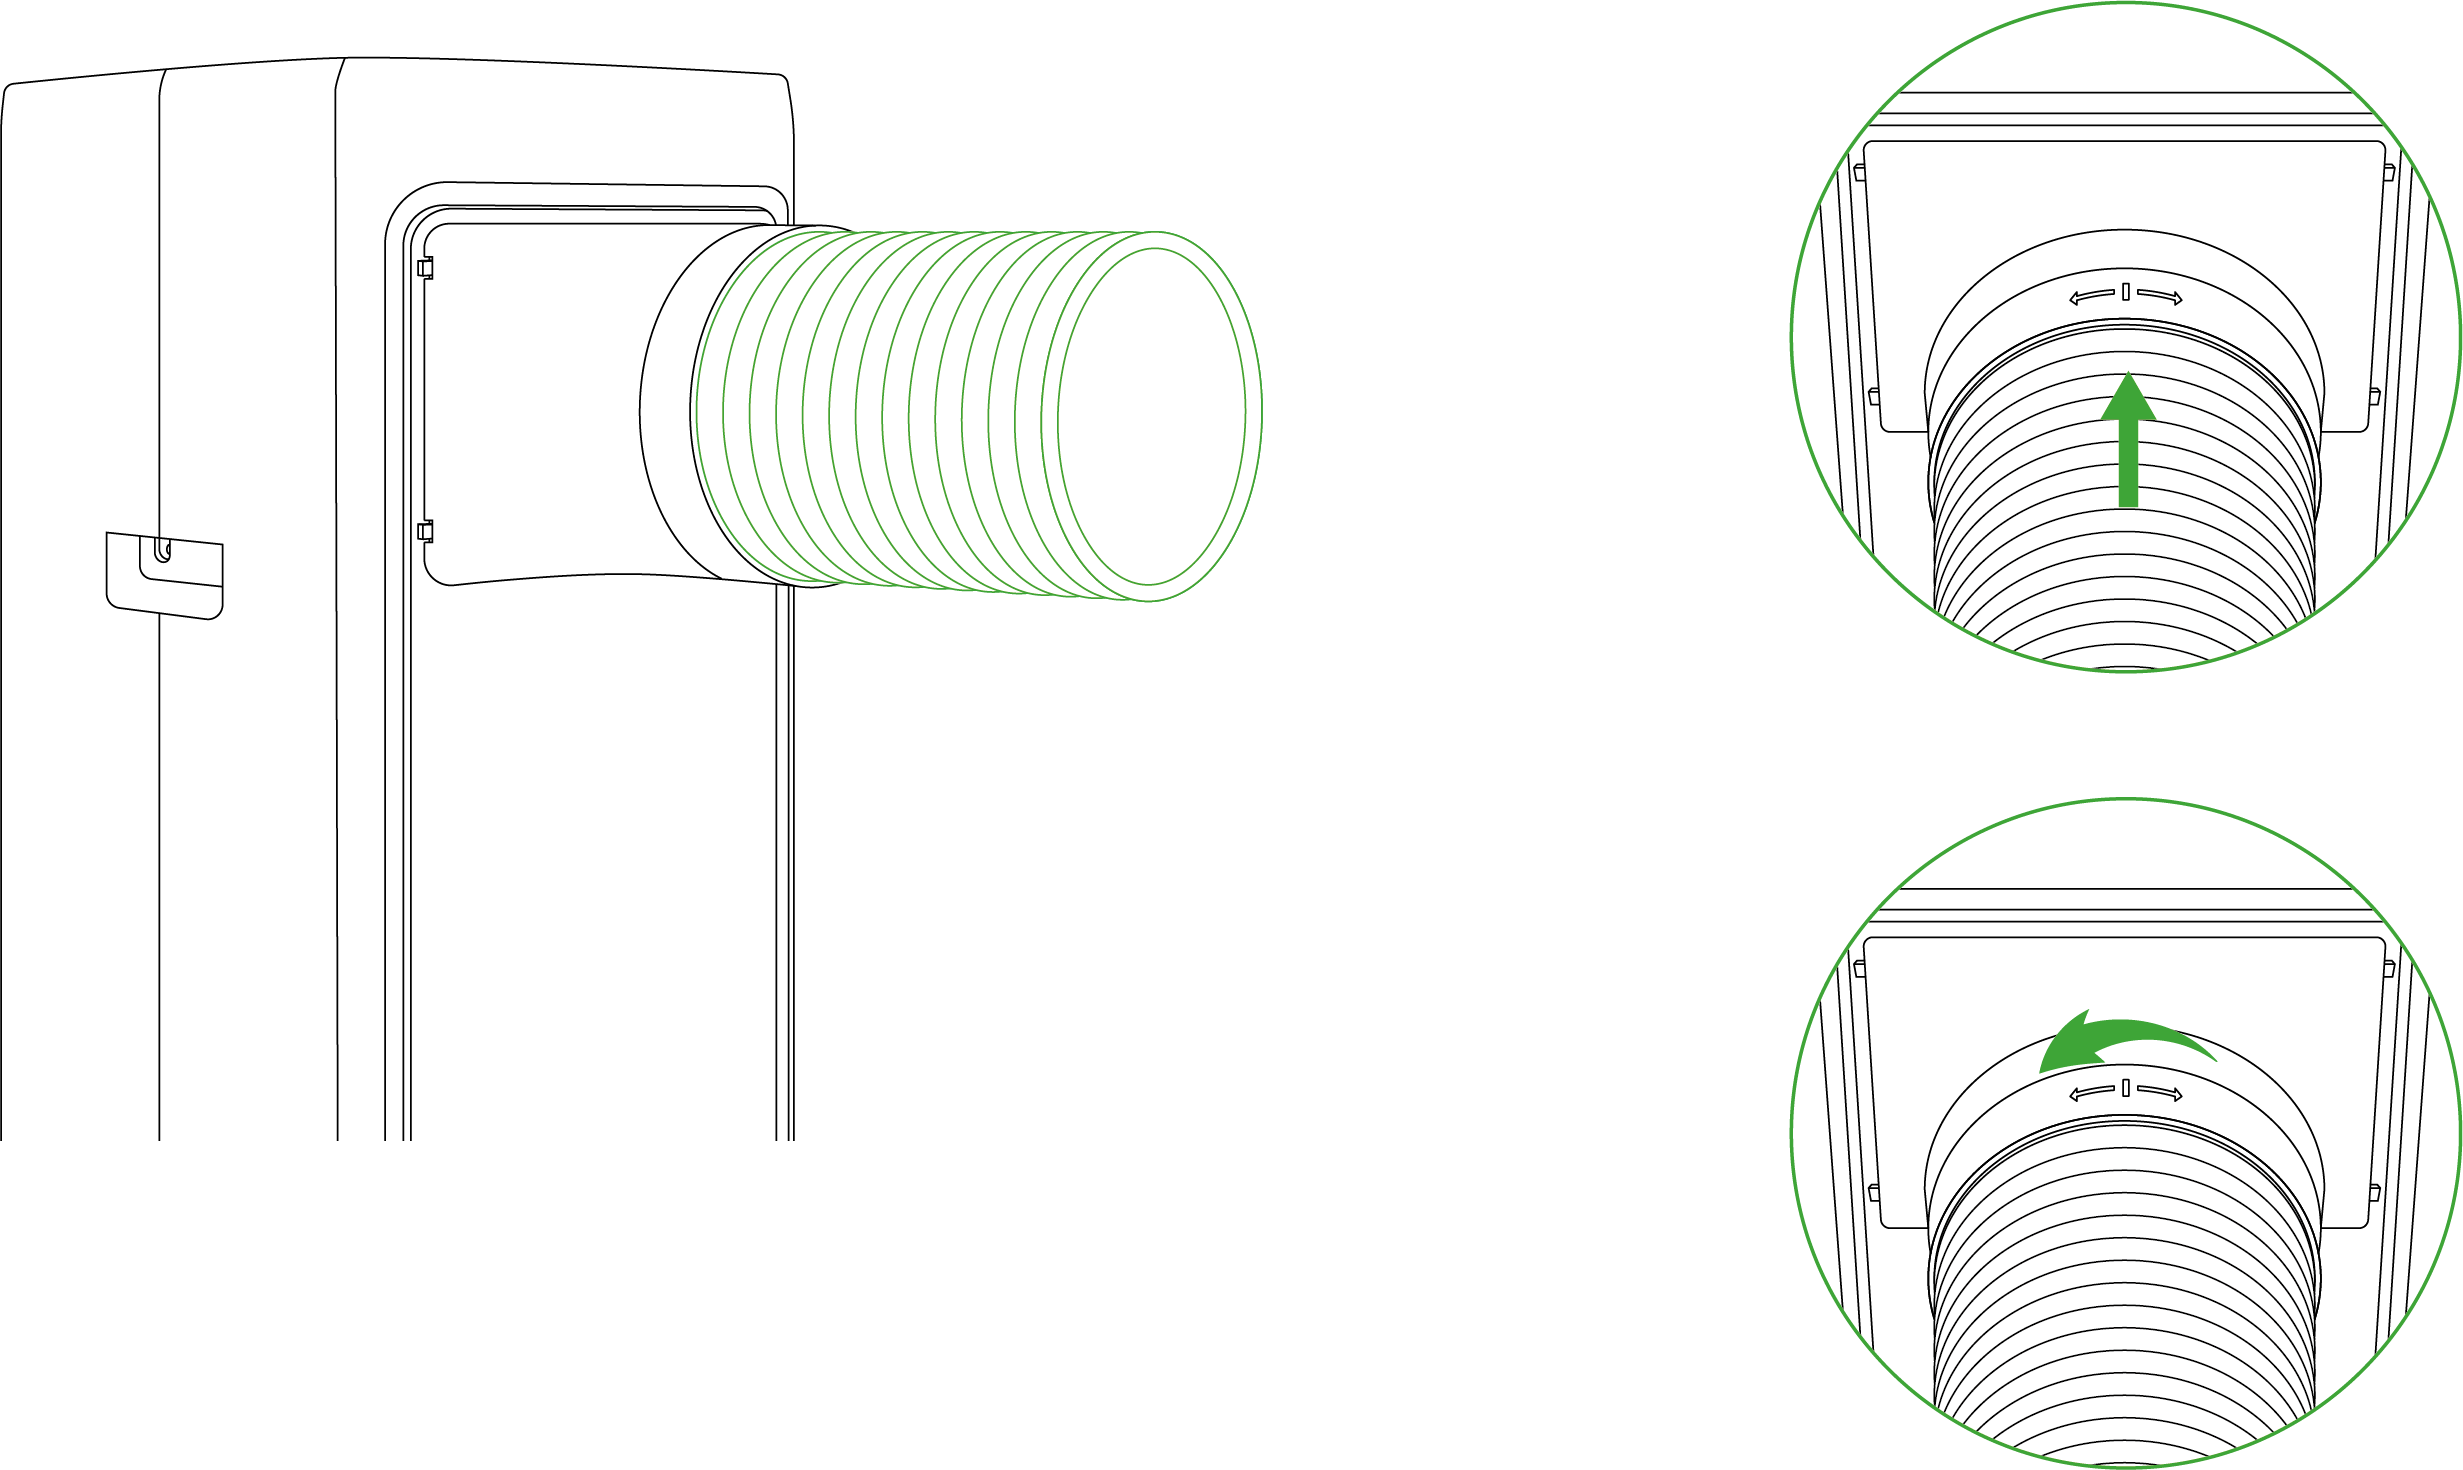
SCHRITT 2.2
Nehmen Sie das andere Stück Abluftkanal (2m mit Adapter) und verbinden Sie es mit der Verdampfer-Lufteinlasshaube, dann drehen Sie es gegen den Uhrzeigersinn fest.
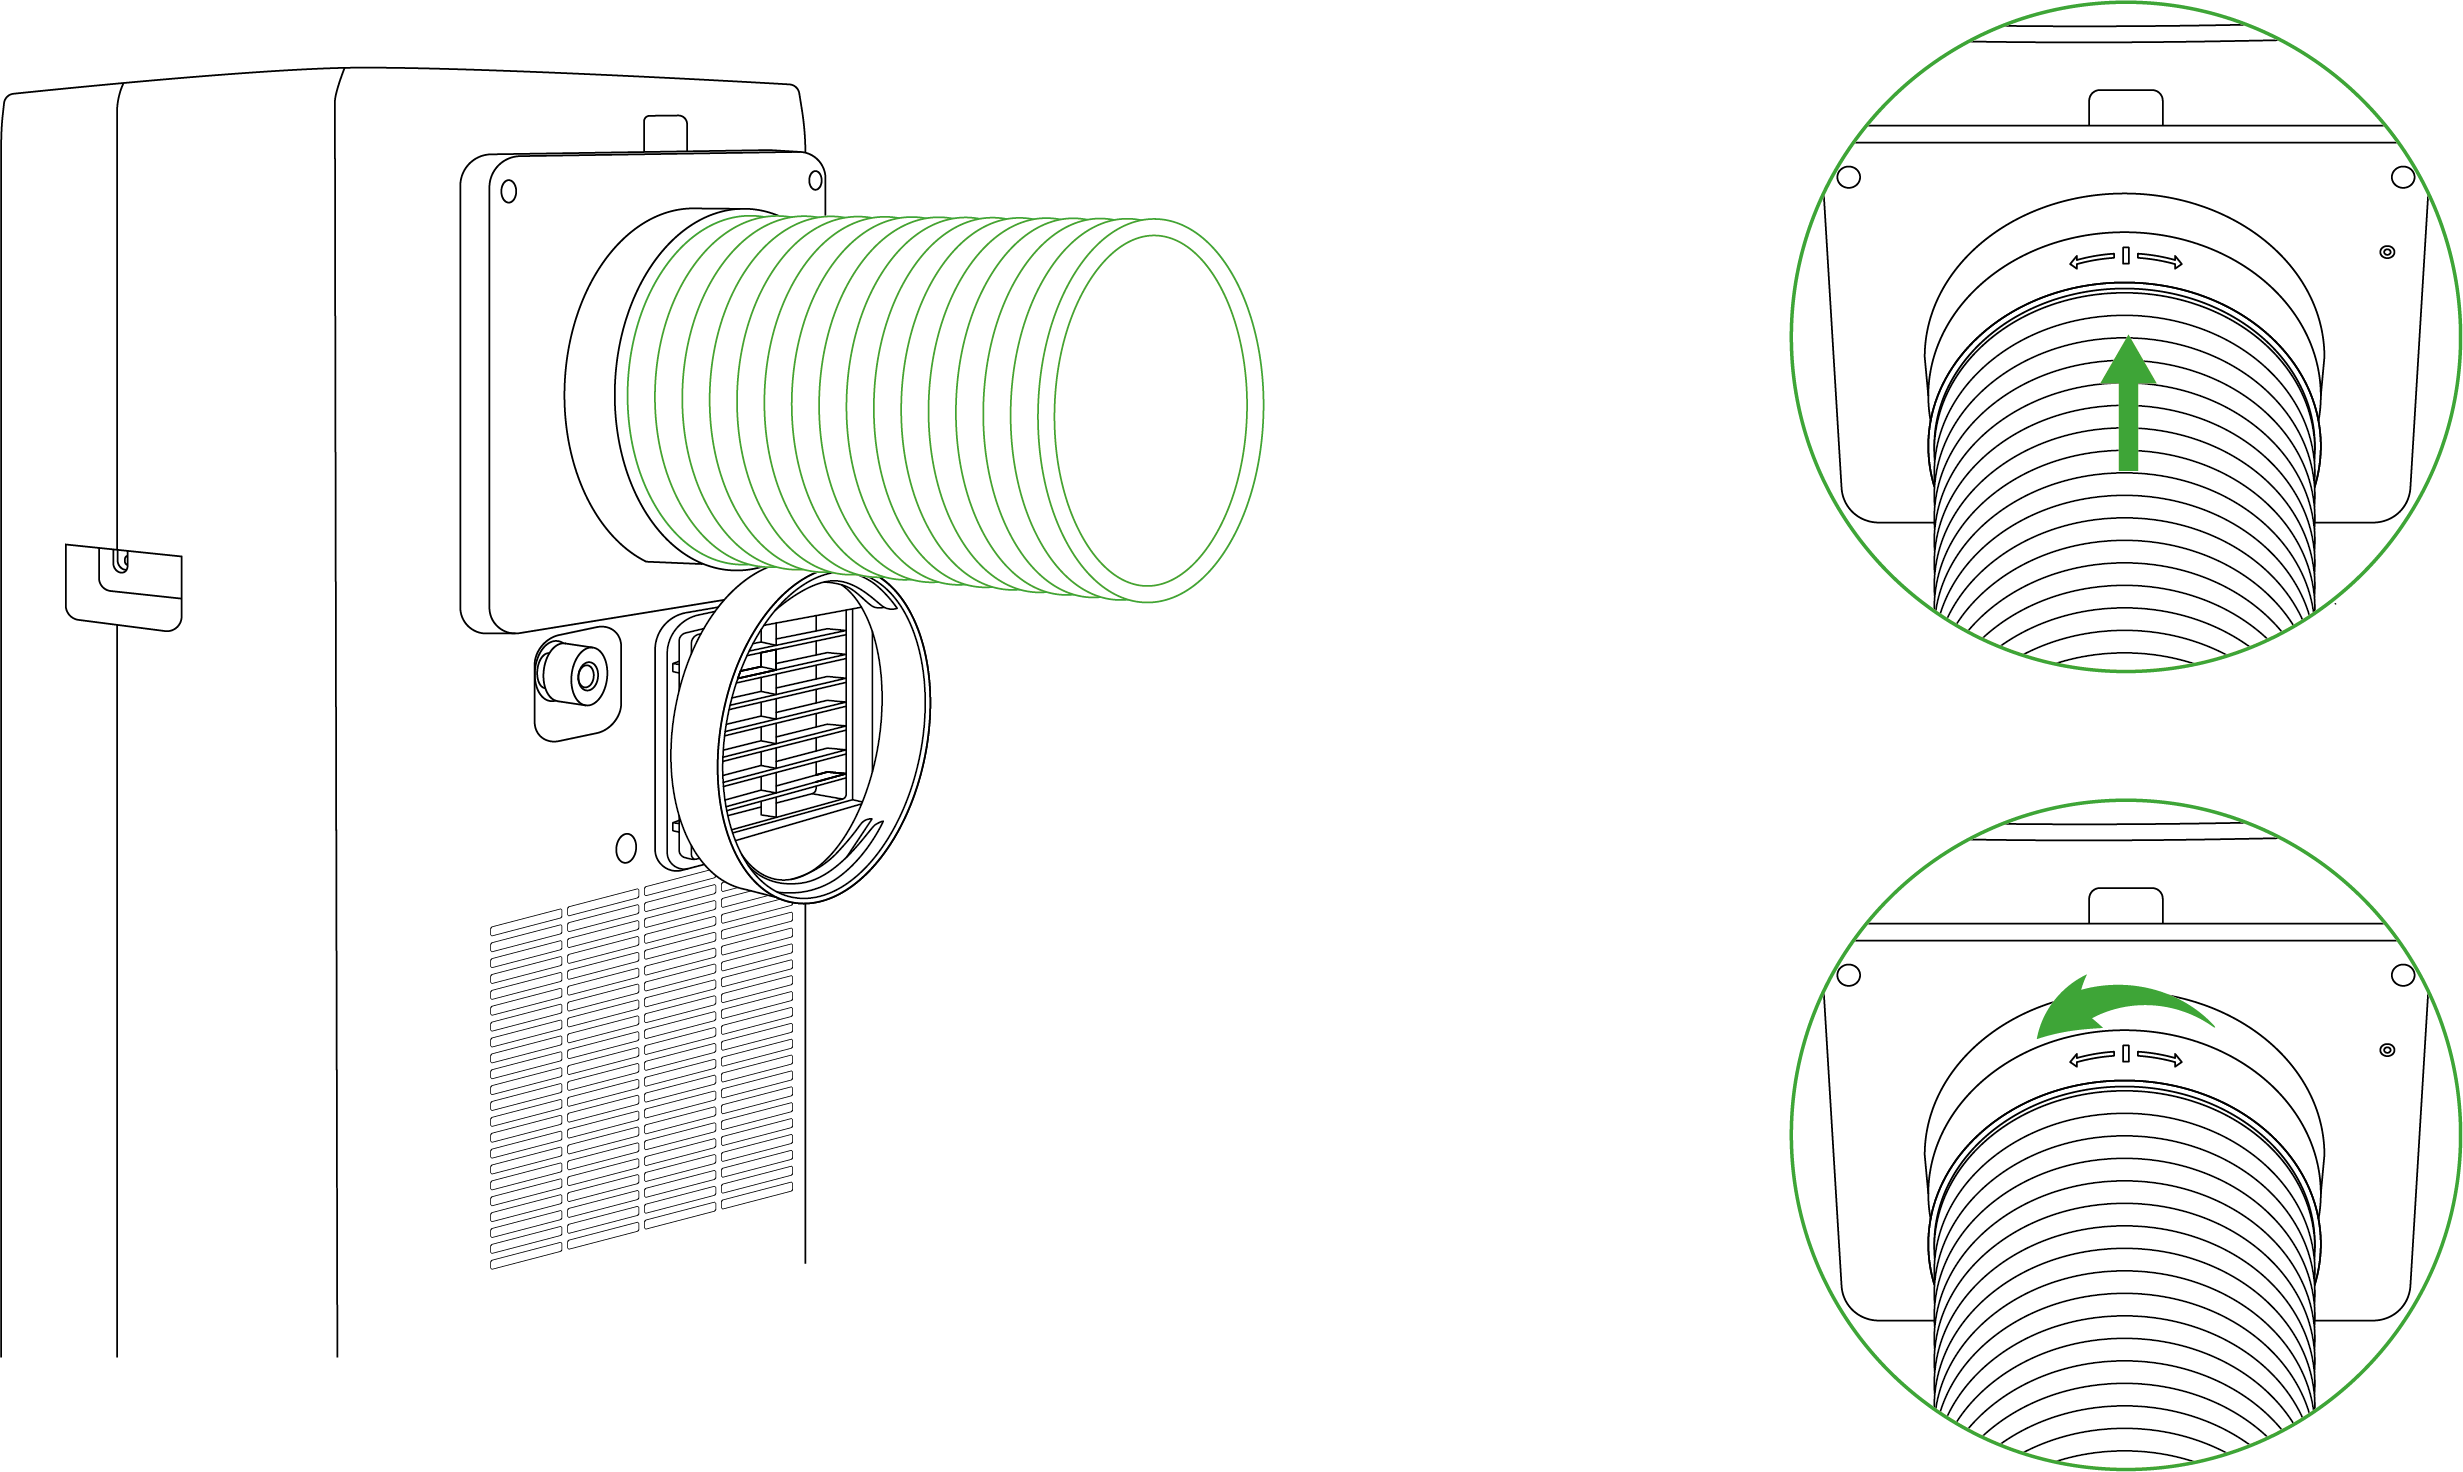
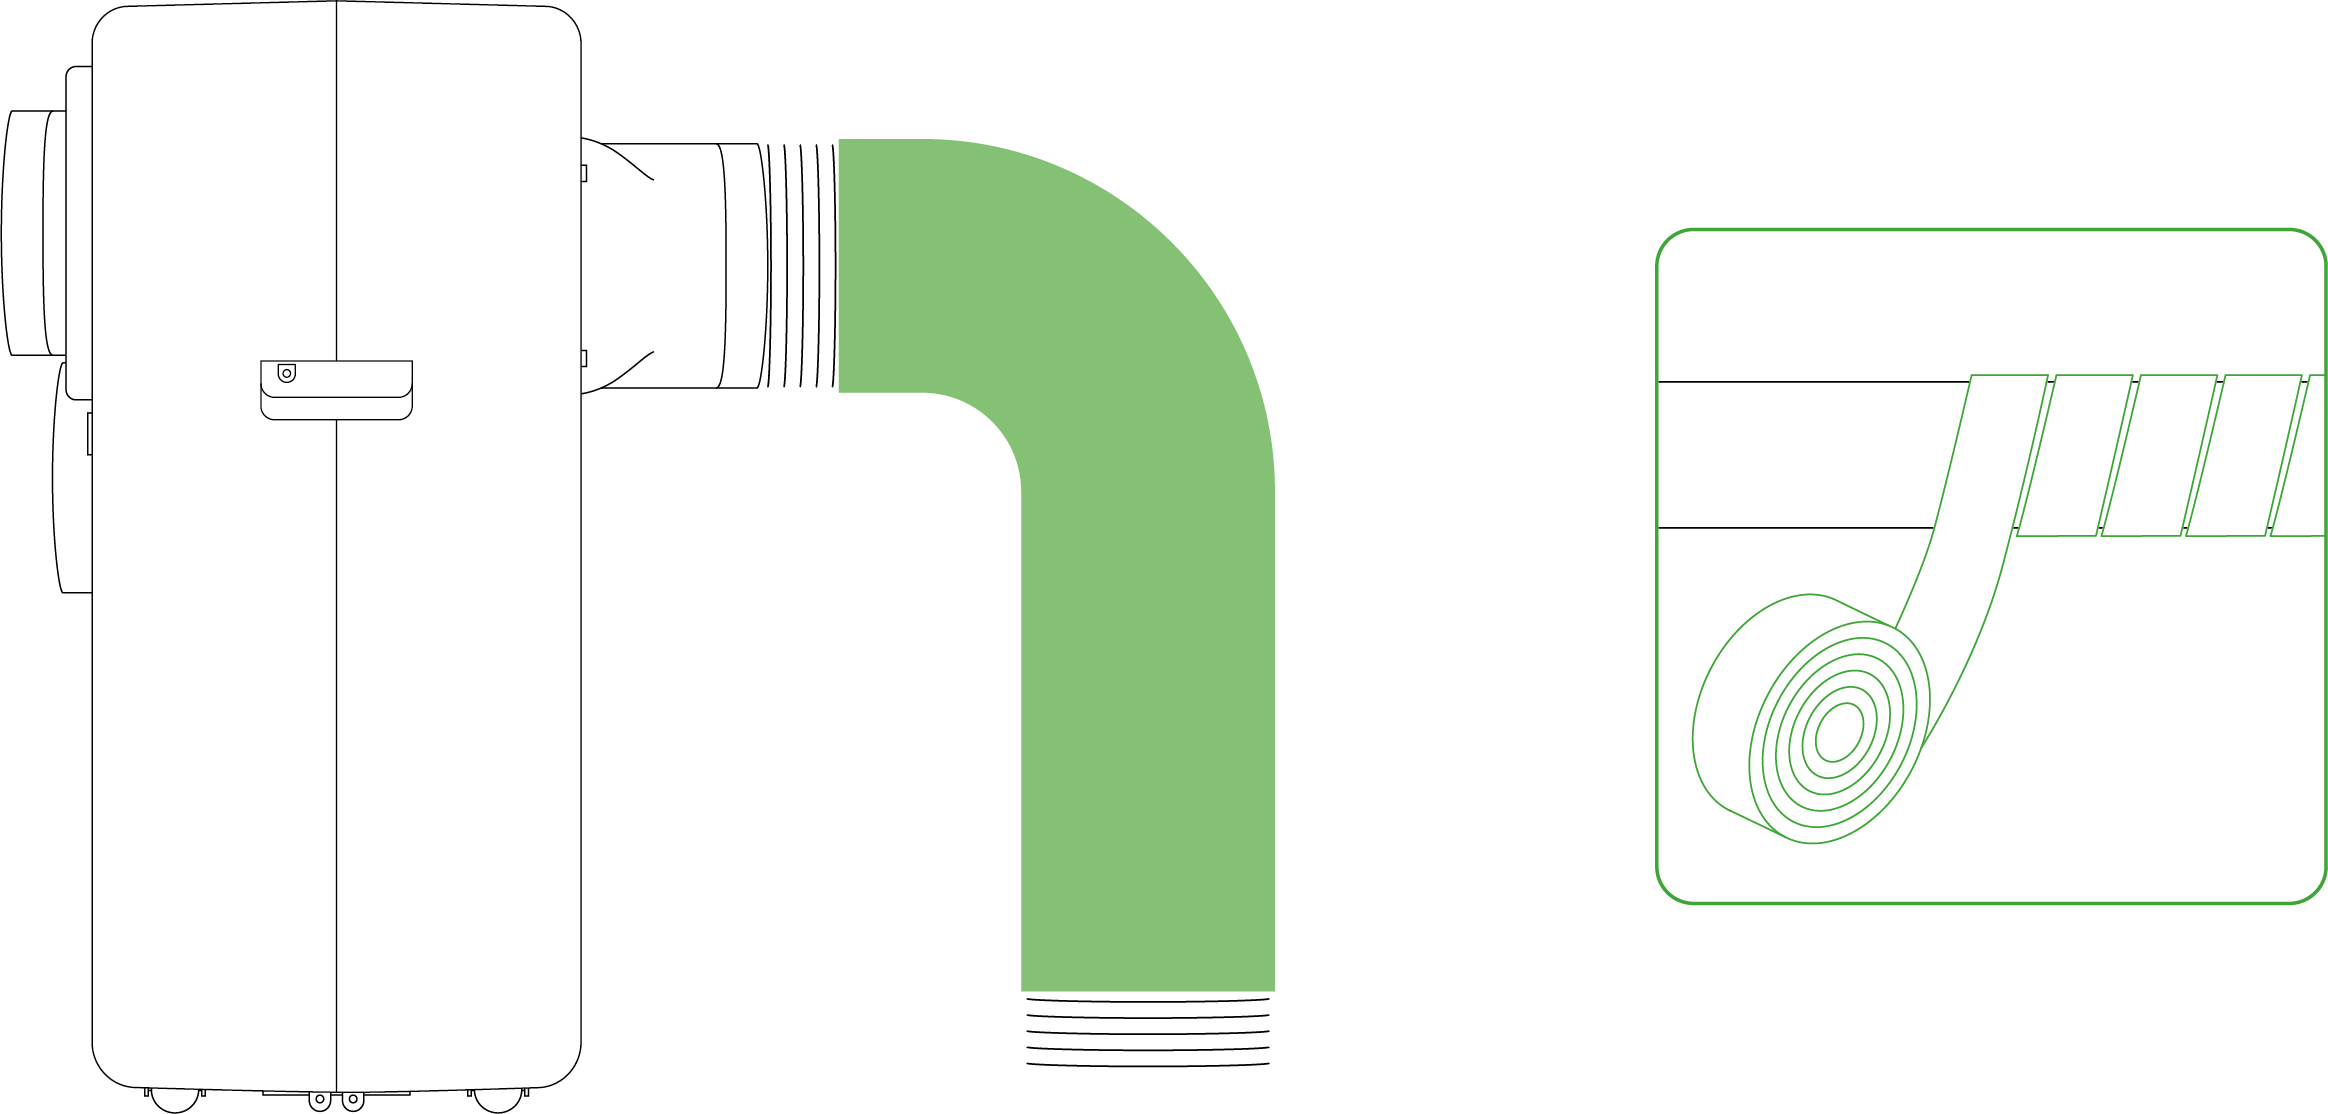
SCHRITT 2.3
Nehmen Sie einen Abluftkanal, ziehen Sie einen Teil vom Ende des Kanals heraus und verschrauben Sie ihn im Uhrzeigersinn mit dem Kondensator-Auslassadapter.
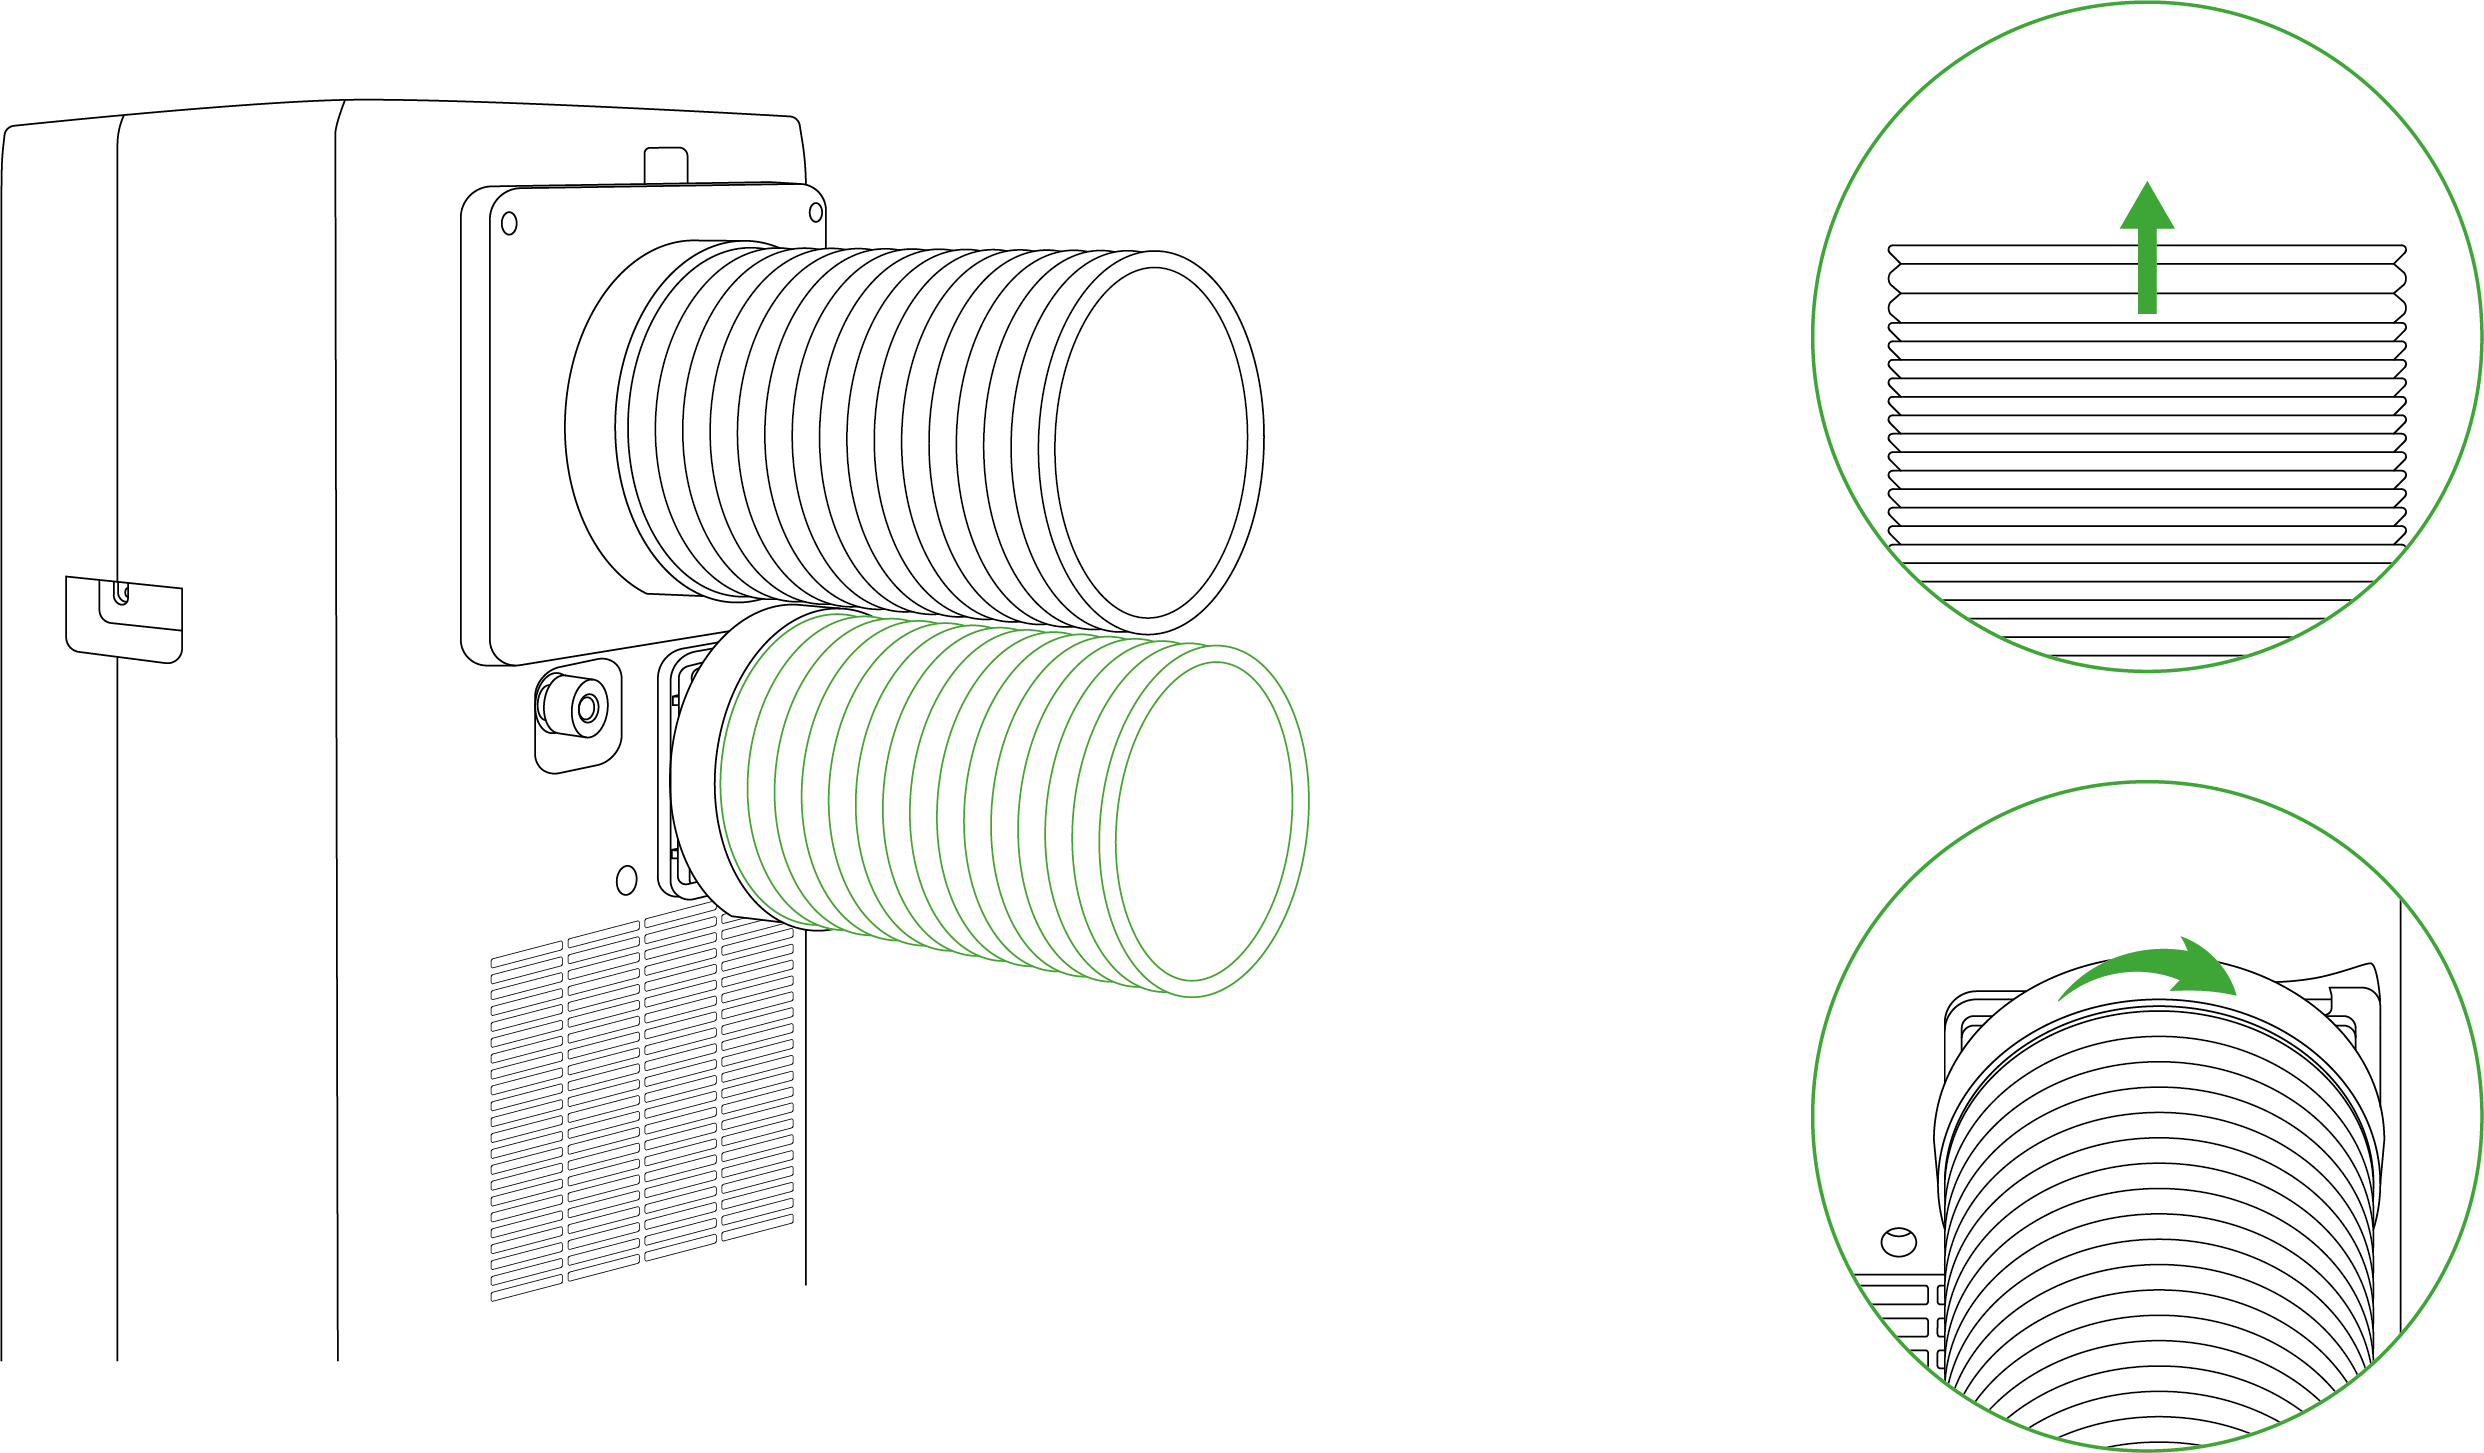
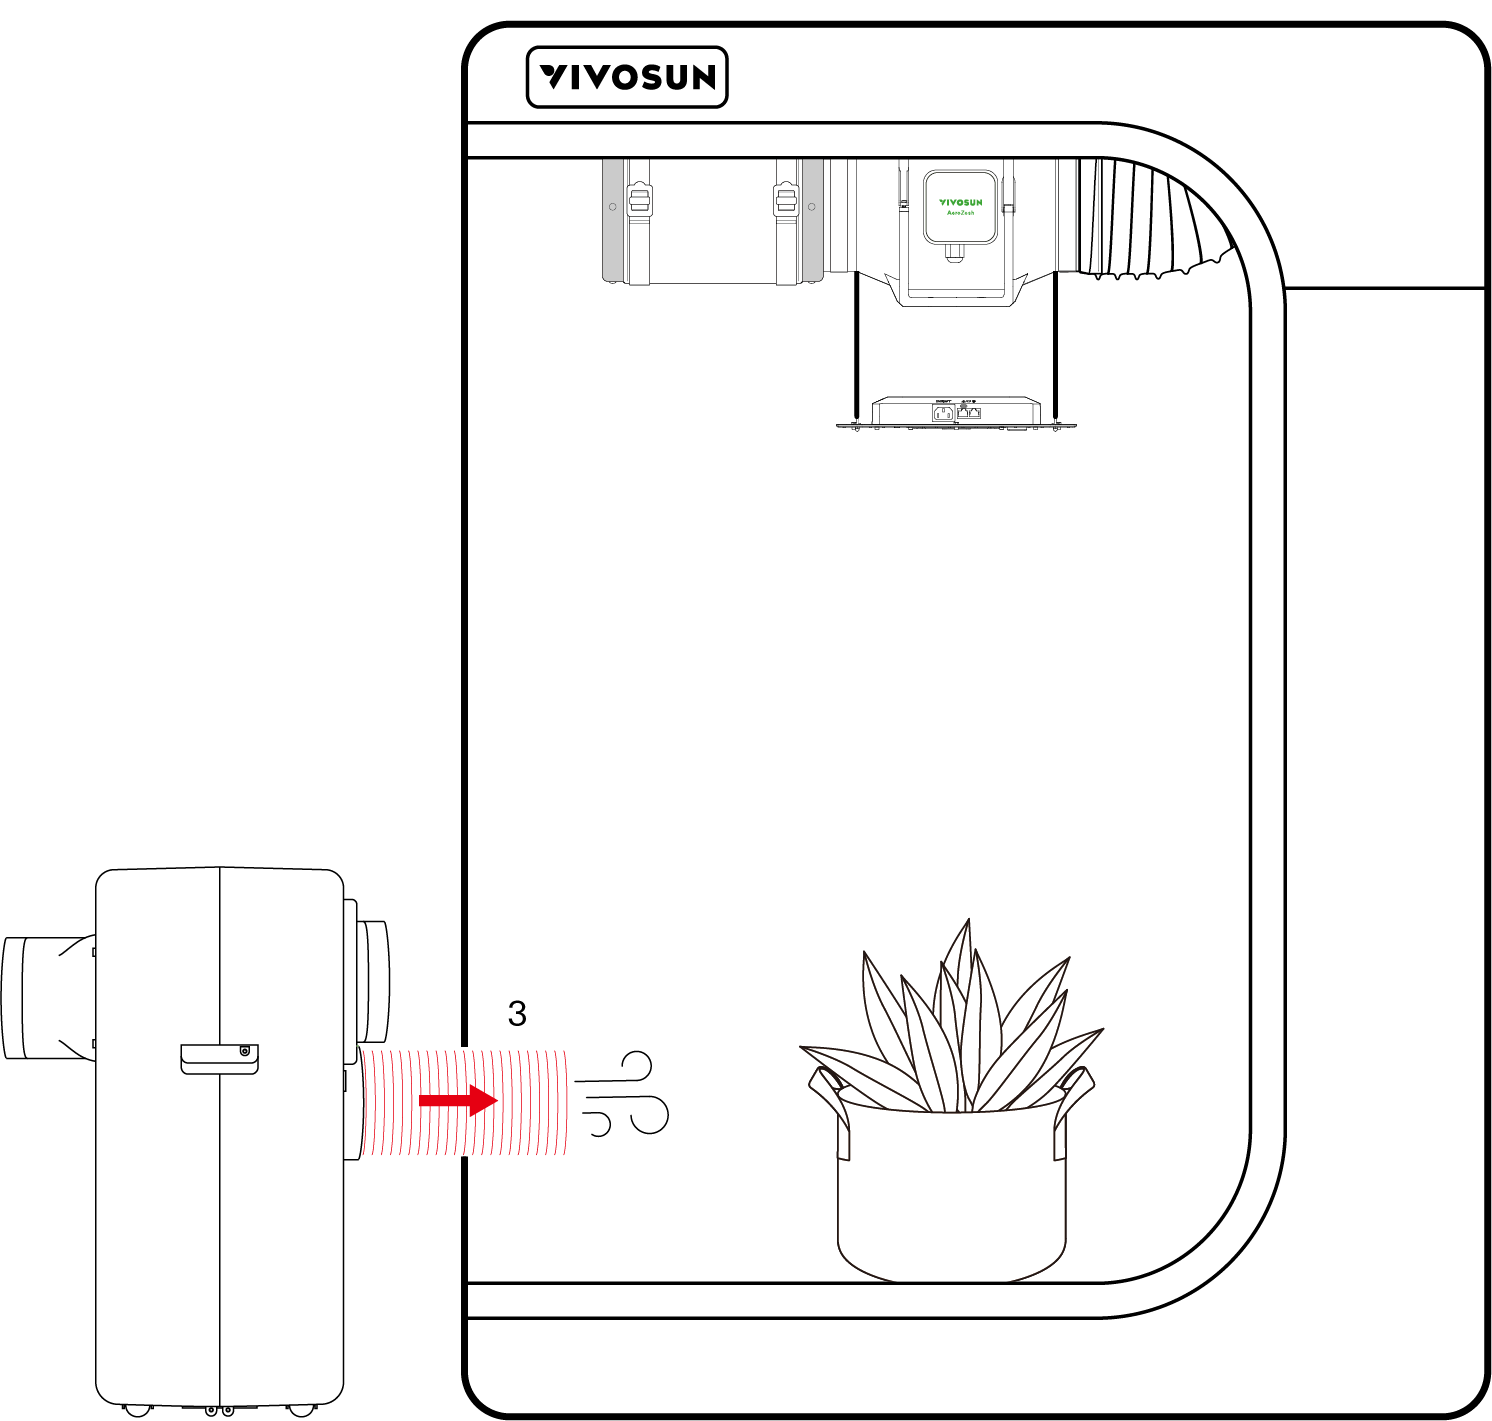
SCHRITT 3
Stellen Sie sicher, dass der Adapter, die Hauben und die Kanäle sicher installiert und ordnungsgemäß befestigt sind.
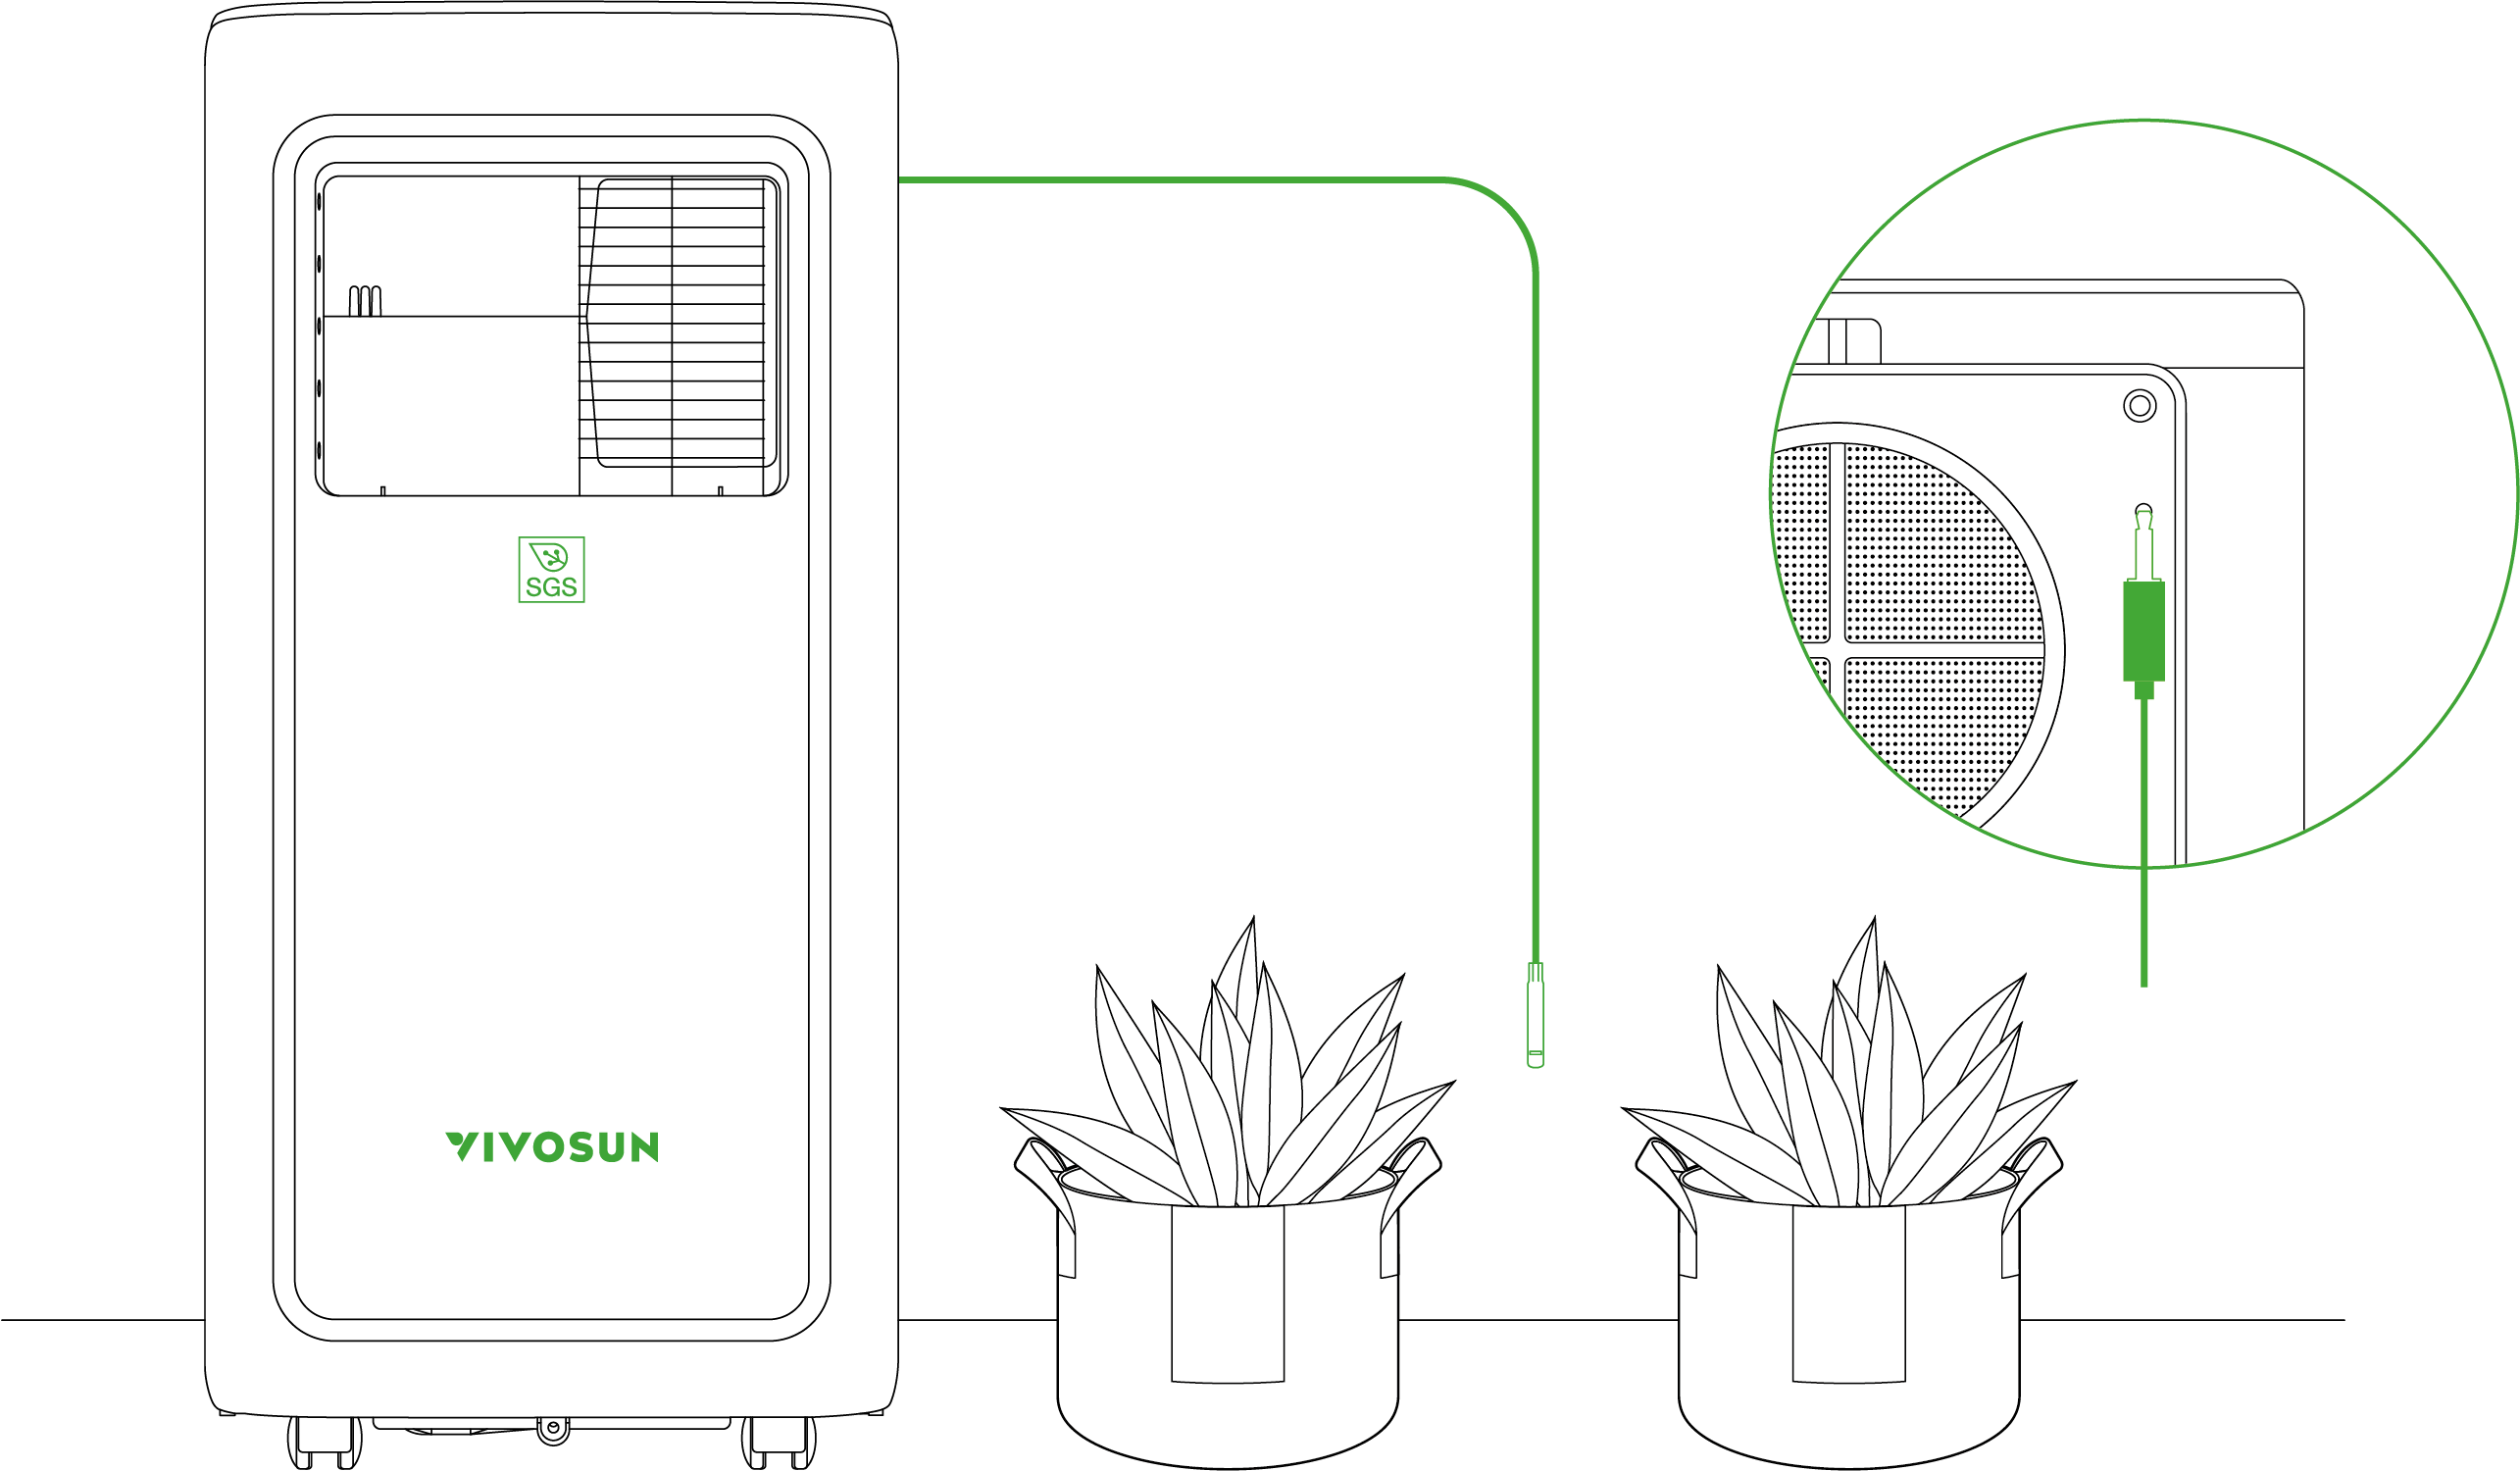
Installation der Sonde
SCHRITT 1
Stecken Sie die Temperatur- und Feuchtigkeitssonde in die 2.5mm Buchse auf der rechten Seite der Verdampfer-Lufteinlasshaube und stellen Sie sicher, dass sie sicher sitzt.
Hinweis: Wenn die Sonde nicht angeschlossen ist, zeigt der Bildschirm „–“ an.
SCHRITT 2
Platzieren Sie die Sonde im Zielbereich und sichern Sie sie ab.
Hinweis: Es wird empfohlen, den Sensor in einer Höhe von 2 bis 4 Zoll über der Krone zu positionieren.
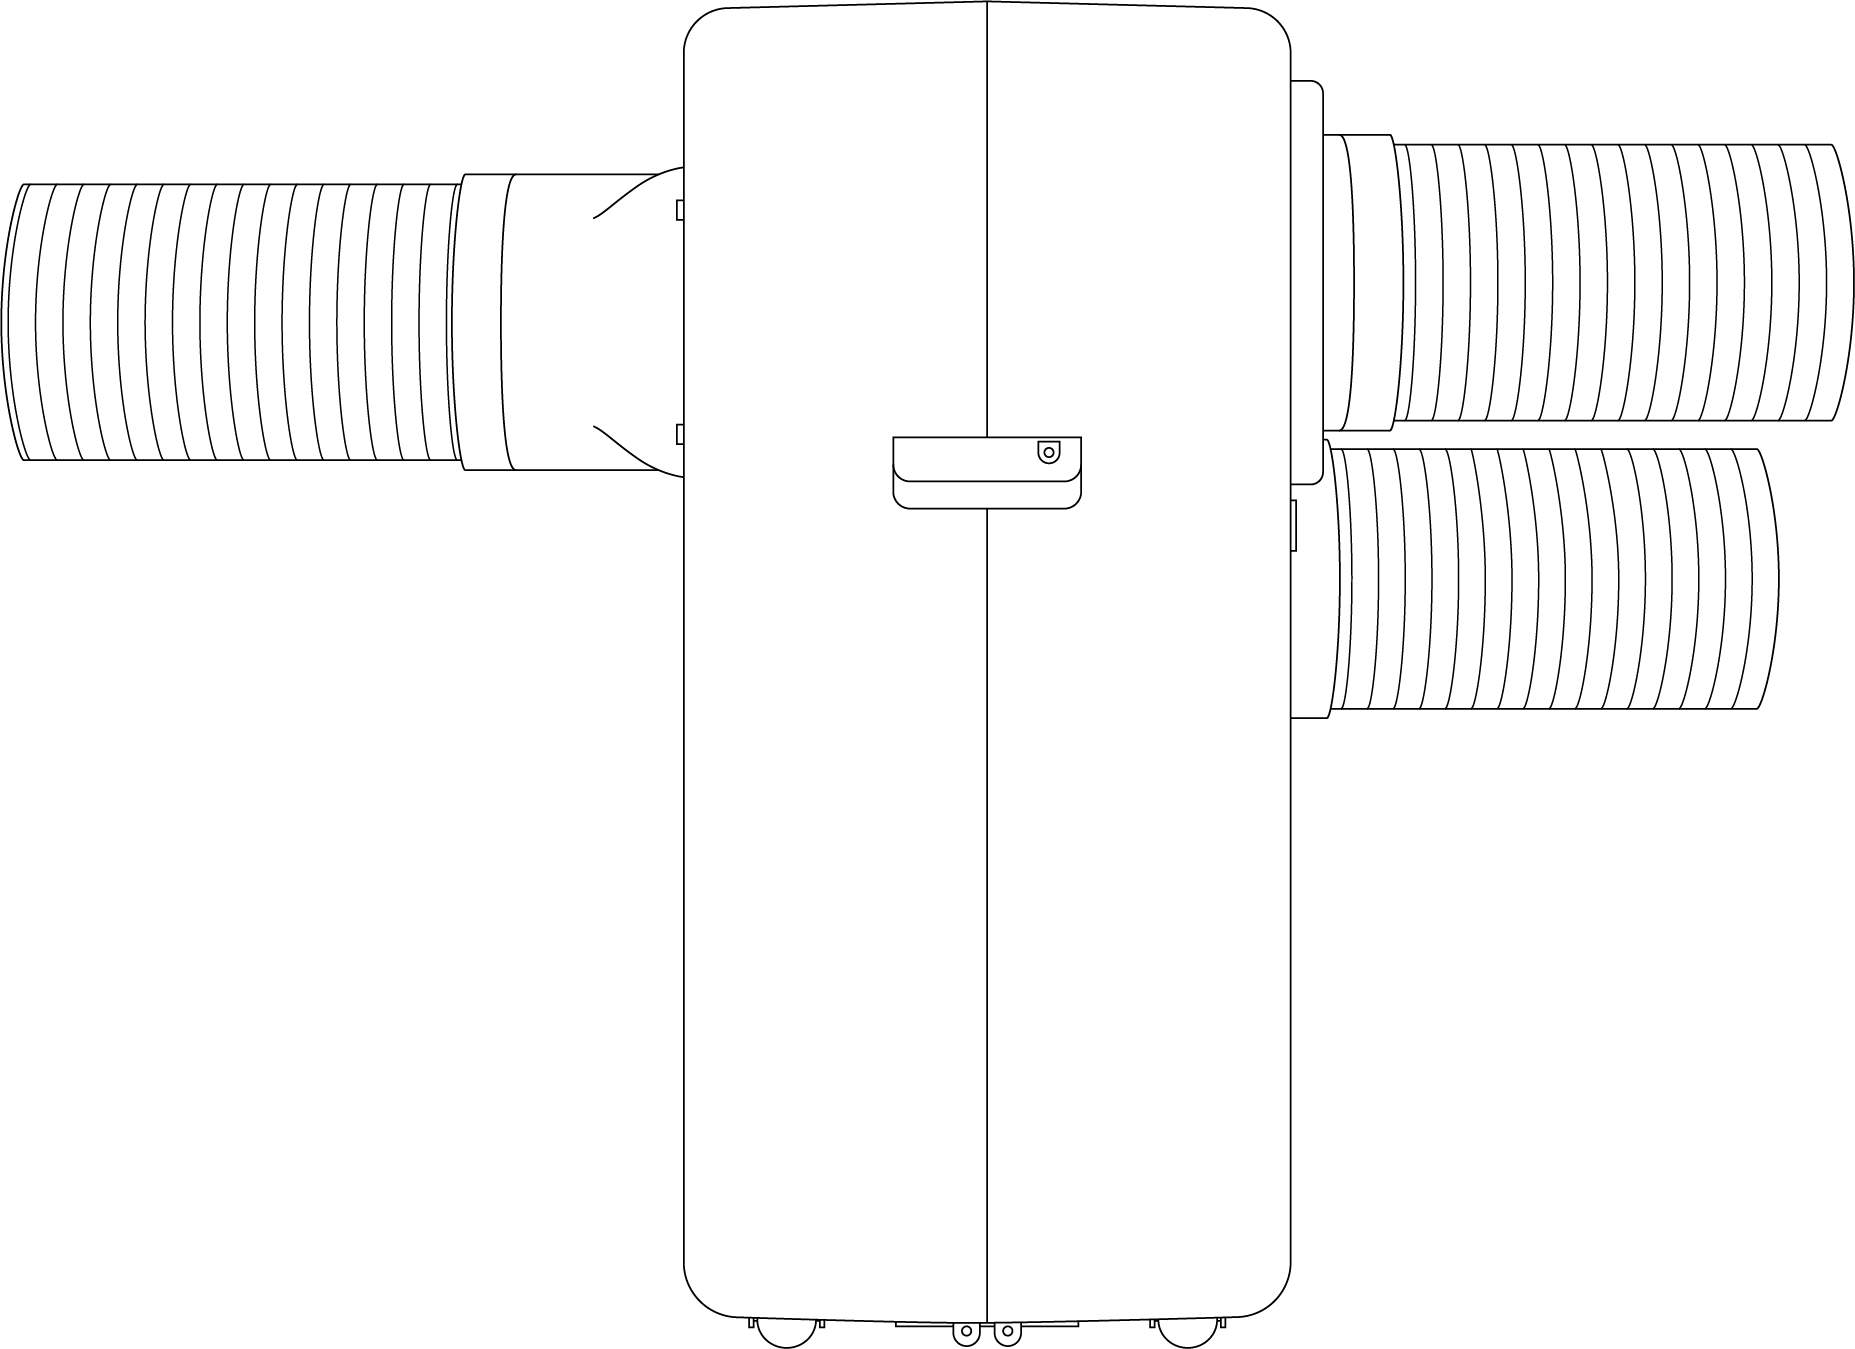
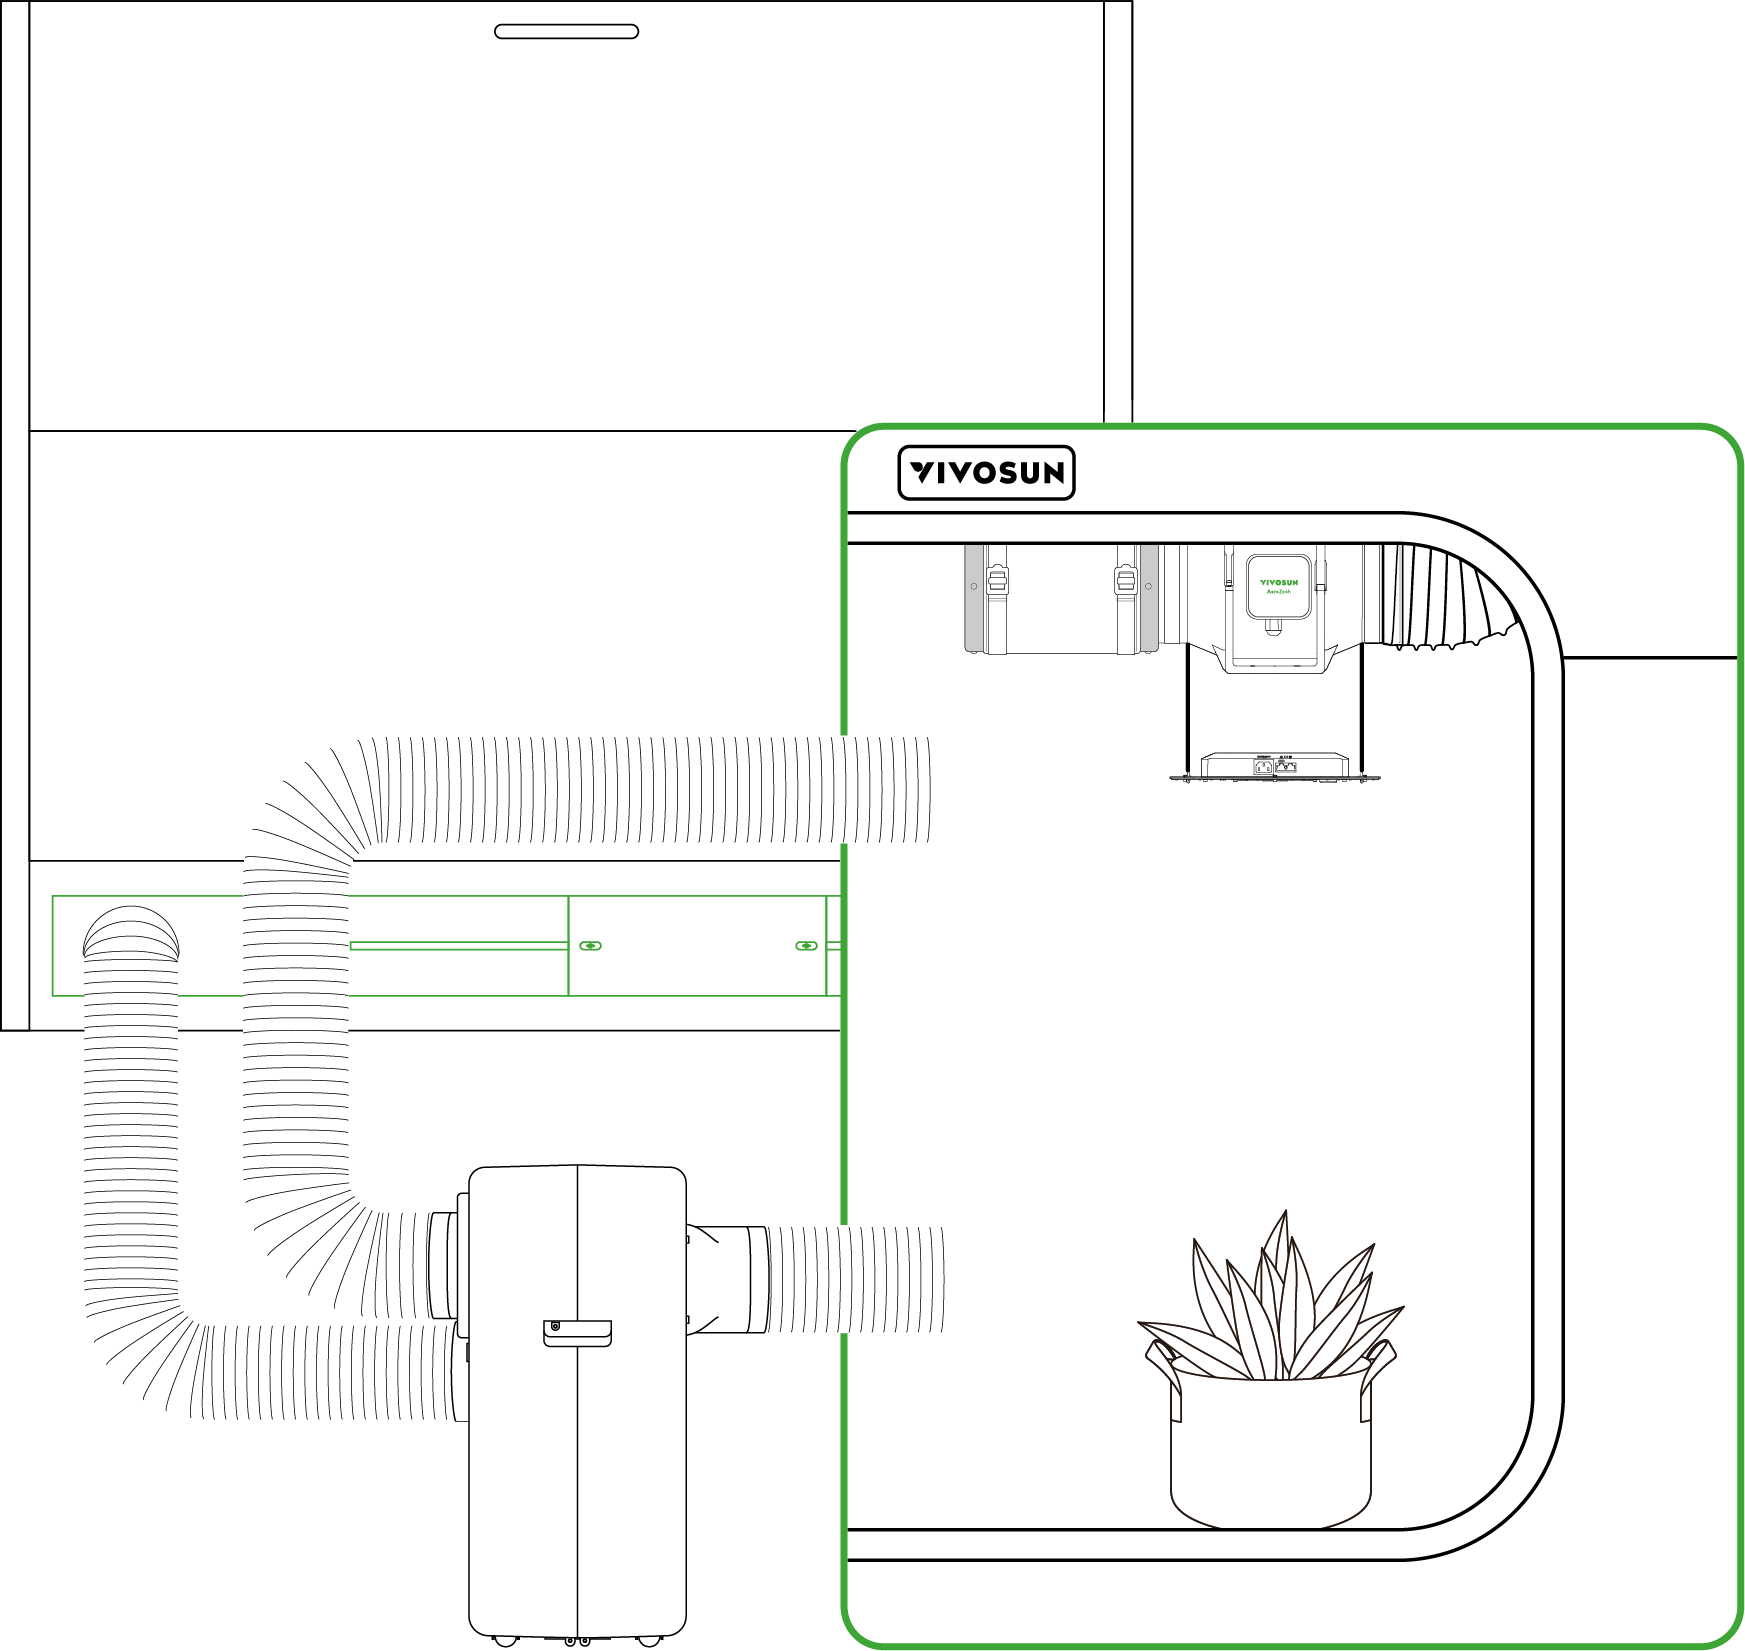
Konfiguration des Kanals
A.Kühlmodus & Trockenmodus

*1. Verdampfer-Lufteinlass 2. Verdampfer-Luftauslass
B.Heizmodus
*3. Kondensator-Luftauslass
Hinweis: Beim Heizen muss der Kanalanschluss gewechselt werden.
C.Lüftermodus
Im Lüftermodus gibt es keine spezifischen Anschlussanforderungen. Sie können sich auf andere Modus beziehen oder den Kanal bei Bedarf basierend auf Ihrer Einrichtung installieren.
Hinweis:
1.Stellen Sie sicher, dass der Abluftkanal keine Biegungen über 45° aufweist, da dies die Leistung der Klimaanlage beeinträchtigen kann.
2.Der Abluftkanal im Zelt sollte nach oben positioniert werden, um direkten Luftstrom auf die Blätter zu vermeiden.
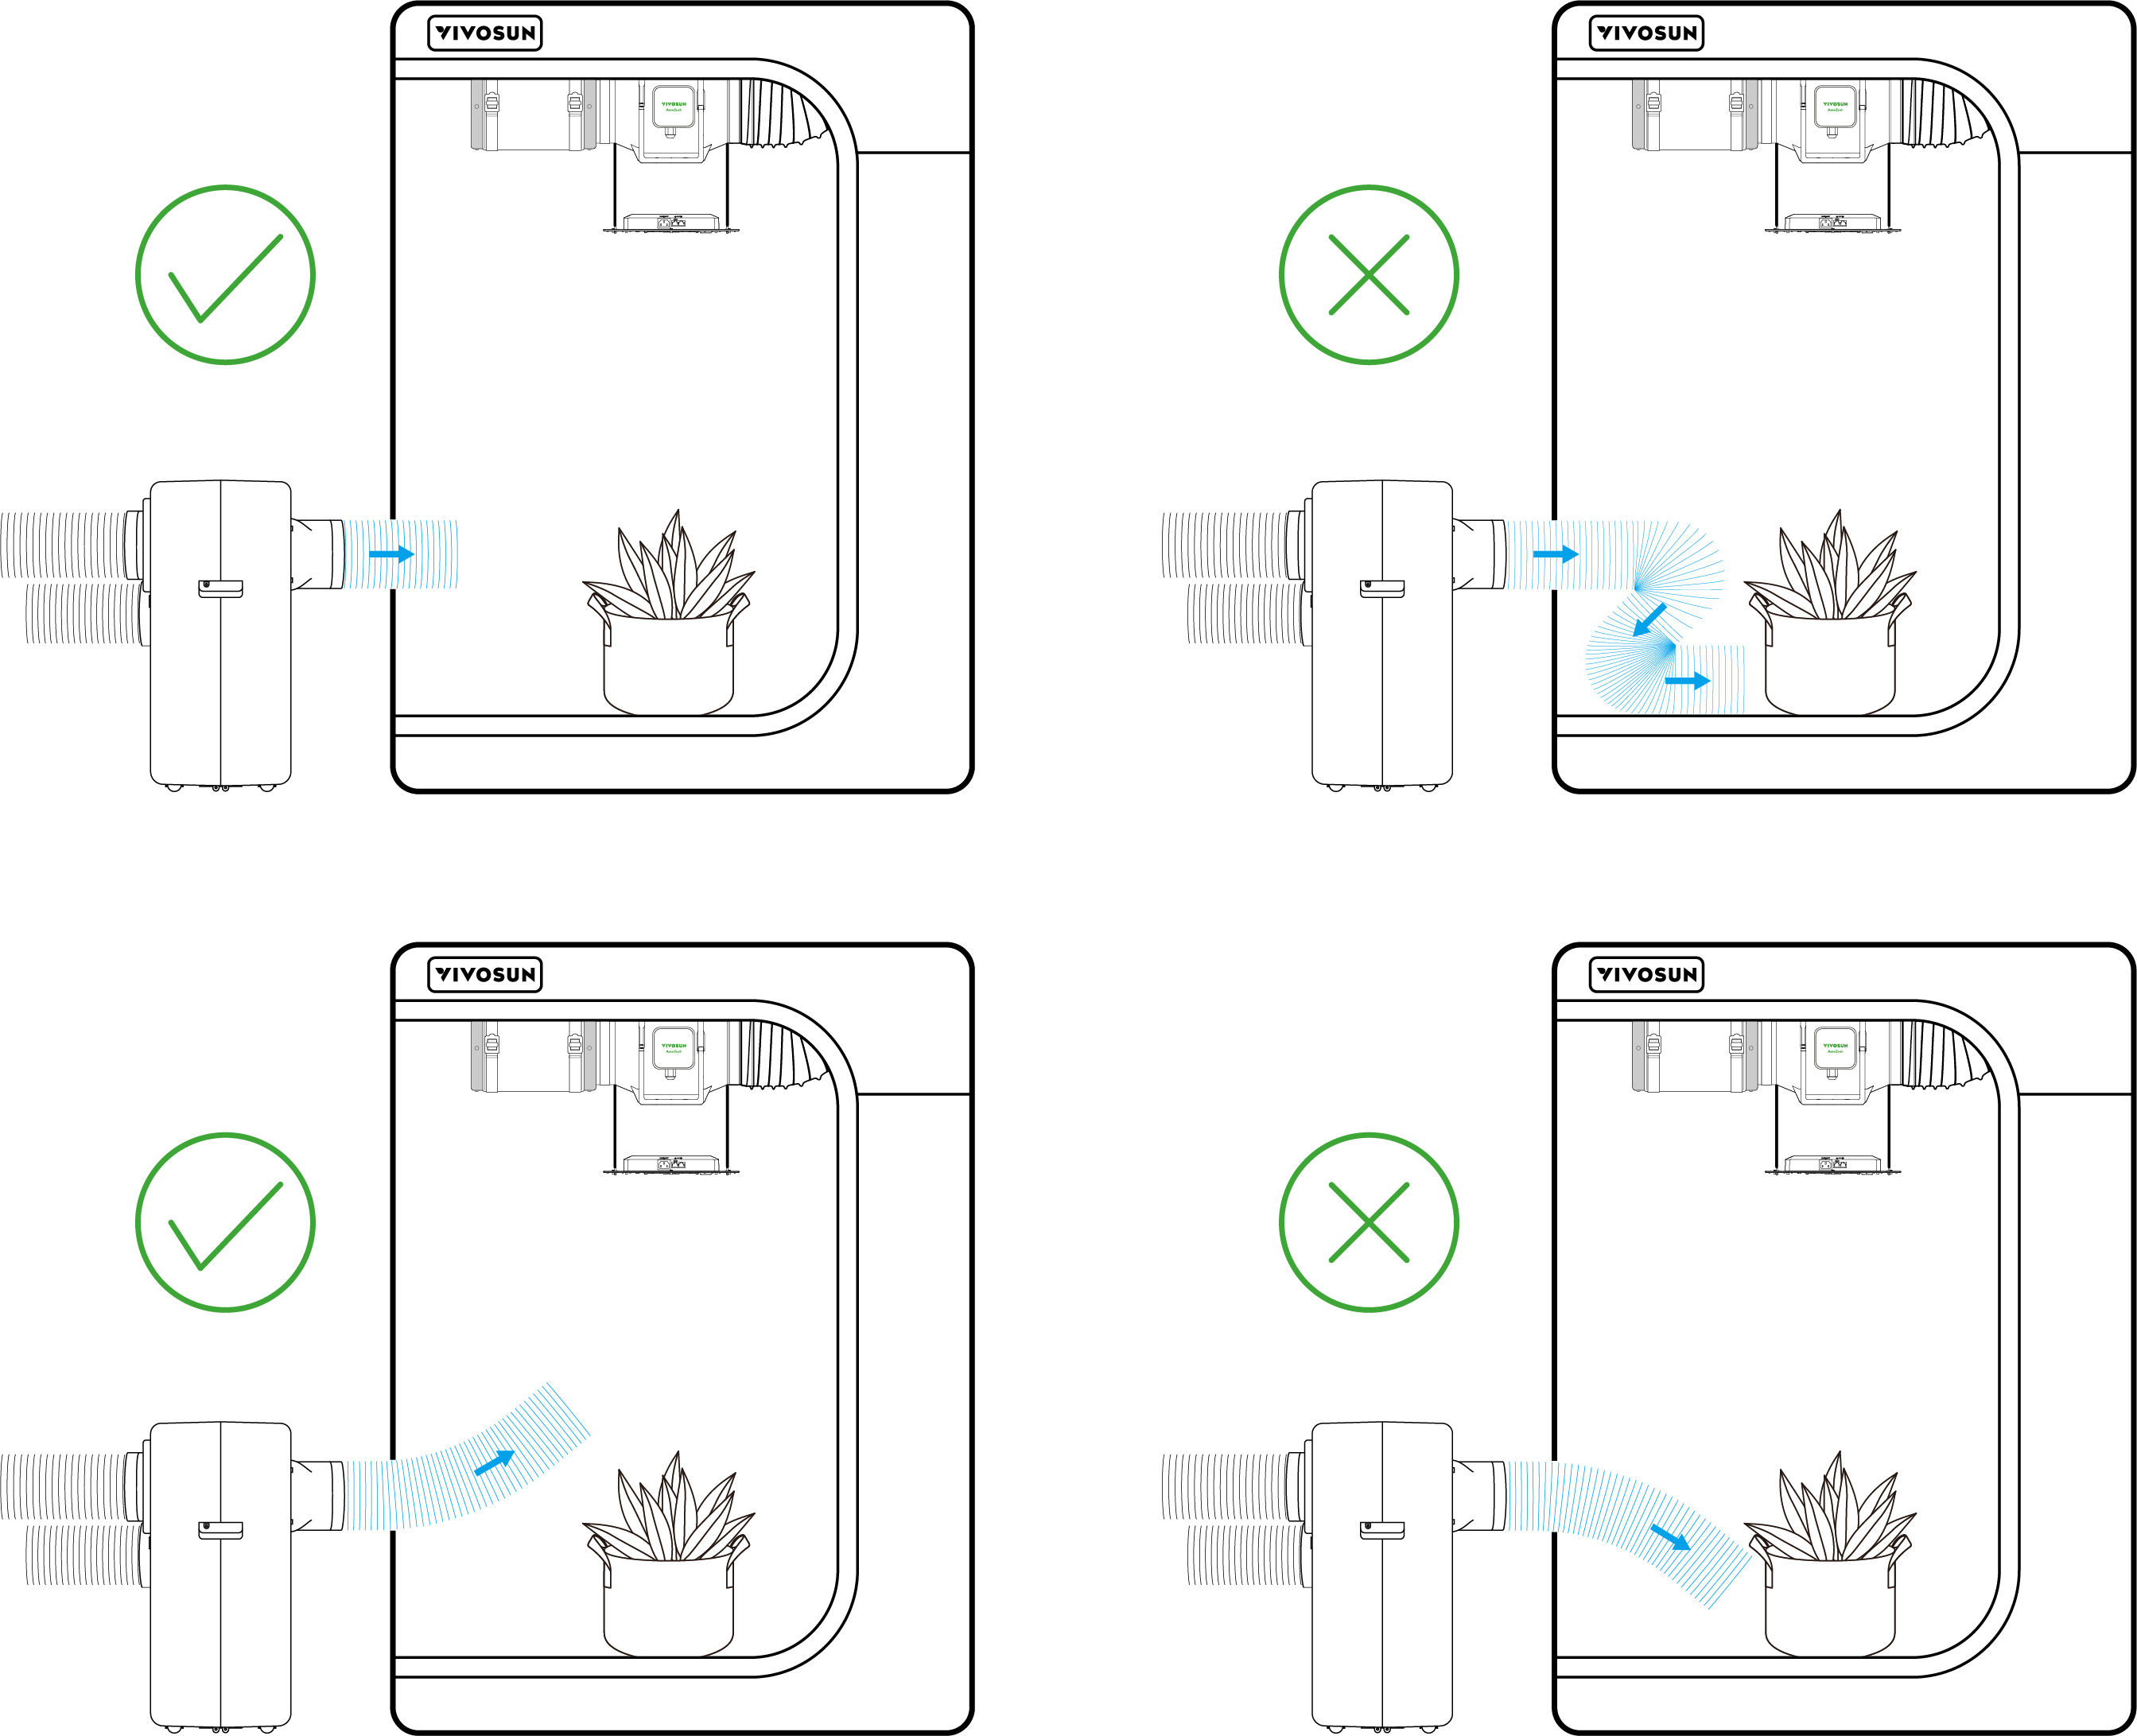
3.Es kann eine Temperaturschichtung und Feuchtigkeitsschichtung im Zelt auftreten. Wenn die Pflanzen hoch wachsen, sollten Sie darüber nachdenken, die Positionen der Luftauslässe und Einlassrohre anzupassen, um optimale Bedingungen für die Krone zu schaffen.
|
|
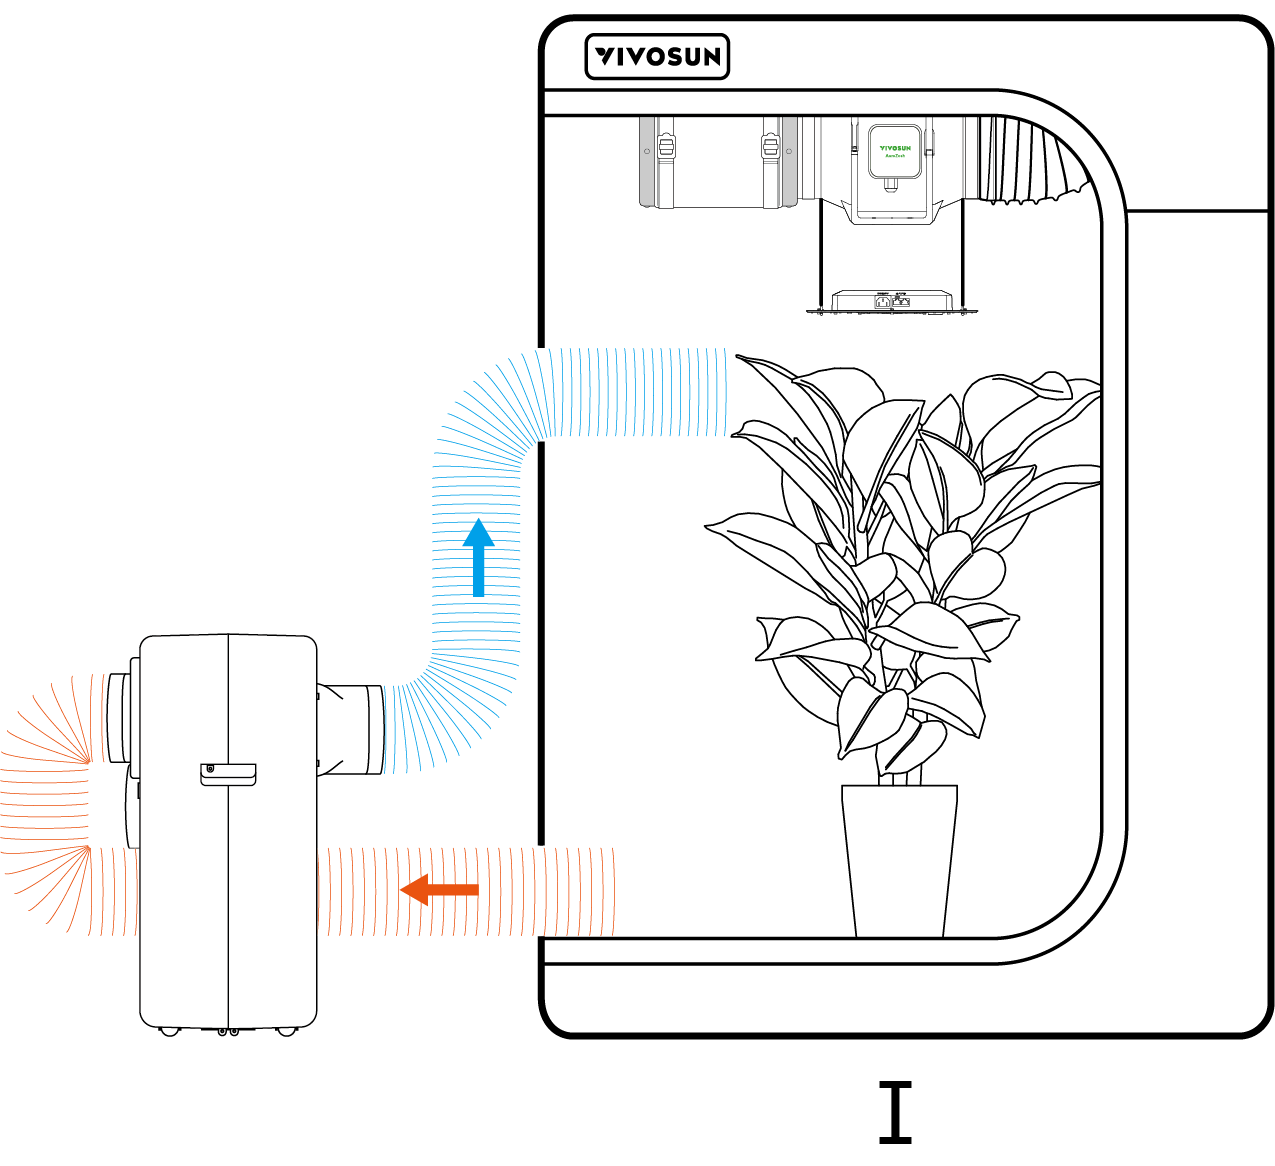
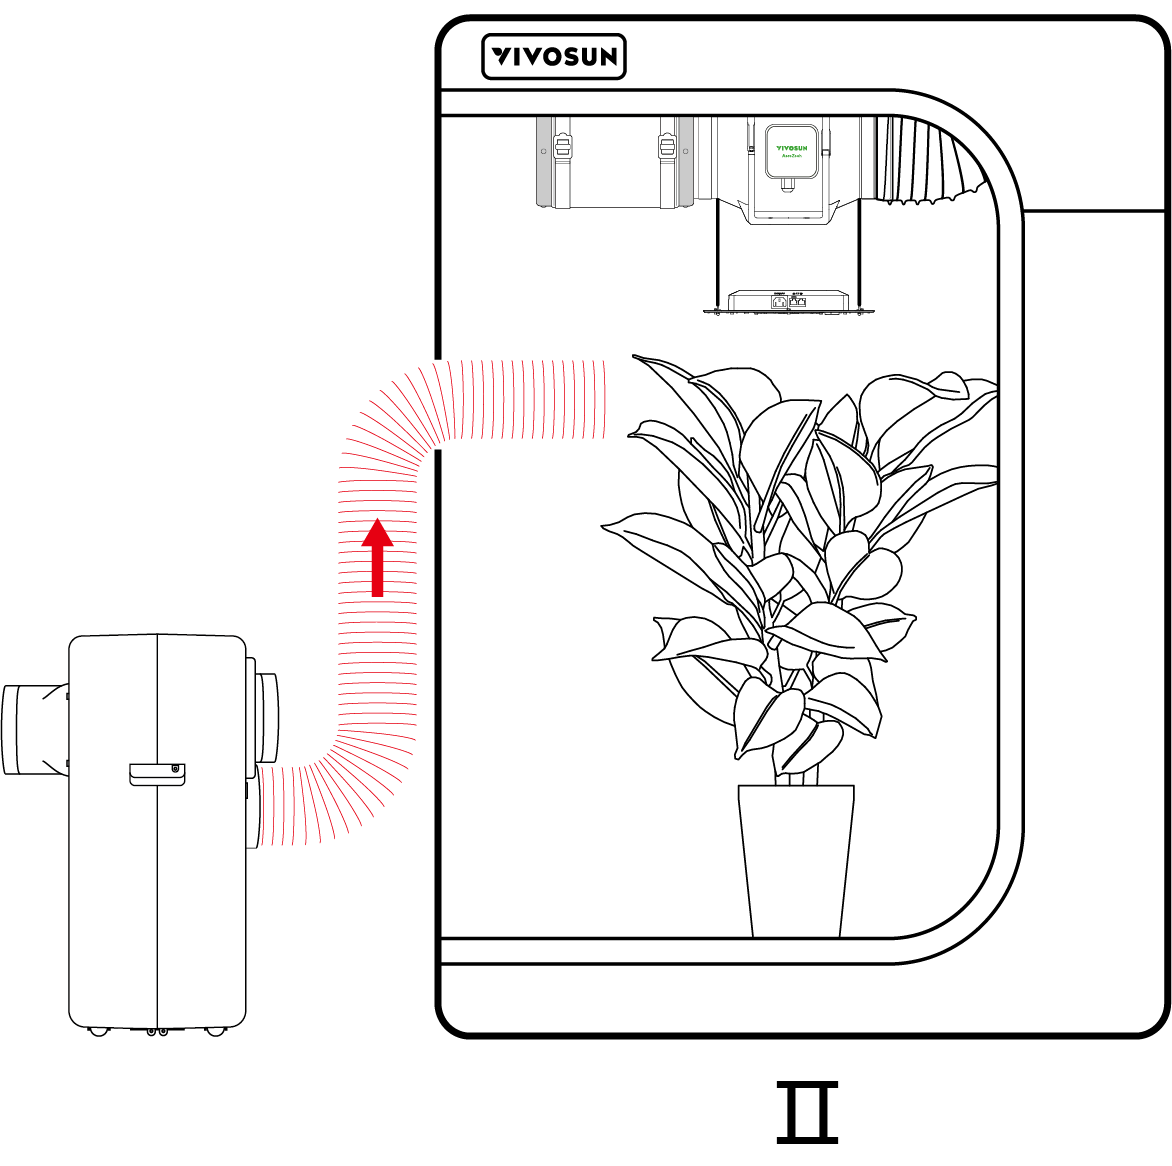
*Ⅰ :Kühlmodus Ⅱ :Heizmodus
4. Wenn die Innenluftfeuchtigkeit zu hoch ist, kann sich Kondensation am Verdampferabluftkanal bilden, wodurch Wassertropfen entstehen. Das Umwickeln des Abluftschlauchs mit Isoliermaterial kann helfen, die Kondensation zu reduzieren.
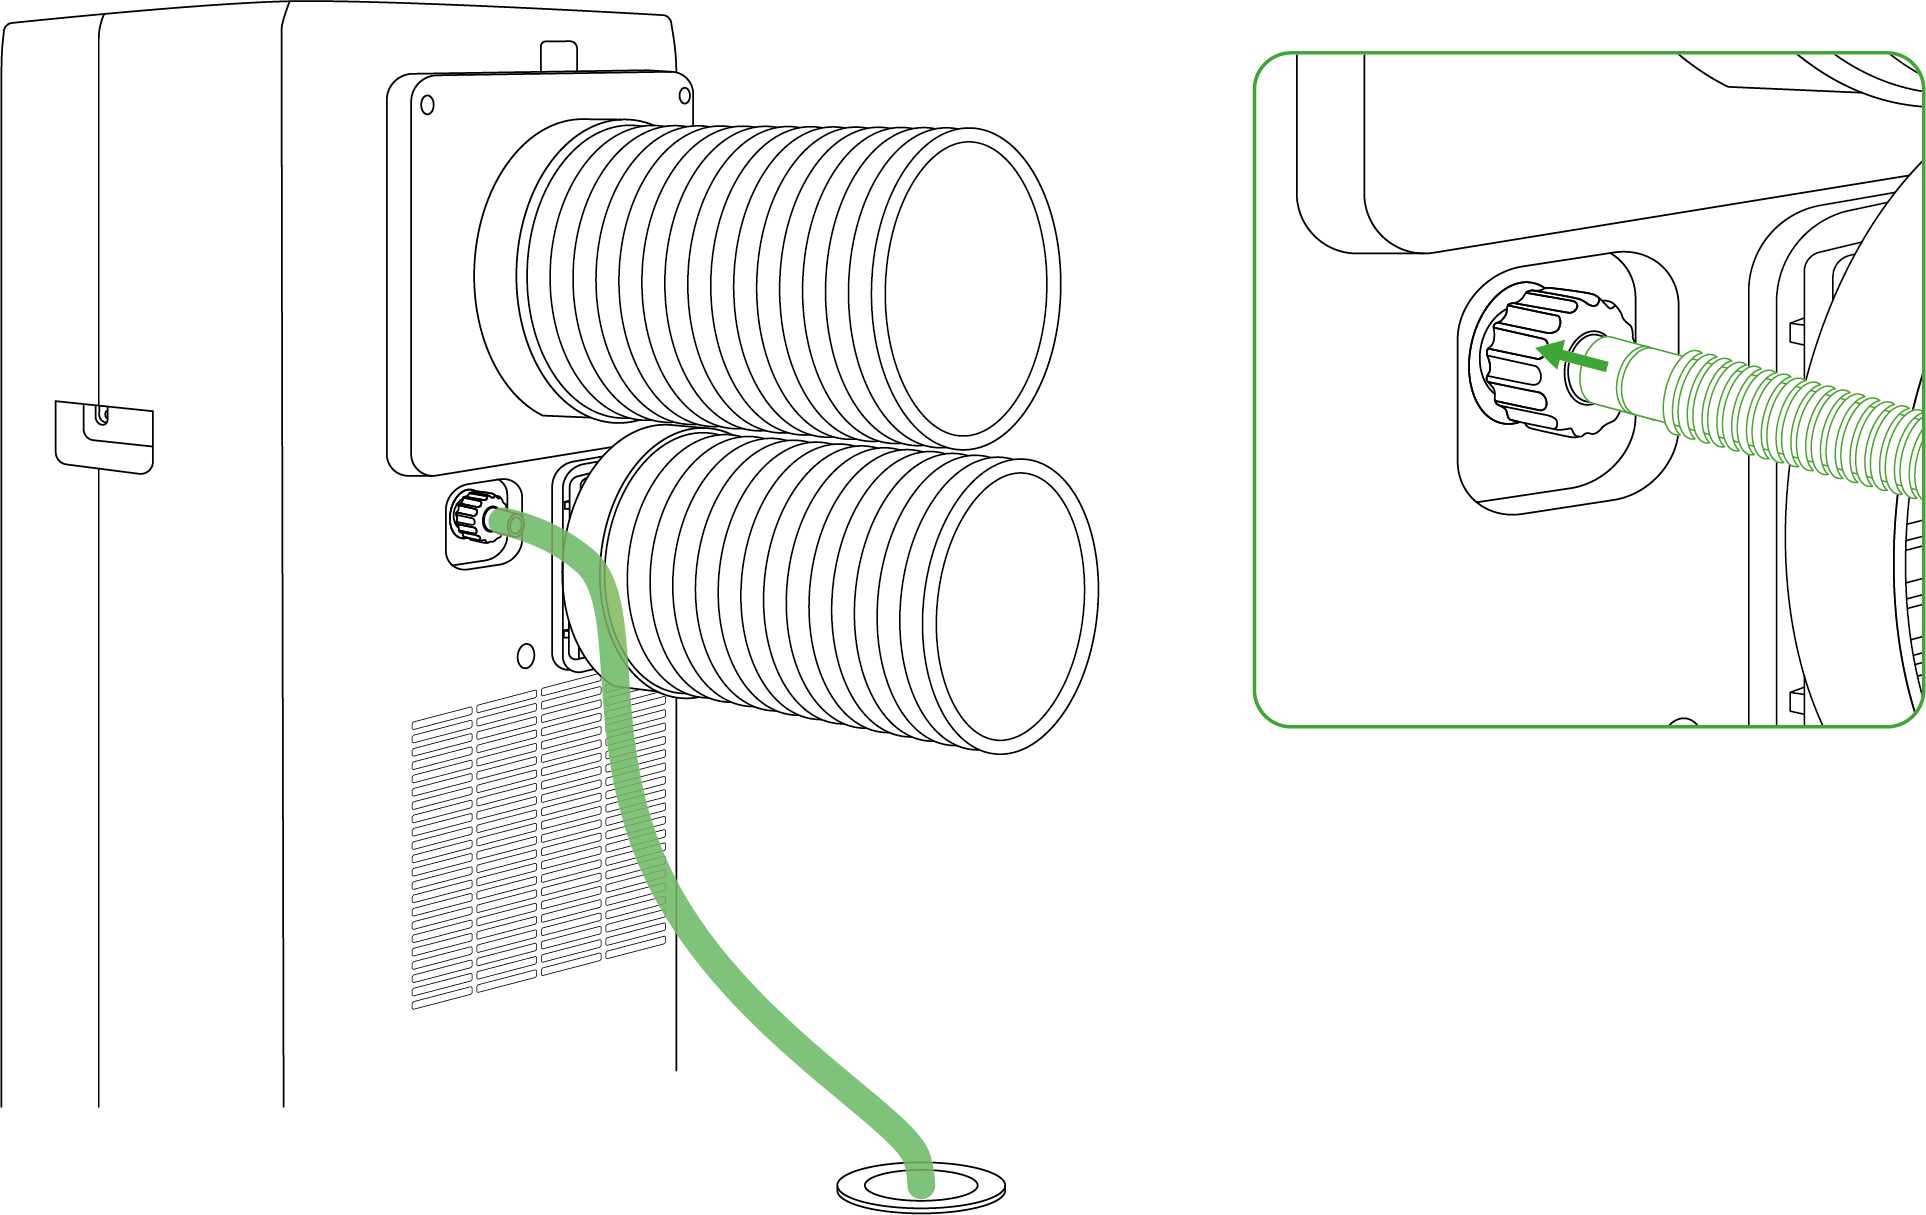
Installation des Abflussrohrs
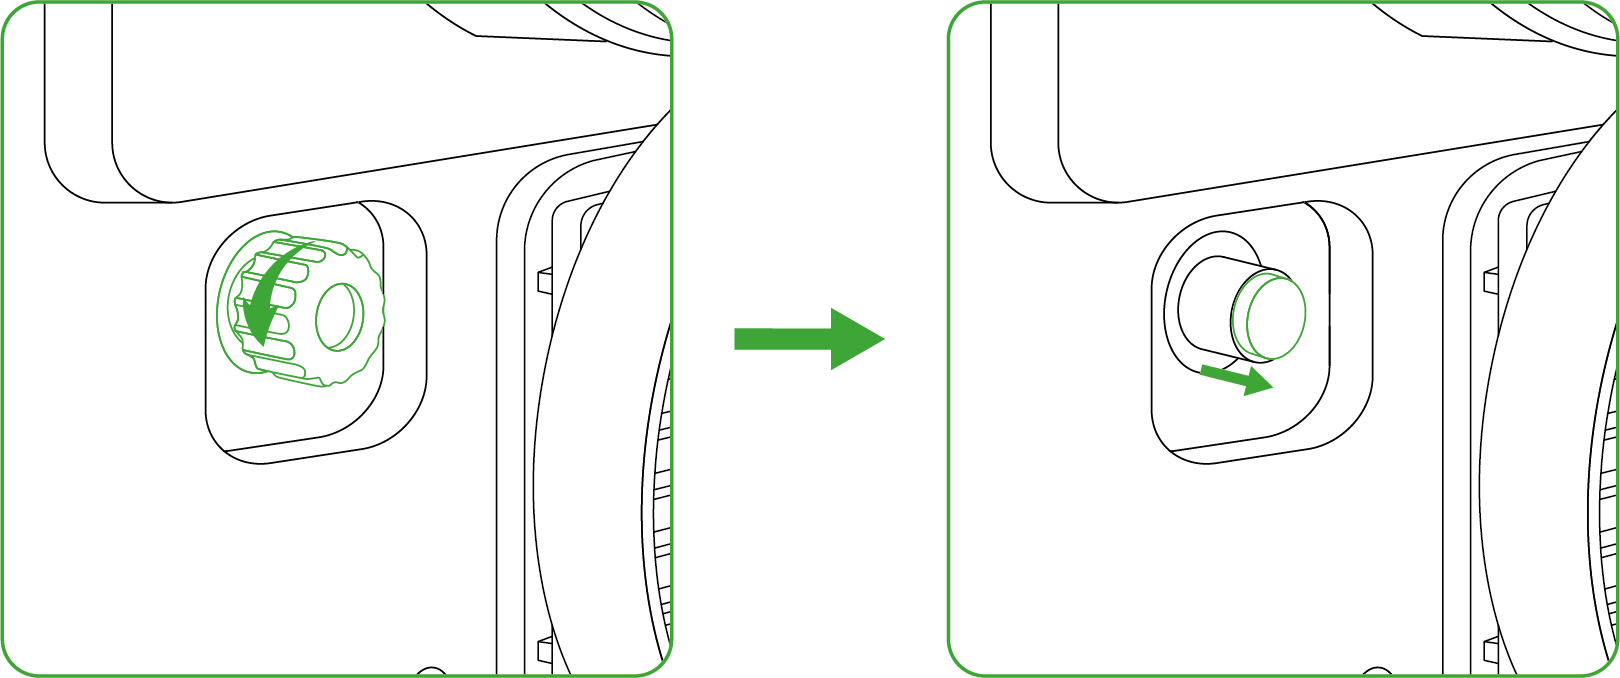
Schritt 1
Schrauben Sie die Mutter am Abflussloch gegen den Uhrzeigersinn ab und entfernen Sie den weichen Stöpsel im Inneren.
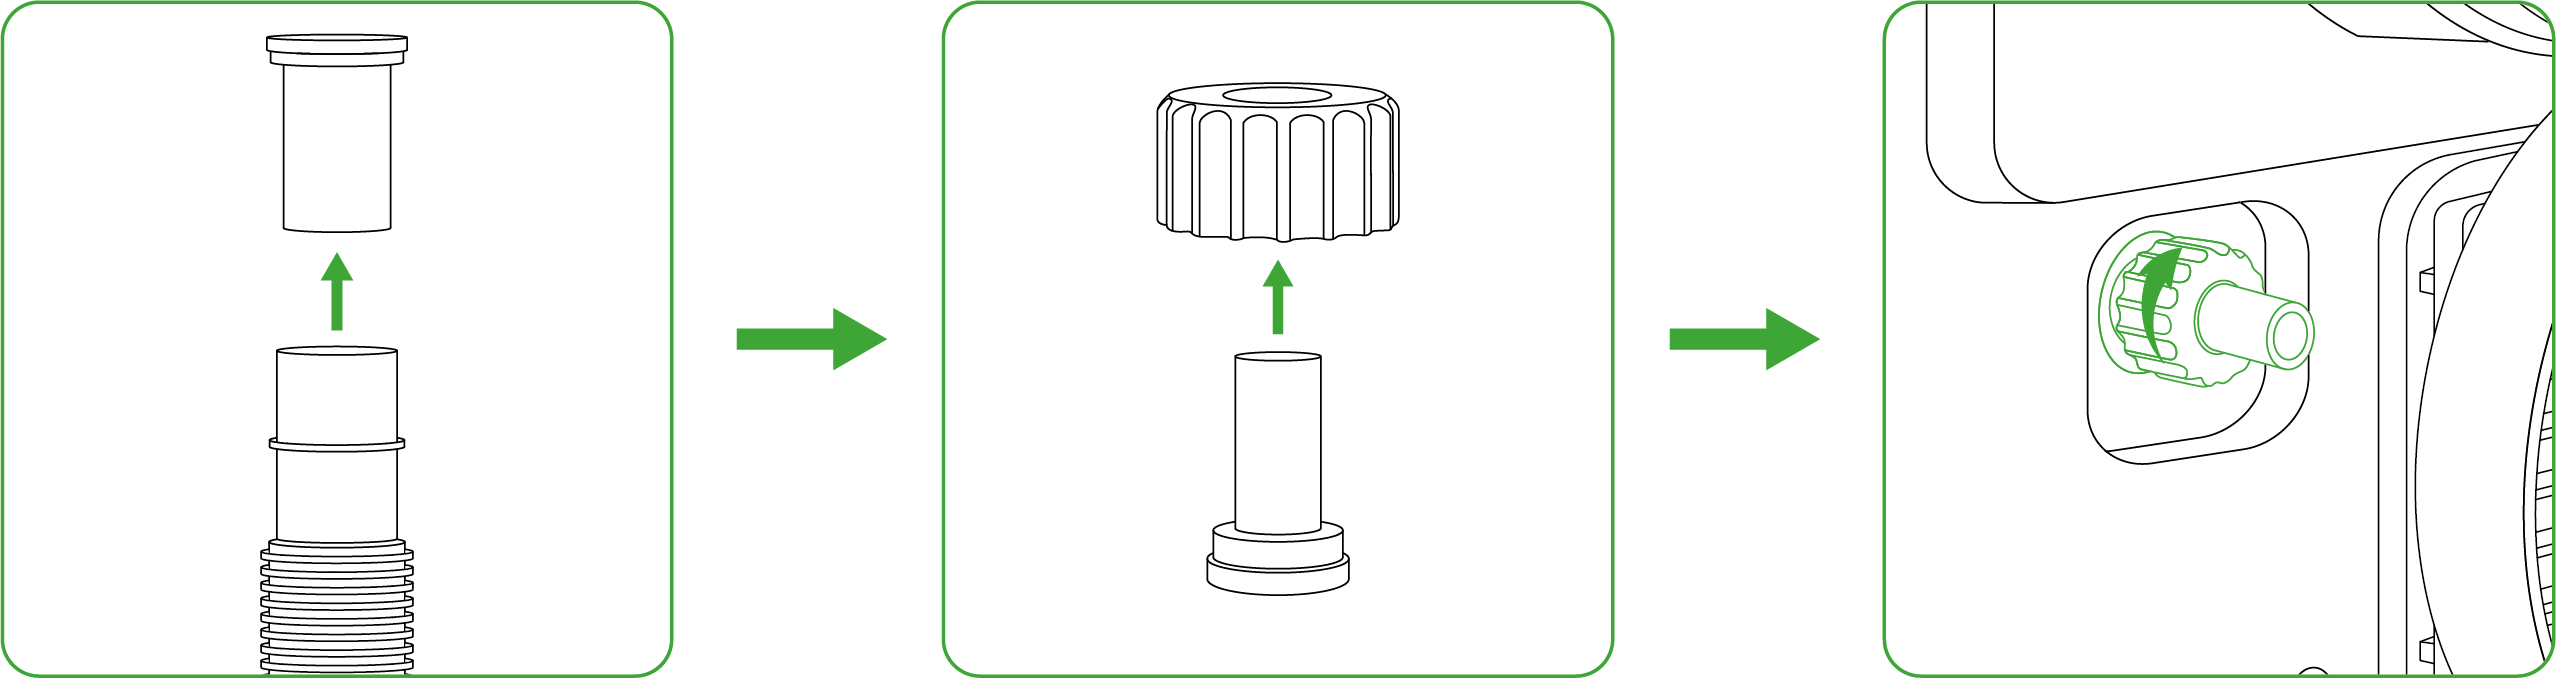
Schritt 2
Entfernen Sie den Abflussanschluss vom Wasserrohr und stecken Sie ihn in die Mutter, dann schrauben Sie die Mutter zurück auf das Abflussloch im Uhrzeigersinn.
Schritt 3
Befestigen Sie das Abflussrohr am Abflussanschluss und stellen Sie das andere Ende in die Kanalisation oder das Abtropfblech.
Hinweis:
-
Das Abflussrohr muss im Trockenmodus angeschlossen sein; für andere Modi ist es optional.
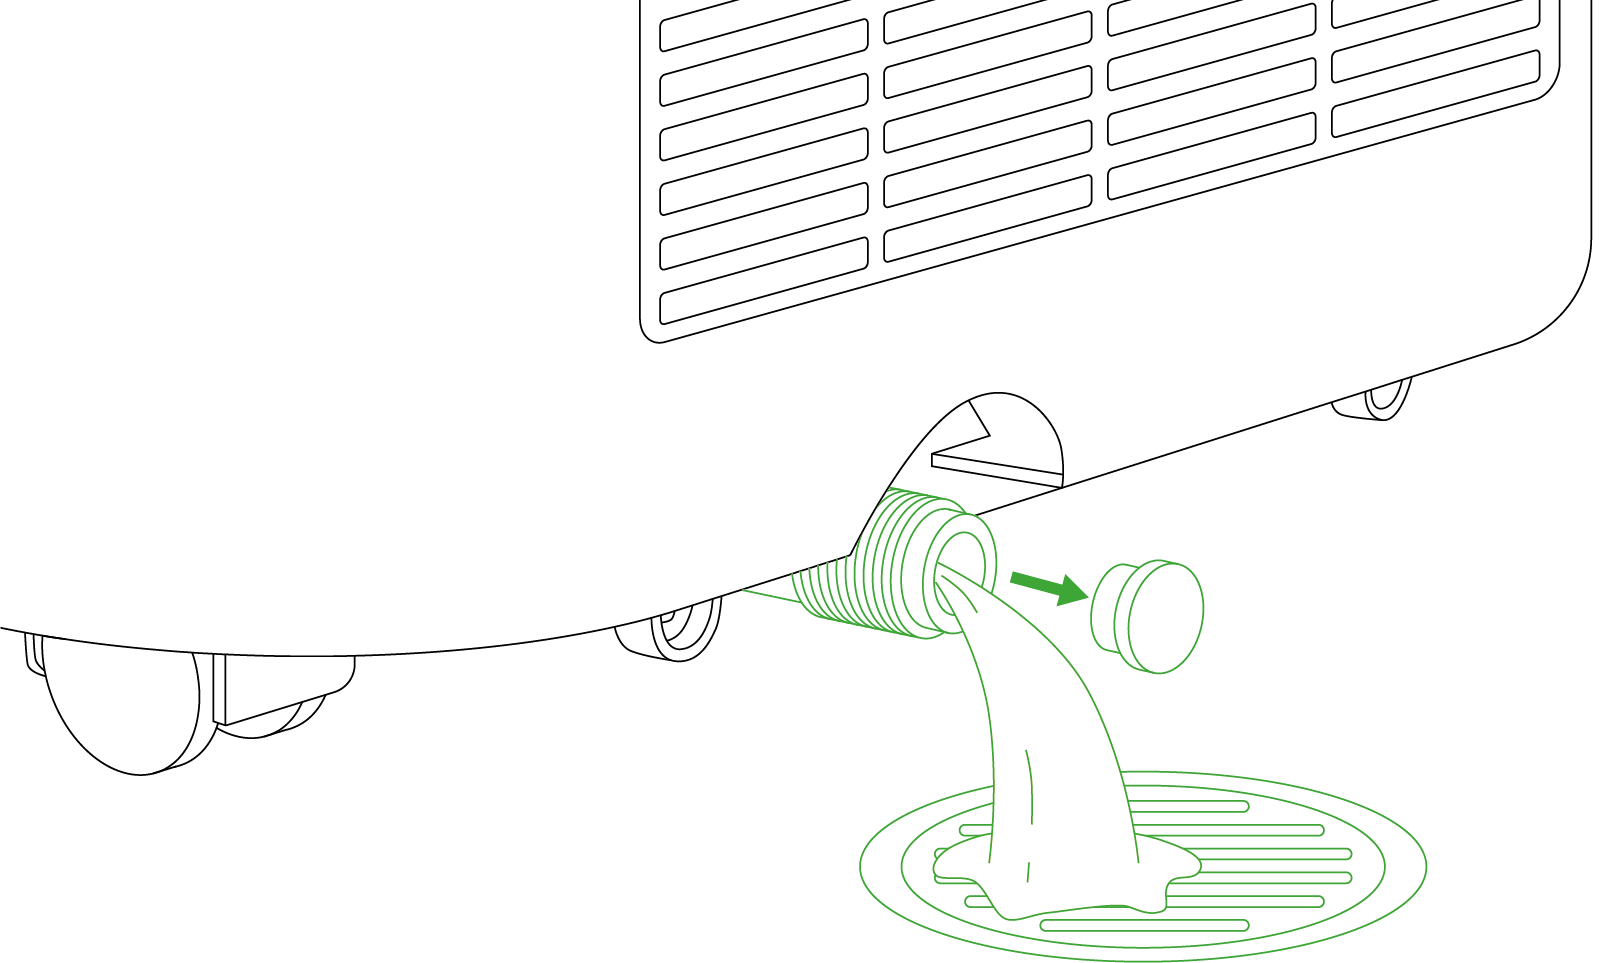
-
Wenn auf dem Bildschirm ein „Wasser voll“ Symbol angezeigt wird, schrauben Sie das Ersatz-Abflussloch ab, um das Wasser abzulassen.
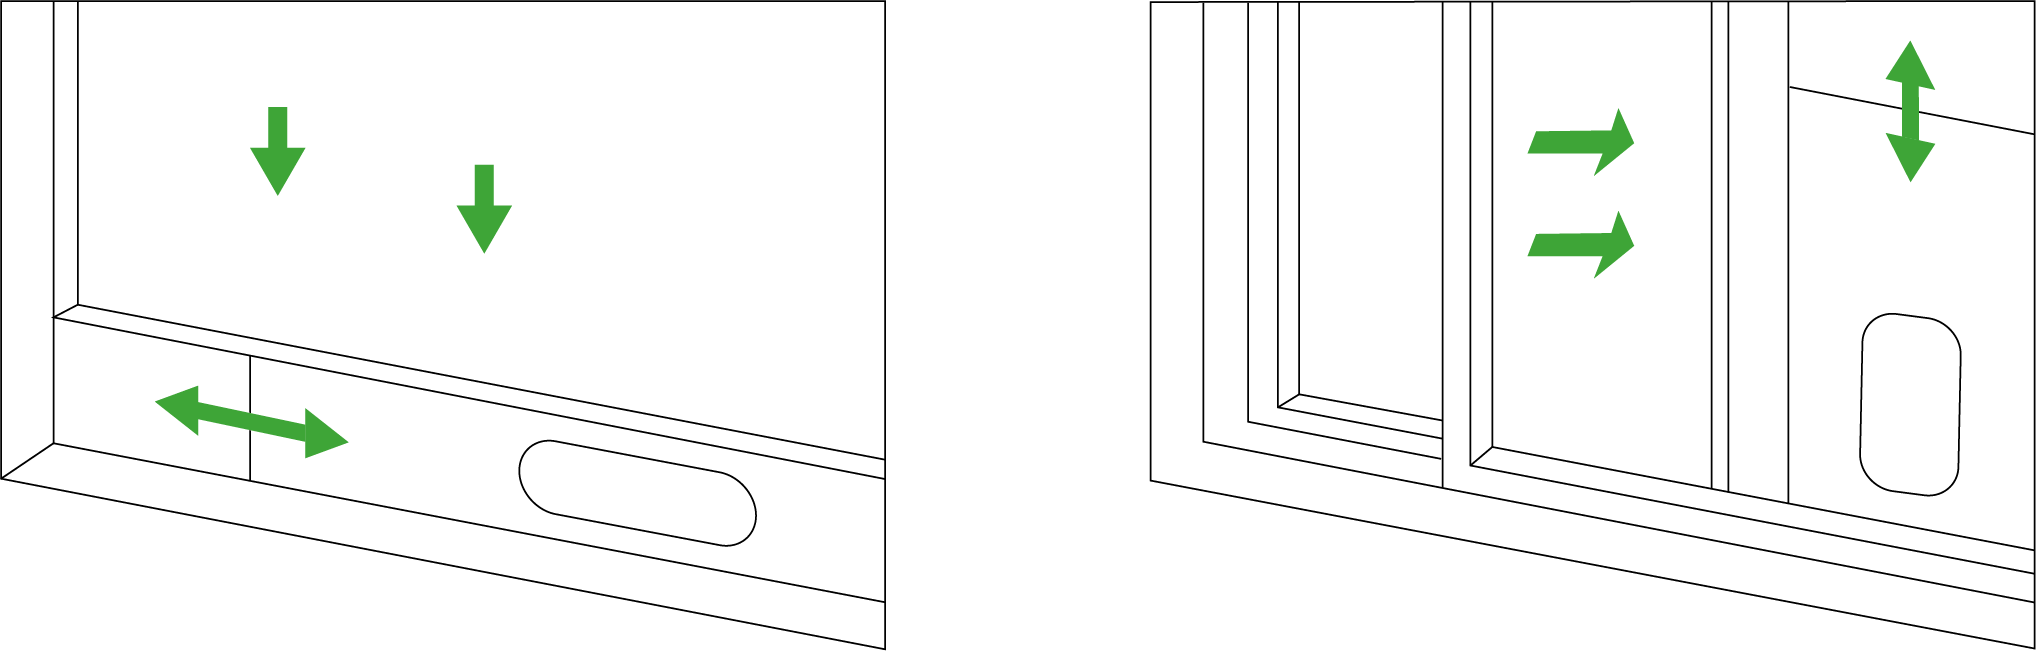
Installation des Fensters
Schritt 1
Befestigen Sie den Fensterkanaladapter im Uhrzeigersinn am anderen Ende des Kondensatorabluftkanals.
Schritt 2.1
Öffnen Sie das Fenster teilweise und montieren Sie die Fensterabdichtungsplattenmontage am Fenster. Die Komponenten können horizontal oder vertikal platziert werden.
Schritt 2.2
Erweitern Sie die verschiedenen Komponenten der Fensterabdichtungen, passen Sie deren Abstand an, um sicherzustellen, dass beide Enden der Montage Kontakt mit dem Fensterrahmen haben. Dann sichern Sie alle Komponenten an Ort und Stelle.
Hinweis:
-
Wählen Sie die geeignete Fensterabdichtungsplatte (lang oder kurz) basierend auf Ihrer Fenstergröße.
-
Die flachen Enden der Abluftschlauchverbindungen müssen sicher eingerastet sein.
-
Der Schlauch sollte nicht verzerrt oder stark gebogen (über 45°) sein. Stellen Sie sicher, dass der Abluftschlauch für eine ordnungsgemäße Lüftung frei bleibt.
Bedienfeld

|
Ein-/Ausschaltknopf |
Drücken um einzuschalten. Drücken und halten für 3 s zum Ausschalten. |
|
Modustaste |
Drücken, um die Funktionsmodi zu wechseln: Kühlen, Heizen, Trocknen, Lüfter. Drücken und halten, um den Rezeptmodus zu beenden (nur wirksam, wenn das Rezept läuft). |
|
Lüftergeschwindigkeitstaste |
Drücken, um die Lüftermodi zu wechseln: Standardmodus und Leisemodus. |
|
Aufwärts-Taste |
Drücken, um den Wert der aktuellen Einstellung zu erhöhen. Drücken und halten, um zwischen °C und °F zu wechseln |
|
Abwärts-Taste |
Drücken, um den Wert der aktuellen Einstellung zu verringern. |
|
Bestätigungstaste |
Drücken um die aktuelle Operation zu bestätigen. Drücken und halten, um das Einstellungsmenü aufzurufen, einschließlich Kalibrierung und Stummschaltung. |


Andere Tastenoperationen:
-
Drücken und halten Sie die Ein-/Aus- und Aufwärts-Taste, um das Gerät zu sperren oder zu entsperren.
-
Drücken und halten Sie die Ein-/Aus- und Bestätigungstaste, um das Gerät auf Werkseinstellungen zurückzusetzen.
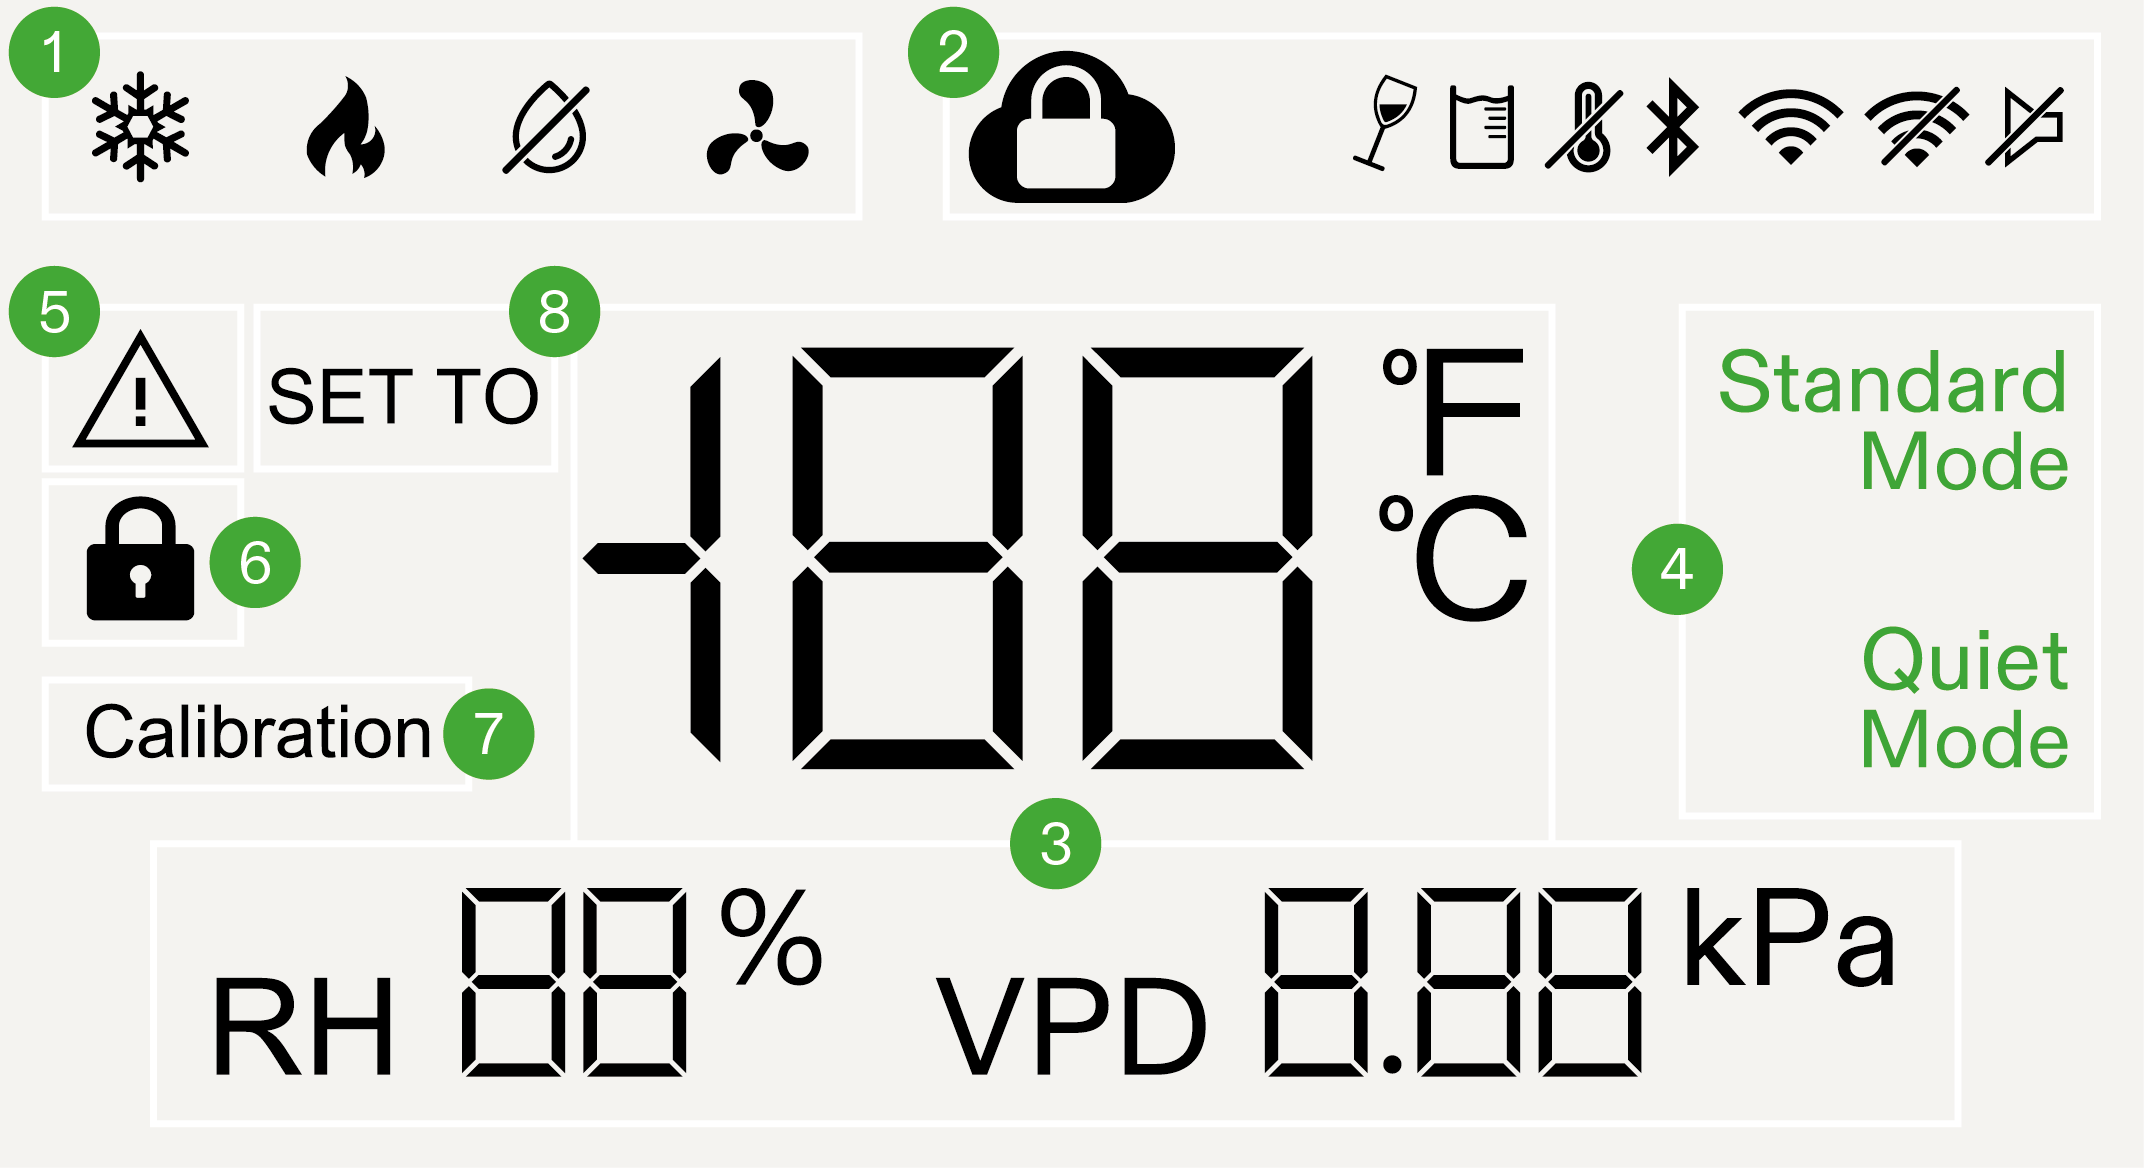
|
Funktionsmodus |
Kühlen, Heizen, Trocknen, Lüfter. |
|
Statussymbol |
Zeigt den Gerätestatus an, einschließlich Cloud-Sperre, Neigung, Wasser voll, Sondenerkennung, Verbindungsstatus und Stummschaltung. |
|
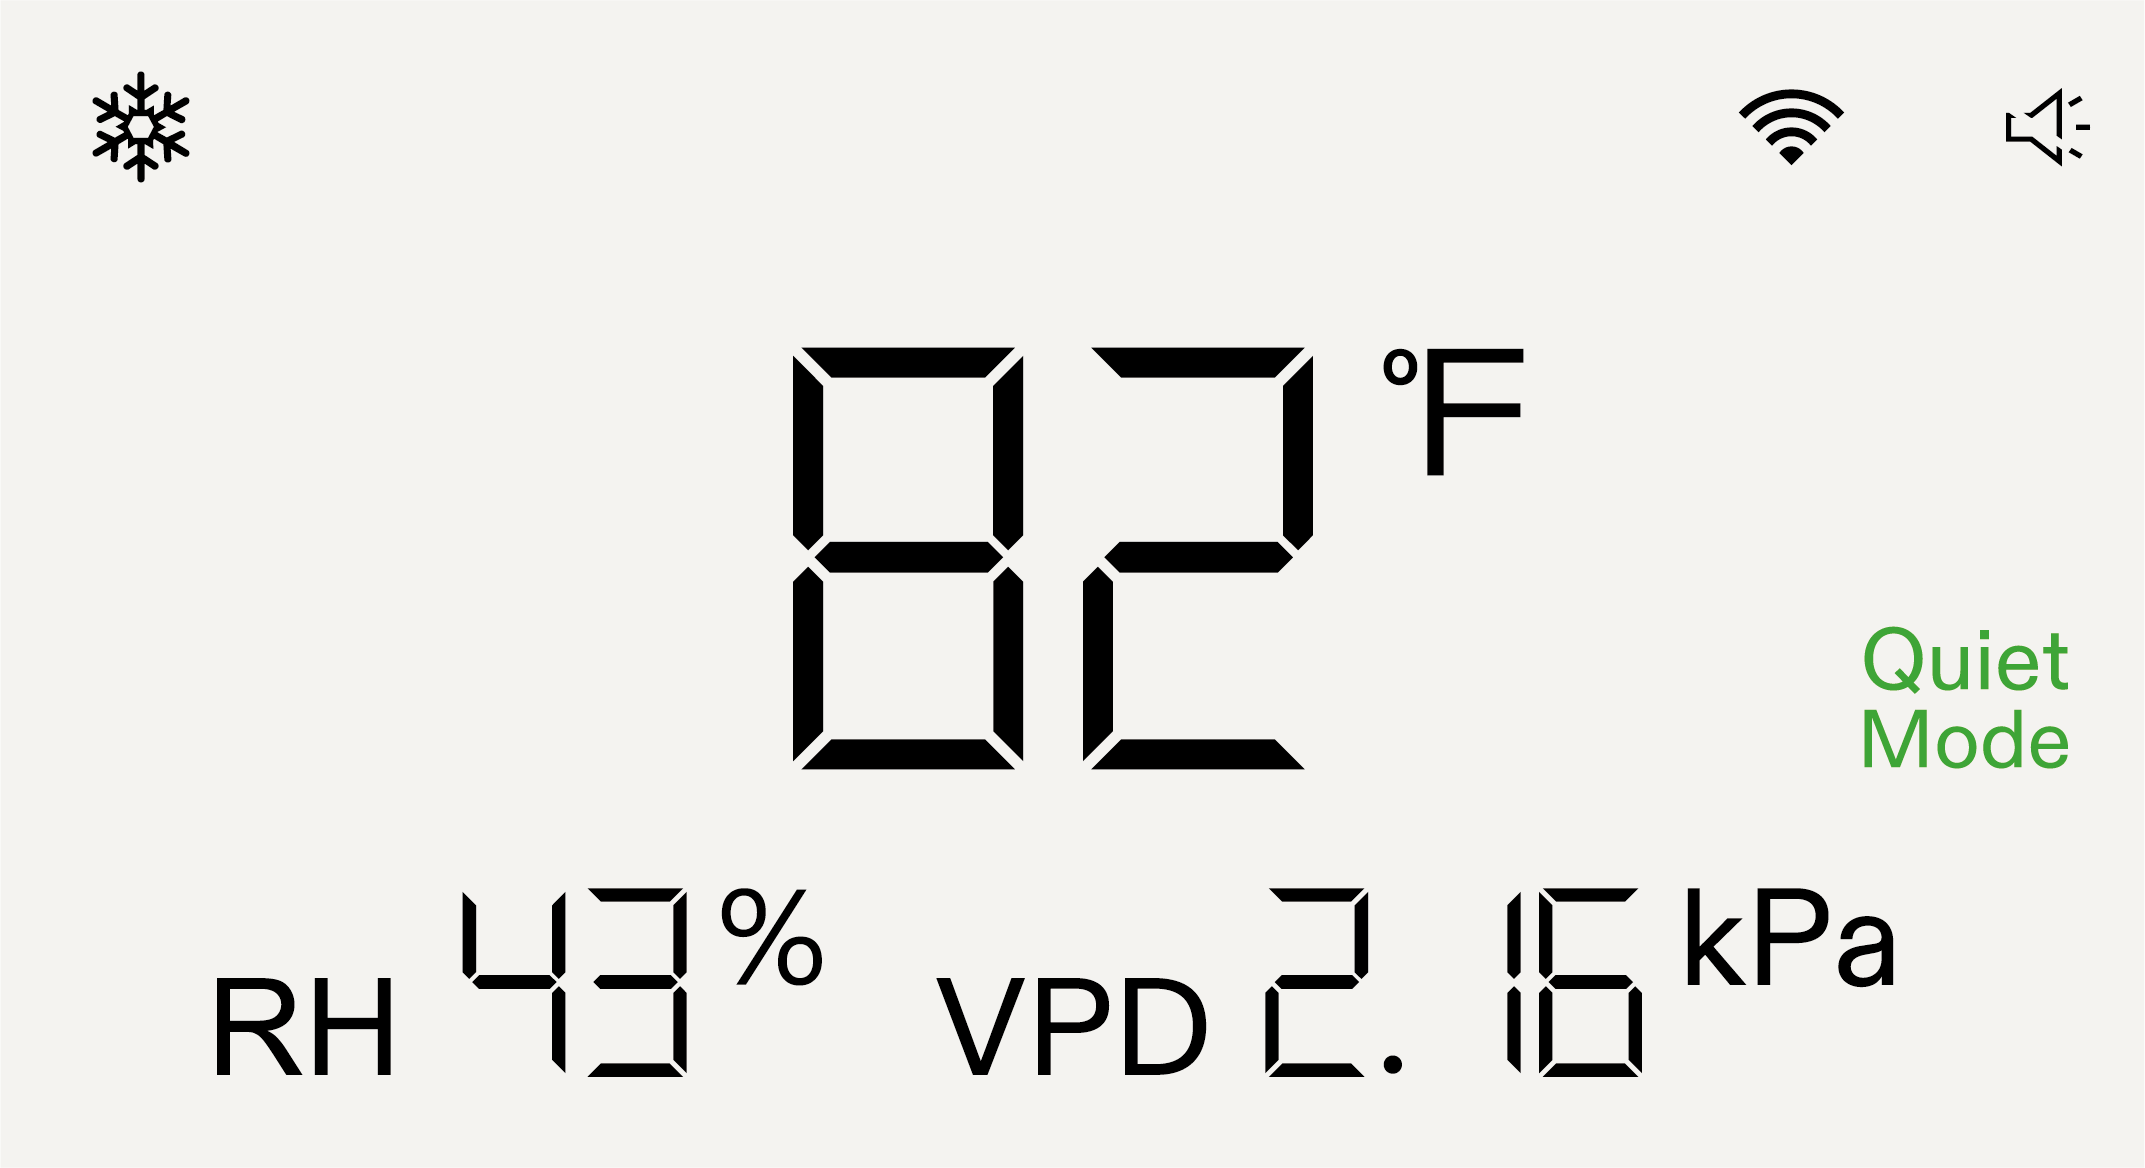
Sondenablesungen |
Zeigt aktuelle Sondenablesungen, einschließlich Temperatur, relativer Feuchtigkeit und VPD an. |
|
Lüftergeschwindigkeit |
Standardmodus und Leisemodus. |
|
Fehler-Symbol |
Zeigt einen Fehlercode an, wenn das Gerät ein Problem hat. |
|
Bildschirm-Sperrsymbol |
Leuchtet auf, wenn die Bildschirmbedienung gesperrt ist. |
|
Kalibrierungsmodus |
Symbol erscheint bei Durchführung von Temperatur- und Feuchtigkeitskalibrierung. |
|
Einstellungsmodus |
Symbol erscheint bei Justierung der Temperatur- und Feuchtigkeitseinstellungen. |


Betrieb
Drücken Sie die Modustaste, um die Modusauswahl aufzuklappen, dann drücken Sie erneut, um durch die verfügbaren Modi zu blättern. Wählen Sie den Kühlmodus und drücken Sie die Bestätigungstaste, um zu bestätigen. Verwenden Sie die Aufwärts-/Abwärtstaste, um die Zieltemperatur einzustellen, und drücken Sie dann erneut die Bestätigungstaste, um das Gerät zu starten.
Hinweis:
-
Stellen Sie nach dem Moduswechsel sicher, dass die Kanalinstallation korrekt ist.
-
Im Lüftermodus sind Temperatur- und Feuchtigkeitseinstellungen nicht erforderlich.
-
Die Klimaanlage verwendet einen intelligenten Puffer, um die eingestellte Temperatur innerhalb von ±1,8 °F und die Ziel-Feuchtigkeit innerhalb von ±5 % zu halten.
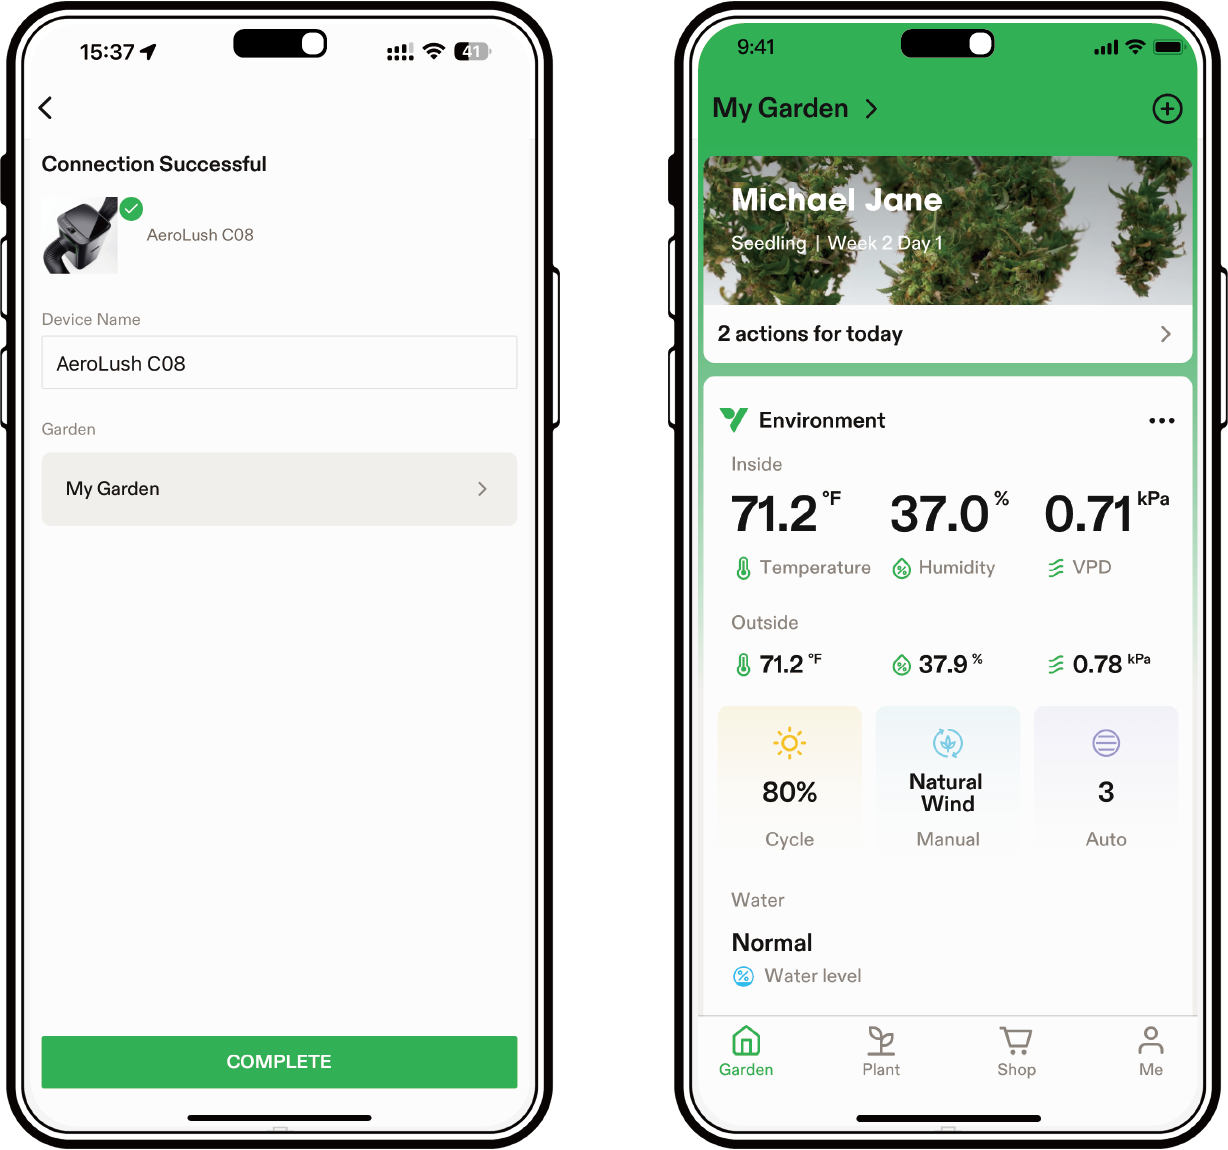
Wi-Fi-Konfiguration
Schritt 1
Laden Sie die Vivosun App herunter
Suchen Sie „VIVOSUN“ im Apple App Store oder im Google Play Store, um die Vivosun App herunterzuladen.

Schritt 2
Fügen Sie AeroLush hinzu
Tippen Sie auf „+“, um AeroLush hinzuzufügen, und folgen Sie den Anweisungen in der App, um die Wi-Fi-Konfiguration abzuschließen.
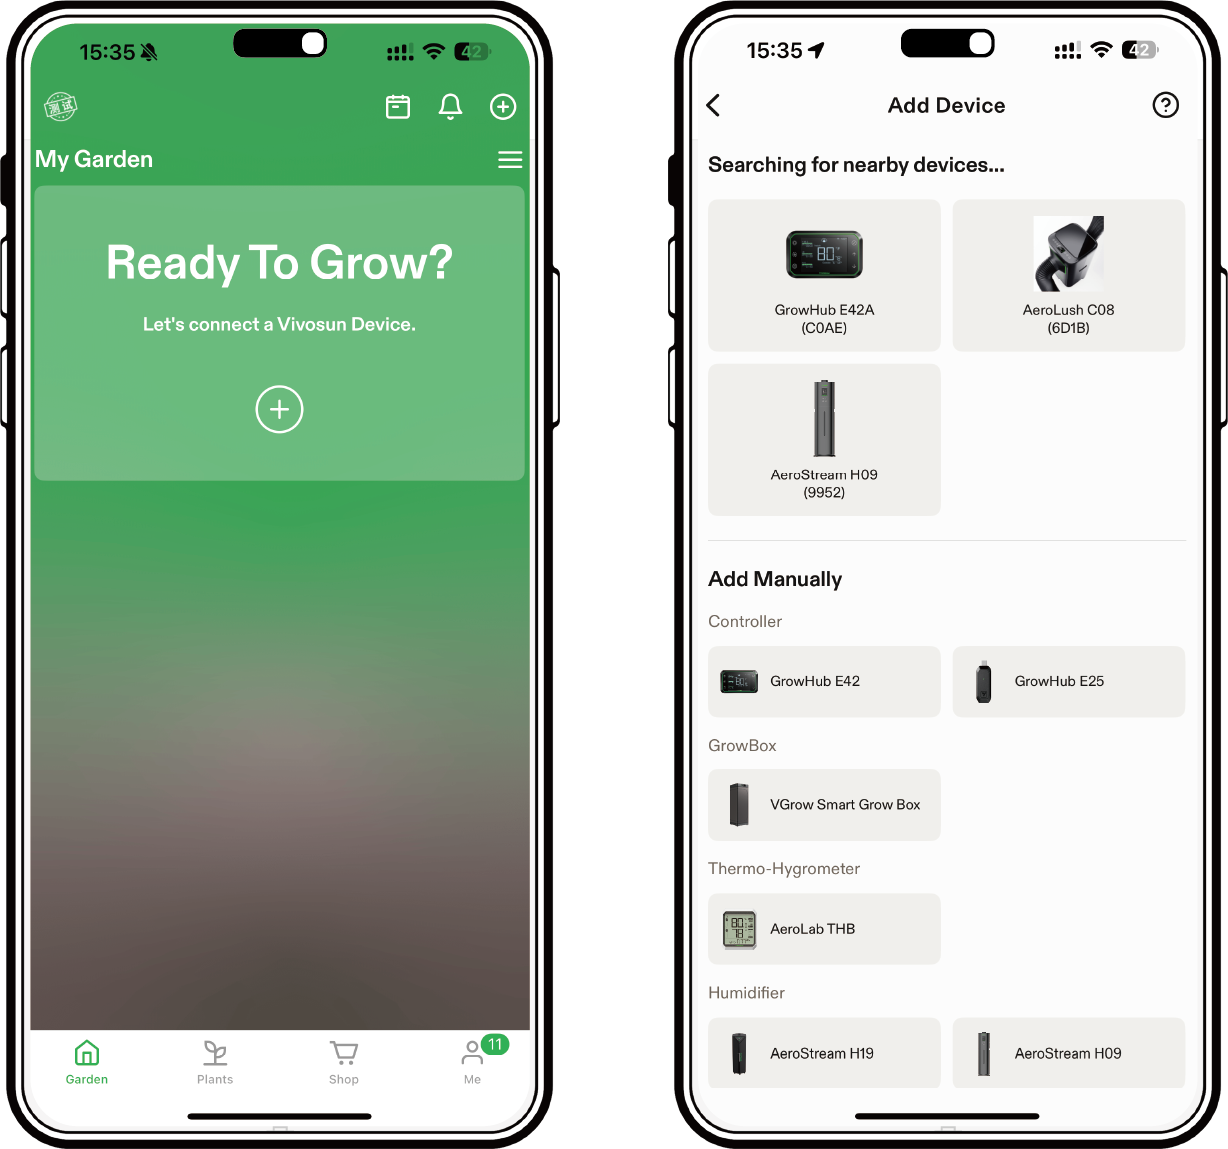
Schritt 3
Gerät benennen
Nach erfolgreicher Verbindung können Sie Ihr Gerät umbenennen.
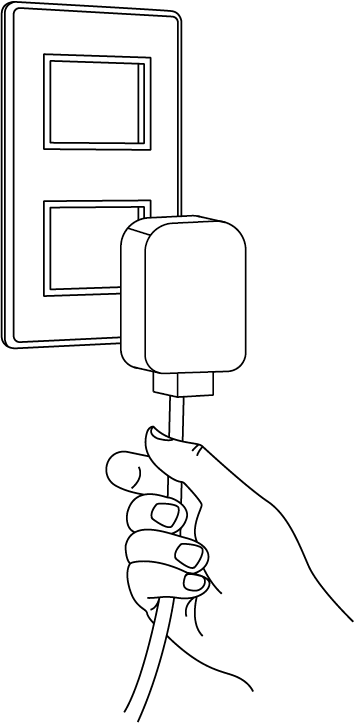
Wartung
Schalten Sie vor der Wartung das Gerät aus und ziehen Sie den Stecker heraus.
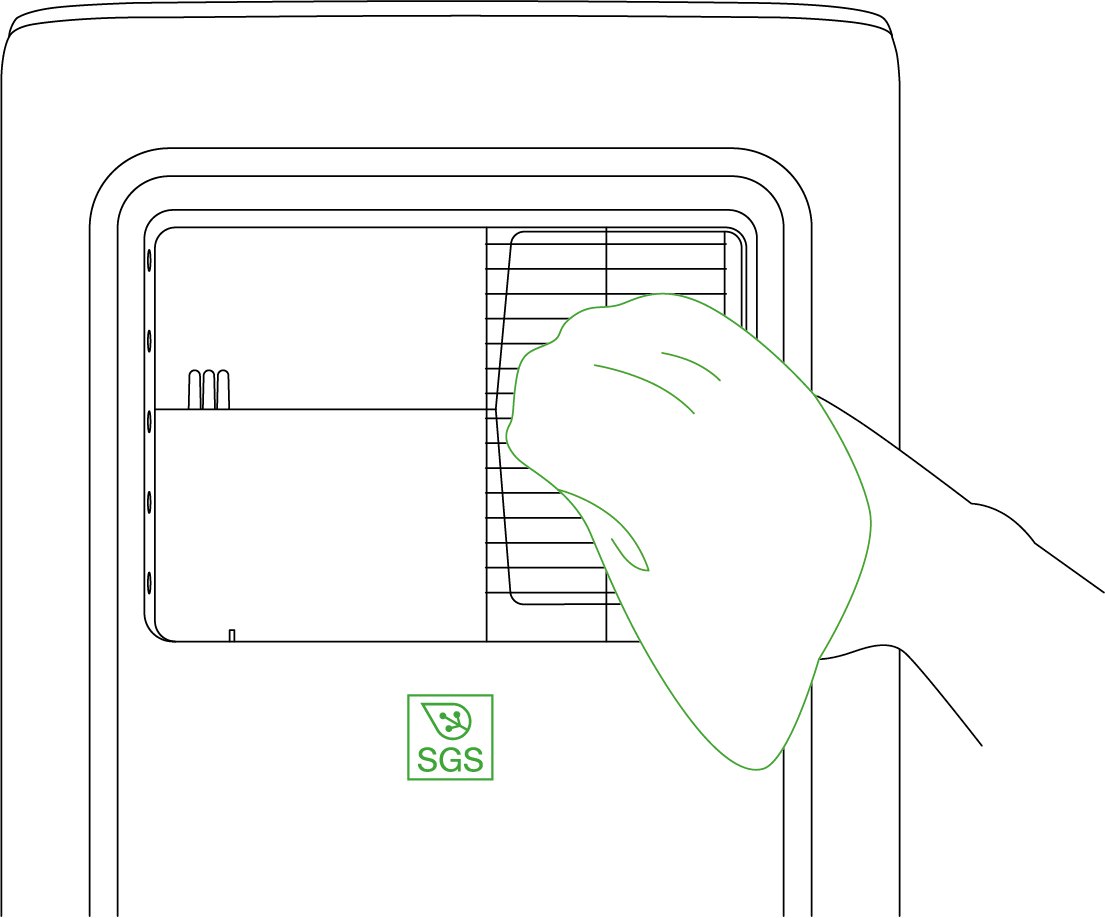
Oberflächenreinigung
Wischen Sie die Oberfläche mit einem weichen Tuch ab. Verwenden Sie keine aggressiven Chemikalien oder Reinigungsmittel zur Reinigung der Oberfläche, da diese Schäden verursachen können.
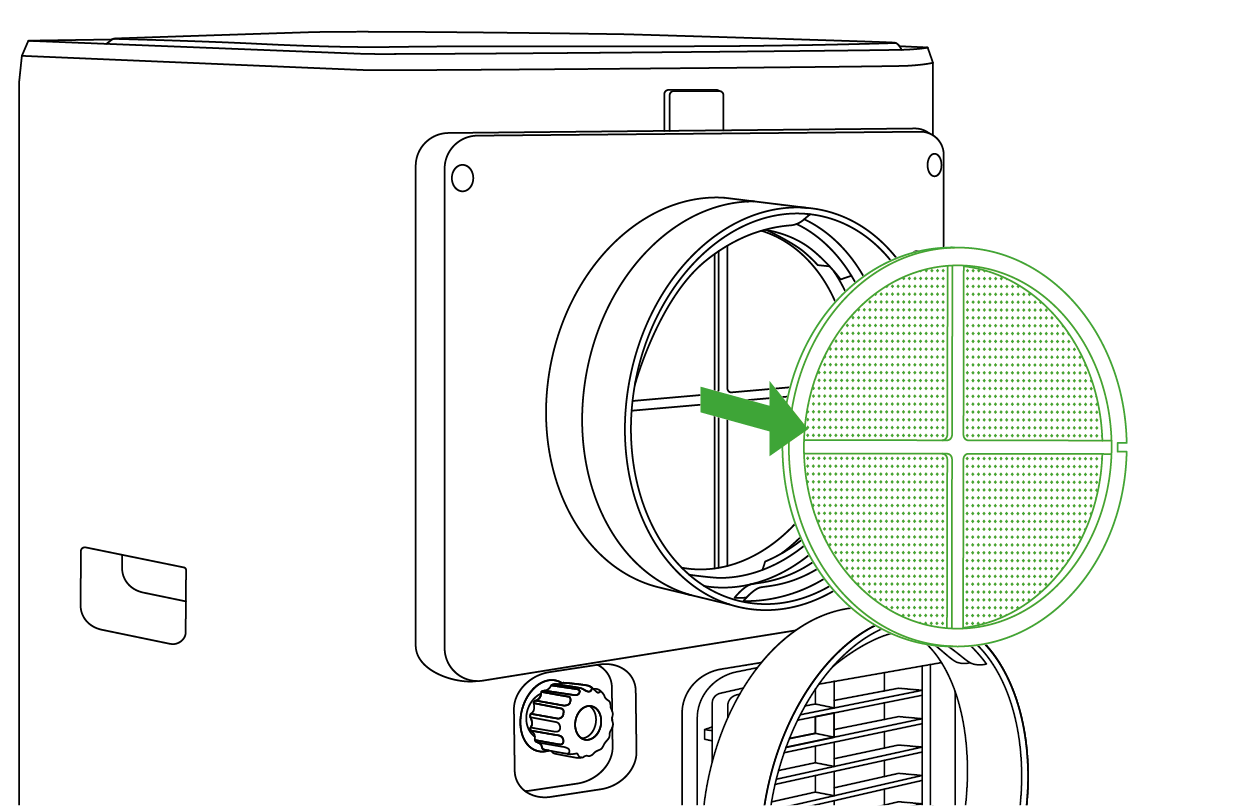
Filterreinigung
Nehmen Sie den Filter aus der Klimaanlage heraus. Tauchen Sie den Filter vorsichtig in ein mildes Reinigungsmittel, spülen Sie ihn gründlich aus und lassen Sie ihn trocknen. Verschmutzte Filter verringern den Luftstrom und sollten alle zwei Wochen gereinigt werden.
Fehlerbehebung
Probleme |
Ursachen |
Lösungen |
Die Klimaanlage arbeitet nicht. |
Es gibt keinen Strom. |
Einschalten, nachdem sie mit einer stromführenden Steckdose verbunden wurde. |
Die Umgebungstemperatur ist zu niedrig oder zu hoch. |
Es wird empfohlen, das Gerät bei einer Temperatur von 7-35°C (44-95°F) zu verwenden. |
|
Der Umgebungszielwert wurde erreicht. |
Stellen Sie die eingestellte Temperatur oder Luftfeuchtigkeit ein. |
|
Der Kompressor muss 3 Minuten nach dem Anhalten warten, bevor er neu gestartet werden kann (Systemschutz). |
Warten Sie 3 Minuten und prüfen Sie, ob es funktioniert. |
|
Der Wassertank ist im Trockenmodus voll. |
Lassen Sie das Kondenswasser ab und schließen Sie das Abflussrohr an. |
|
Die Temperatur- und Feuchtigkeitssonde wurde nicht erkannt. |
Stecken Sie die Temperatur- und Feuchtigkeitssonde erneut ein oder ersetzen Sie sie. |
|
Die Klimaanlage fiel um. |
Stellen Sie das Gerät flach und lassen Sie es mindestens 24 Stunden stehen, bevor Sie es verwenden. |
|
Produkt zeigt Fehlercode an: DF: Entfrosten im Gange E01: Kommunikationsfehler der Steuerplatine E02: NTC-Sensor Kurzschluss E04: NTC-Sensor Unterbrechung |
Warten Sie 5 Minuten, um zu sehen, ob das Problem behoben ist. Falls nicht, wenden Sie sich bitte an unseren Kundenservice. |
|
Die Kühlkapazität reicht nicht aus. |
Die Luftein- und Auslässe sind blockiert. |
Blockierung entfernen. |
Der Abluftkanal ist stark gebogen. |
Stellen Sie sicher, dass die Biegung des Kanals 45°-Biegungen nicht überschreitet. |
|
Der Filter ist zu schmutzig. |
Filter reinigen oder ersetzen. |
|
Die Lüftergeschwindigkeit ist zu niedrig. |
Wechseln Sie in den Standardmodus. |
|
Geräusche oder Vibrationen. |
Die Klimaanlage steht nicht auf einer ebenen Fläche. |
Stellen Sie die Klimaanlage auf eine harte, ebene Fläche. |
Garantie
VIVOSUN bietet ab dem ursprünglichen Kaufdatum eine zweijährige beschränkte Garantie auf dieses Produkt, das direkt bei uns oder unseren autorisierten Händlern gekauft wurde.
Diese Garantie gilt zusätzlich zu Ihren gesetzlichen Rechten nach den geltenden Verbraucherschutzgesetzen des Landes, in dem das Produkt gekauft wurde, und beeinträchtigt diese nicht.
Für die vollständige Garantiepolitik besuchen Sie bitte: https://www.vivosun.com/help/warranty-policy
Alternativ können Sie den Kundenservice unter support@vivosun.com / +1 888-505-8486 kontaktieren.
Contents

We help you grow your best green.

We provide the highest quality.

We relentlessly pursue the future.

We make growing more enjoyable.

We support every grower.
Registrieren Sie sich und erhalten Sie 10% Rabatt auf Ihre erste Bestellung.
©2026 Vivosun Alle Rechte vorbehalten